
Rub-in oils

![]()

![]()
The Lowdown: These are more or less pure oils, and they are extremely simple to apply: you just rub them in, wait a few minutes (or hours) to allow the oil to penetrate the wood, and then wipe off the excess. The two main players in this category are tung oil and linseed oil. Given enough time, both will naturally dry or cure on their own. (As opposed to other natural oils—think canola or olive oil—which just stay “wet” for an indefinite period of time and would eventually go rancid.)
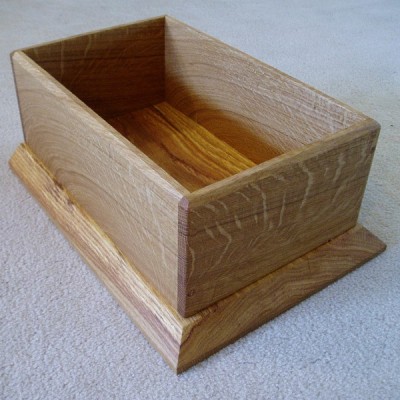
Quartersawn White Oak box finished with boiled linseed oil
Boiled linseed oil (BLO) tends to be the cheaper of these two oils, and since raw linseed oil can take a very long time to dry, heavy-metal driers (cobalt/manganese salts) are added to accelerate the curing process in lieu of actually “boiling” the oil. For something closer to a true boiled linseed oil without the added chemicals, try something like Tried & True Original Wood Finish, which is FDA approved for direct food contact in both its cured and uncured state.
Tung oil is very similar, except that raw tung oil still eventually dries and can be used as-is. (Look for words such as “raw,” “pure,” or “100%” in the name to find the straight oil.) There are also heated/altered versions of tung oil which, like linseed oil, helps the oil polymerize (fancy chemistry word for “dry”) faster. Many “tung oil” finishes sold on the market today are not truly pure tung oil, but may incorporate a portion of tung oil with other resins and could really be considered an oil-varnish blend, discussed further down.
Where it works: These oils give a rich warmth to the wood surface, and linseed oil in particular tends to accelerate and exaggerate the natural patina of the wood. They tend to impart a satiny sheen that isn’t too glossy, replicating a “natural” wood look. However, because it’s in the wood rather than on it, these oils don’t offer the best protection and wear/moisture resistance, and should be used on places that receive minimal wear, or on pieces where fresh coats of oil can easily be reapplied.
Best Bets: Walnut, mahogany, oak, cherry (if you’re looking for a darker, richer natural patina with low sheen).
Fails: Anywhere a glossy, high-sheen finish is desired, or any place where wear/durability will be an issue. Also, linseed oil isn’t the best for woods like padauk, purpleheart, or cocobolo (if you like the color of the wood as-is, this isn’t the finish to use; light-colored woods will yellow, and colorful woods age/darken much faster).
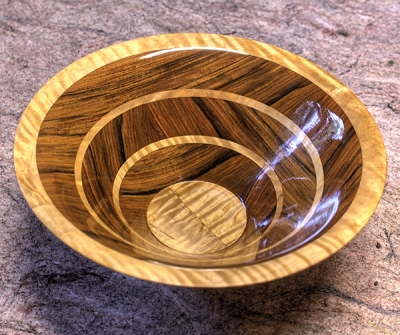
Oil-varnish blends

![]()

![]()

![]()
The Lowdown: Oil-varnish blends are an extremely popular wood finish. They combine the ease-of-application of rub-in oils, but are fortified with resins to give them a bit more durability. Various other additives may be found as well, such as dyes/pigments, driers, or UV inhibitors. Depending on the composition of the blend, it may be more able to build up a moderate sheen (semi-gloss) on the wood surface.
One of the biggest drawbacks to these sorts of finishes is that they are somewhat of a mystery in terms of their composition. In nearly all cases, they will use a linseed or tung oil base, but beyond that, there’s no telling what exactly is in each product. Many times, a host of products are cleverly named as a marketing ploy to increase sales (e.g., “teak oil” for Teak furniture, “antique oil” for antique furniture, etc.) At times, an oil product may be nothing more than a drastically thinned-down version of a pure rub-in oil with added driers to make it easier to recoat in less time.
Where it works: In most instances, oil-varnish blends work in much the same way and in much the same capacity as rub-in oils. They soak into the wood and provide a thin, natural-looking finish that’s easy to apply. They may have a bit more versatility in terms of sheen and color options. Durability of the finish is slightly better than pure oils (due to added resins), but is usually still inadequate for high-traffic, high-wear pieces.
Best Bets: [Same as rub-in oils] walnut, mahogany, oak, cherry (if you’re looking for a darker, richer natural patina with low to mid sheen).
Fails: [same as rub-in oils] Anywhere a glossy, high-sheen finished is desired, or any place where wear/durability will be an issue. Also, linseed oil-based finishes aren’t the best for woods like padauk, purpleheart, or cocobolo (if you like the color of the wood as-is, this isn’t the finish to use; light-colored woods will yellow, and colorful woods age/darken much faster).
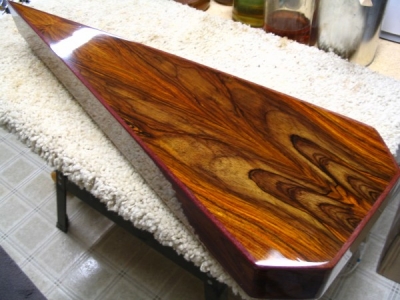
Varnishes

![]()

![]()

![]()
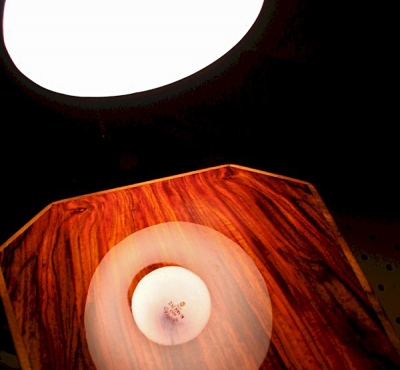
The Lowdown: Varnishes are known for their durability and toughness. A variety of sheens are available: from satin to glossy. They are generally oil-based, and contain synthetic resins such as phenolic, alkyd, and urethane.
The most desirable attribute of varnishes is that they are able to build up multiple coats (known as “film-building”), which enable them to excel at truly protecting the wood. When slopped on with a brush in several thick coats, they’re notorious for creating a plastic-like appearance on wood surfaces. Thinned-down formulations also exist, which can be wiped on, but still require slightly more care to apply than a strictly rub-in oil finish.
What sets varnishes apart from one another is their formulation and quantity of resins. Finishes that contain a higher percentage of oils and less resins are called long-oil varnishes, and tend to be more elastic and soft—perfect for outdoor applications and areas that receive a lot of moisture (Epifanes is a good example of a long-oil varnish). Toward the other end of the spectrum are medium and short-oil varnishes, which contain a higher concentration of resins and cure to a harder finish—good for table tops and floors (such as Behlen’s Rockhard Table Top Varnish).
Where it works: Anywhere toughness is paramount, varnishes should be your go-to option. Also, the glossy properties of varnish, when applied well, can give an eye-catching sophistication to a piece.
Best Bets: Exterior wood surfaces (boats, decks, outdoor furniture), as well as high wear areas (flooring, tabletops, and cabinets). Teak, white oak, cherry (use water-based varnishes such as Minwax’s Polycrylic to preserve lighter colored woods such as maple).
Fails: Oily tropical hardwoods (can have issues curing properly), as well as any project where a natural or rustic look is desired. Wormy chestnut, ambrosia maple, banksia pods.
Evaporative finishes

![]()

![]()

![]()
The Lowdown: The two primary types of evaporative finishes seen today are shellac and lacquer; they’re a bit different than varnishes or oils as they are composed of a solvent and a resin, and simply rely on the solvent to evaporate, leaving the resin behind. Shellac uses a denatured alcohol (DNA) solvent with a natural resin—secreted by lac bugs found in India and Thailand. Lacquer uses a special blend of solvents referred to simply as lacquer thinner, with alkyd and nitrocellulose resins. Because they rely on evaporation (rather than oxidation), they both tend to be very fast-drying. Like varnishes, they are film-building and sit on top (not in) the wood, and are available in a number of different sheens. They offer better protection than oil or oil-varnish blends, but fall short of the supreme toughness of varnishes.
One of shellac’s claims to fame is its compatibility with a variety of surfaces and topcoats. The old adage is: shellac sticks to everything, and everything sticks to shellac. Traditionally, shellac is mixed from shellac flakes dissolved in alcohol, but premixed commercial varieties are also available. The downside to this is that shellac has a somewhat short shelf-life (about one year from the time it’s mixed). Instructions on mixing your own shellac are given in my page on finishing exotic woods. Zinsser’s SealCoat is an excellent shellac product that is premixed and relatively shelf-stable.
Bonus note on shellac: Based on an experiment of wood finishes for African padauk put on by Woodworker’s Source, it was found that shellac outperformed all other major finish types in preserving the orange color of the padauk. My theory as to why this is the case is that padauk’s colors (as well as many other exotics) are very much soluble in alcohol, and the solvent present in the shellac may actually be pulling some of the wood’s natural colors out of the wood surface and locking them into the lac resin.
Lacquer tends to be a little tougher and more resilient than shellac. Many professional furniture makers have dedicated spray booths and spray lacquer onto their pieces with great efficiency. But even without expensive spray equipment, much of the benefits of lacquer can still be reaped in the form of brushing lacquer, as well as spray-cans of lacquer sold at hardware stores. Besides the somewhat noxious solvents contained in lacquer, the only other downside is that the nitrocellulose resin (contained in ordinary lacquer) tends to yellow with age, which may be an issue on lighter-colored woods. A special type of lacquer—cellulose acetate butyrate (or CAB)—made with different, non-yellowing resins is also available.
Where it works: Great for interior projects that will see a moderate amount of use (again, varnishes should be used for the most demanding applications). Choose an evaporative finish if you have a very colorful or ornately figured project that you want to highlight in all its glossy glory. Some of the most dazzling and renowned wood finishes in the world have historically been from padding very thin coats of shellac onto the surface of the wood (a technique called french polishing) until an immaculately clear shine emerges.
Best Bets: Rosewoods, colorful exotics (padauk, purpleheart, bloodwood, cocobolo), and burls.
Fails: Evaporative finishes tend to have poor heat and chemical resistance (its own solvent is capable of re-dissolving the cured finish), and should be restricted to interior projects. Shellac really only comes as a glossy finish, and must be rubbed out by hand to a lower sheen (using #0000 steel wool
) if a satiny finish is desired.
Fill, Level, and Buff for the Win!

![]()

![]()

![]()
The Lowdown: With all film building finishes (polyurethane, tabletop varnish, shellac, and lacquer), there’s just a few critical elements missing from achieving a flawless, glass-like surface. The first is the pores of the wood. Some woods have small enough pores that it doesn’t matter (maple, cherry, beech, boxwood, holly, and poplar), which are sometimes referred to as close-grained woods. But many other woods have larger pores that the finish will sink into, creating unevenness in the finish film, and ruining the smooth-as-glass effect. These open-pored or open-grained woods include a bunch of common favorites, as well as many exotics, such as: oak, walnut, mahogany, ash, sapele, purpleheart, zebrawood, bubinga, teak, cocobolo, and so forth.
The foundation to every mirror-like gloss finish is an underlying smooth wood surface. It is absolutely critical with open-grained woods that the pores be filled in order to obtain a smooth wood surface before any finish is even applied to the wood. For natural colored woods (in varying shades of brown), an oil-based pore filler can be used. (I greatly prefer oil-based fillers over water-based products because they have less of a tendency to shrink back into the pores over time, material won’t come out of the pores during sanding, and they generally fill the pores in a single application.) These fillers can also be stained to roughly match the color of the wood being filled. With multi-colored woods (such as zebrawood) or colorful woods (like padauk), a transparent grain filler should be used. I prefer spreading a thin layer of thick CA glue over the wood surface with an old credit card or playing card (using a fan for ventilation), spraying accelerator, and then sanding the surface flat with 200 – 300 grit sandpaper.
Besides the pores, the second obstacle standing in the way of achieving a glassy wood surface is minor imperfections. No matter how perfectly a finish is brushed, sprayed, or wiped on, there will always be imperfections in the final topcoat. These make a bigger difference than you may realize. Dust, drips, unevenness, brush hair, lint, haze, and a host of other imperfections mar the work of even the most assiduous of laborers. The finish will need to be leveled with fine-grit sandpaper, and then buffed up to the desired sheen. Leveling should be done carefully with 200 – 600 grit sandpaper. Because of the risk of sanding through to raw wood, most finishers that intend to level a finish will intentionally build up a thicker film to have a greater margin of error. For spray lacquer, the norm seems to be about 10 coats—brushed finishes should generally require slightly less than that.
Once the finish has been adequately leveled (the wood surface should be uniformly dull—any glossy/low spots remaining indicate incomplete leveling), you can be assured that every possible imperfection and irregularity has been removed from the finish film. The finish is flat and flawless—with no luster whatsoever. All that’s left is to restore the gloss using very fine sandpaper and buffing compounds. After using normal sandpaper up to about 800 grit, I’ve found that 1000 grit Abralon discs![]() are absolutely fantastic at preparing the finish for the buffing wheel. After the Abralon, I use a cotton buffing wheel with some Menzerna buffing compound applied to the wheels to bring the finish up to a candy-like shine.
are absolutely fantastic at preparing the finish for the buffing wheel. After the Abralon, I use a cotton buffing wheel with some Menzerna buffing compound applied to the wheels to bring the finish up to a candy-like shine.
Where it works: Fine woodworking. Anywhere that you’d like to show off the details of your wood projects with a new-car-paint level of shine.
Best Bets: Just about anything with an interesting grain or color. walnut, oak, mahogany, cocobolo, rosewoods, snakewood, and so forth.
Fails: Outdoor projects (mother nature will laugh at all your efforts and subsequently trash your hard work in short order). Carved or irregular objects can be very tricky if not impossible to level or buff out. Very light or unfigured woods (plain maple, birch, or pine) aren’t flattered much by this technique.
Specialty Finishes

![]()

![]()
![]()

![]()
The Lowdown: In certain circumstances, you may want/need to use a specialty wood finish that doesn’t quite fit the characteristics of any of the above categories.
One product that is very similar to the pure oils such as tung or linseed is mineral oil. Mineral oil doesn’t cure (polymerize), nor does it go rancid. It just sort of “is.” And for a butcher block or other food utensil, that’s okay. The idea is that this harmless, innocuous substance penetrates the wood and remains there, helping to drive out moisture and preventing bacteria from getting lodged within the wood and breeding. Mineral oil just stays somewhat “wet” and needs to be recharged and replenished from time to time.
Although an adhesive, CA glue can also be used as an actual finish for small turned items. Thick CA glue is applied to the piece via a paper towel with the lathe on a slow speed. The glue is then allowed to dry (or sprayed with an activator) and then sanded with very fine grit sandpaper. This process is repeated until a sufficiently thick finish has been formed, and then it is leveled and buffed in much the same way as any other film finish. The resulting finish is very hard, strong, and long-lasting.
Finally, there is paste wax. In most cases, wax should be seen as a temporary finish. It’s generally used in new projects to add an extra layer of protection to the wood after the final finish has been applied and buffed. In older projects and restorations, it’s used to bring back some of the shine of a piece’s younger days, and to help mask and scratches or imperfections in the wood. But with all of waxes’ cosmetic improvements to a wood surface, it should be remembered that wax will eventually rub off with wear. (Also keep in mind that despite any marketing pitches, wood does not “need” wax. Wood is not “thirsty.” Wood reaches an equilibrium moisture content with the surrounding air based on the relative humidity of the environment.)
See also:
Are you an aspiring wood nerd?
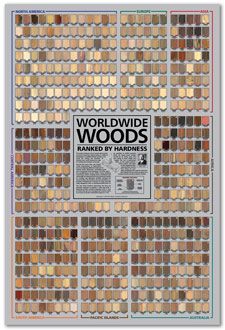 The poster, Worldwide Woods, Ranked by Hardness, should be required reading for anyone enrolled in the school of wood nerdery. I have amassed over 500 wood species on a single poster, arranged into eight major geographic regions, with each wood sorted and ranked according to its Janka hardness. Each wood has been meticulously documented and photographed, listed with its Janka hardness value (in lbf) and geographic and global hardness rankings. Consider this: the venerable red oak (Quercus rubra) sits at only #33 in North America and #278 worldwide for hardness! Aspiring wood nerds be advised: your syllabus may be calling for Worldwide Woods as part of your next assignment!
Has anyone tried Paraffin Oil on wood ? I am tempted, but need advice before plunging.
I am deeply unsatisfied with linseed (raw or boiled).
>Thank you so much for the abundance of advice<
Mineral oil is called paraffin oil in Australia. Food grade paraffin oil (ie the laxative stool softener) can be used on chopping boards but does not cure or dry.
Using tung oil on exterior cedar trim. How often do I need to reapply in mid-Atlantic region?
What do you think about hardwax oil (Osmo, Rubio, etc…) ?
I have an acacia wood bench which is very dull, I would like to put a satin shine to it, but confused with which oil to use, help
What finish can I use to keep the fluorescence of my locust?
So here is my situation. I read a ton of great info and yet I am still wondering which product or which procedure I need to use. Make it simple for me..lol. Here I have a bathroom where I am installing T&G Teak wood on the ceiling. I want it to be glossy and shine. I was going to get the pre-sanded T&G planks and then wipe them down and then 1 coat of Teak Oil and let dry and then a thin layer of shellac with a sponge brush. Its gonna be on the ceiling so it does not… Read more »
I have the Big Sur table by Crate and Barrel -white oak, rustic looking. They recommend Briwax, but I have only used Liberon beeswax + turpentine. It has lots of marks from dining room use. I want to refinish and am wondering about using Tung oil first and then the the Briwax paste wax over it. I understand it will have marks, but I want to prevent those white water rings.
Somewhere, I acquired the belief that oils like linseed oil should be thinned down, maybe a five-to -one ration (five parts thinner or mineral spirits to one part oil. Then applied in multiple coats.) Is that so, or am I better off applying the oil right out of the can?
In early coats I thin my pure oils. For my first coat I thin my tung oil to 25% with 75% thinner. My second coat I use 50% tung 50% thinner. The third coat 75% tung with 25% thinner. Each coat after I use 100% tung. I do this because thinned oil with permeate the surface of the wood ever so slightly better (I understand this is a disputable opinion) and it also allows the oil to dry more quickly. This is helpful since pure tung oil dry times can be upwards of a week (depending on temperature and humidity)… Read more »
Very helpful, thorough, and educational. Thank You!
can you to stain the following:
newly installed bannister (which seems to be oak?) to exact colour of existing bannsister rail next to it which seems to be brown mahogany?
Doesn’t look like oak to me. If the bannister is still unfinished, you should be able to stain it.
If unfinished you can use whatever finish you want. Considering it is a high wear surface.