

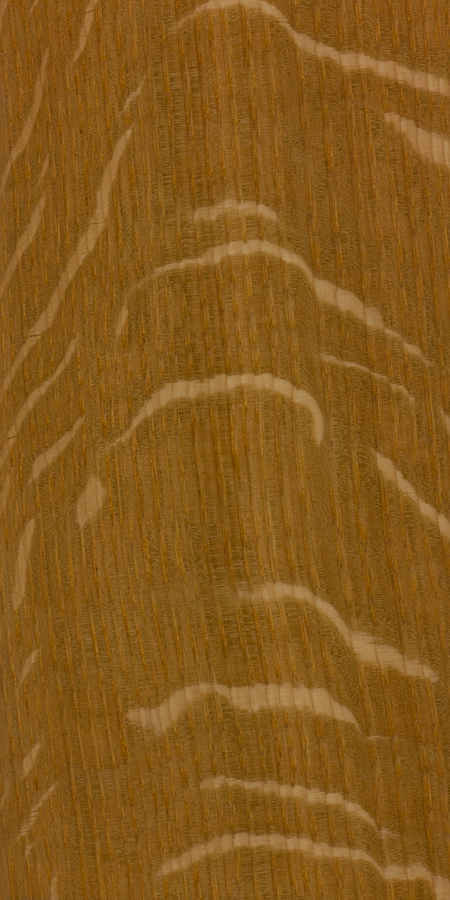
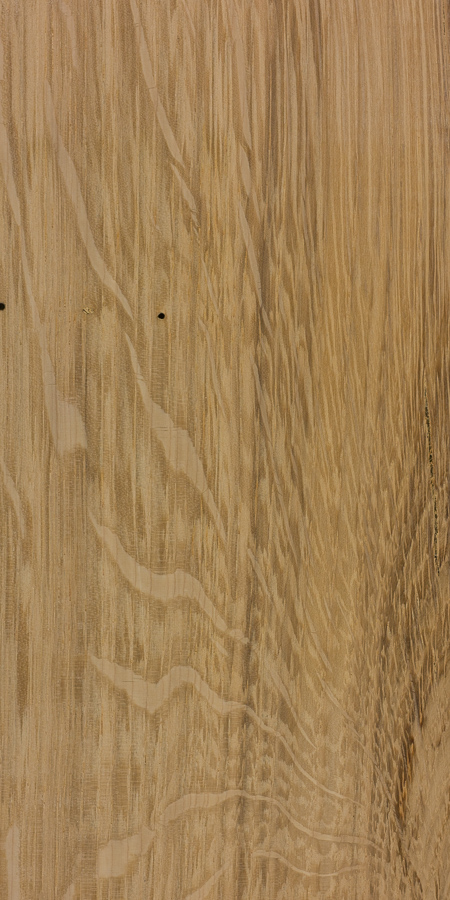
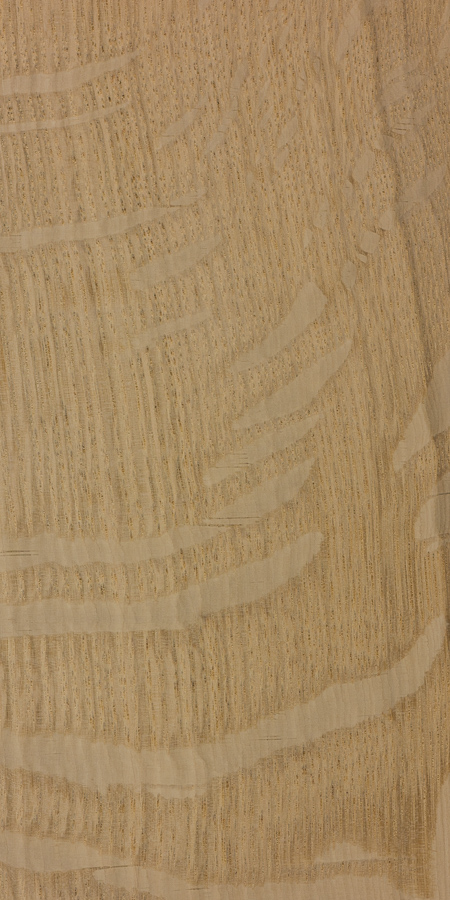
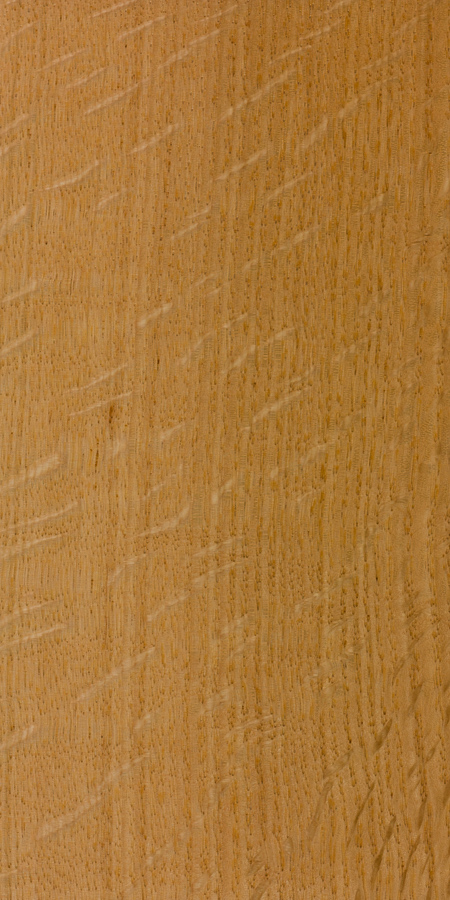
But in addition to the leaves and outward appearance of the trees, the wood of the various oaks also have a few important distinctions. Most notably, white oak is rot resistant, while red oak is not—an important detail for boatbuilding and exterior construction projects. White oak also has a unique ray fleck pattern when perfectly quartersawn that’s seen more often in antiques—a figure that’s sometimes called “tiger oak” in antique furniture circles.
It should be noted that red oak also has conspicuous ray fleck patterns on its quartersawn surfaces, but it’s generally just not quite of the same caliber and size as white oak. (See this quartersawn picture of red oak for reference.)
Red oak group
")
")
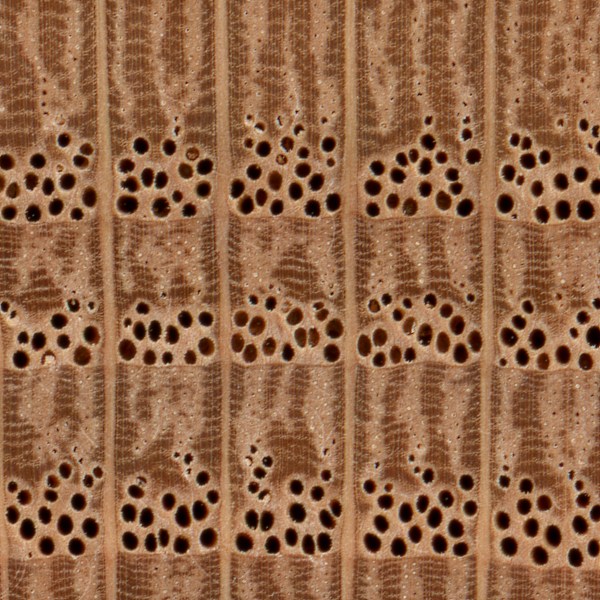
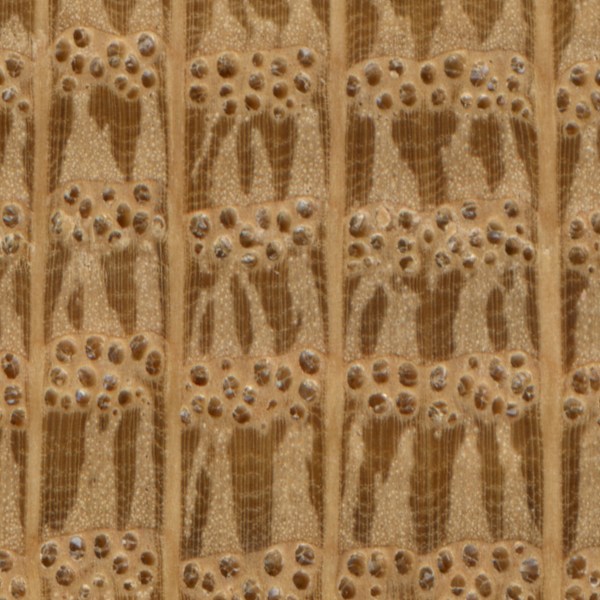
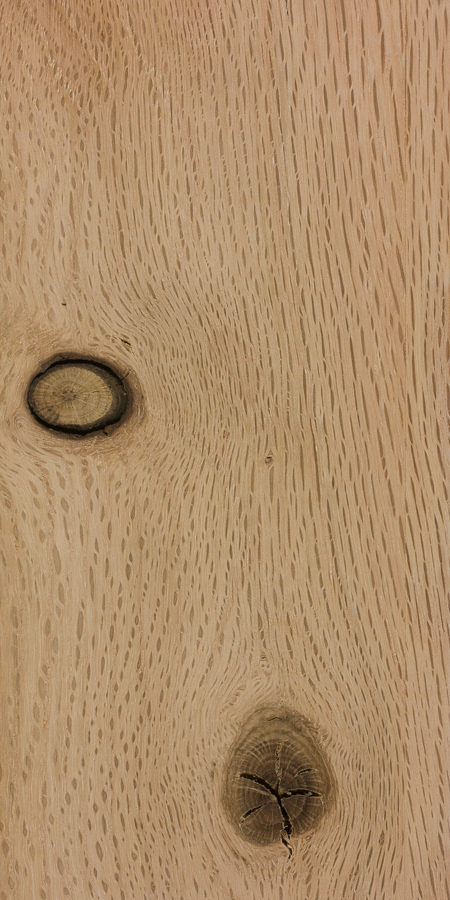
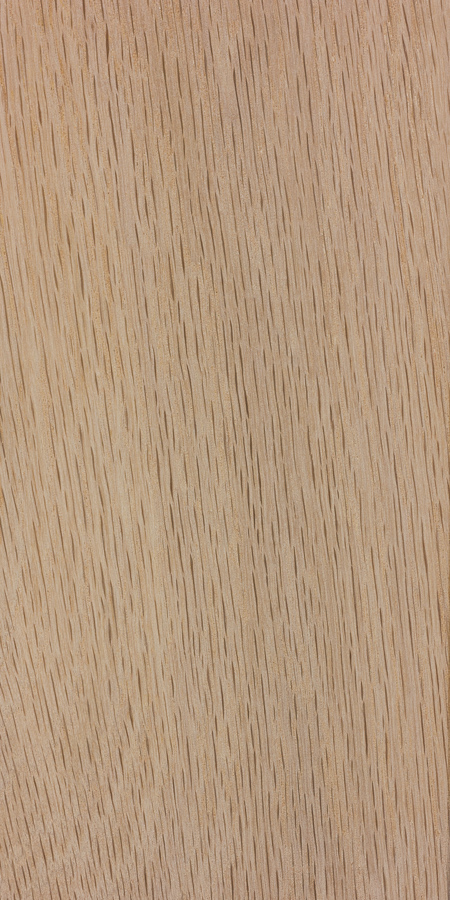
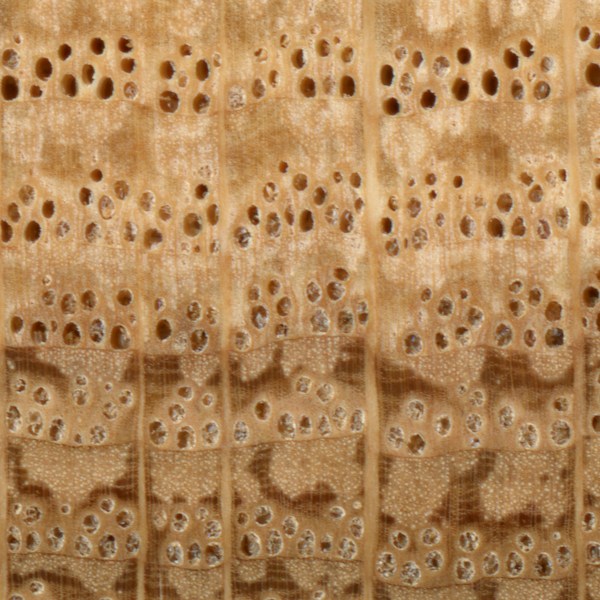
The pores found in the growth rings on red oak are very open and porous, and should be easily identifiable. White oak, however, has its pores plugged with tyloses, which help make white oak suitable for water-tight vessels, and give it increased resistance to rot and decay. The presence of tyloses is perhaps the best and most reliable way to distinguish the two oaks, but it comes with a few caveats:
1.) Make sure that you’ve cleaned up the endgrain enough to see the pores clearly, and blown out any dust from the pores. You don’t want a “false-positive” and mistake sawdust clogged in the pores for tyloses.
2.) Make sure that you’ve viewing a heartwood section of the board in question. While white oak has abundant tyloses in the heartwood, it is frequently lacking in the sapwood section.
One related test regarding porosity is to take a short section of oak and try to blow air through the pores. If you are able to blow anything through it at all, it’s probably red oak. Take a look at this video, where a red oak dowel was used to blow bubbles in water:
One exception to this rule is chestnut oak, which is still considered to be in the white oak group, even though its pores are open like red oaks.
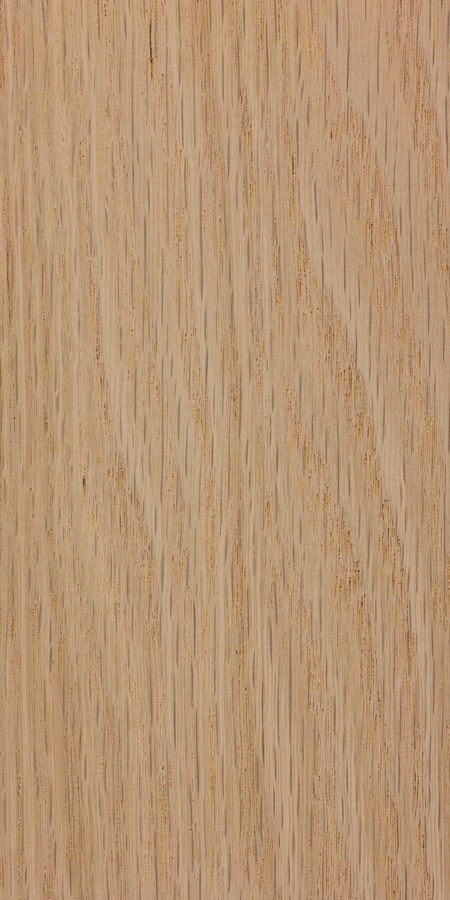
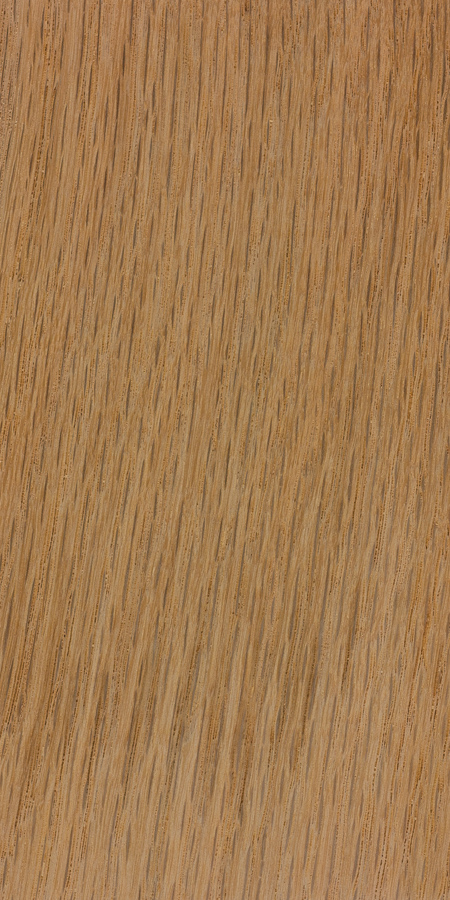
2. Look at the rays
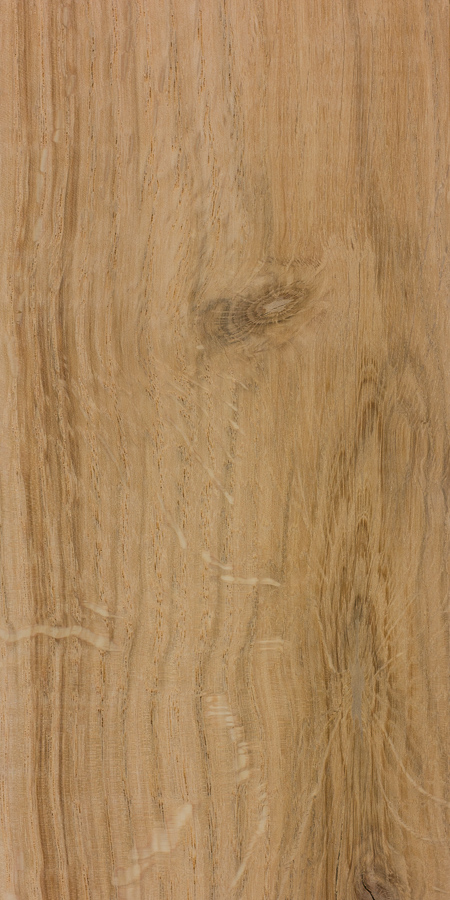
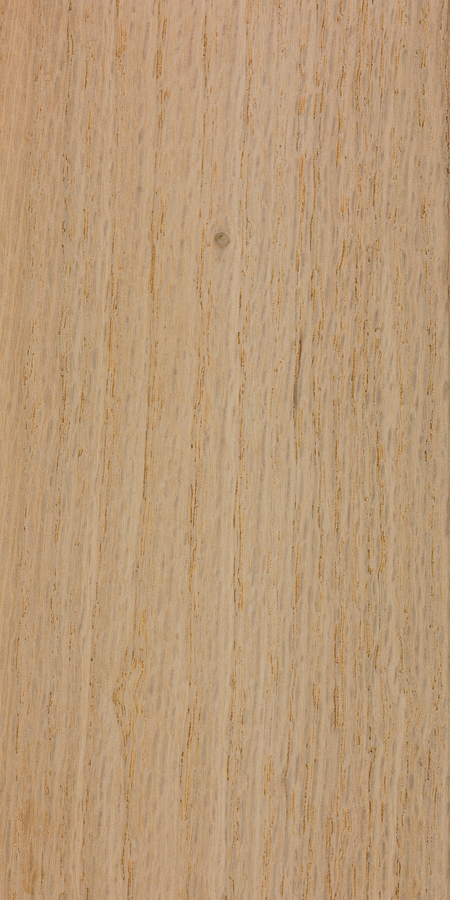
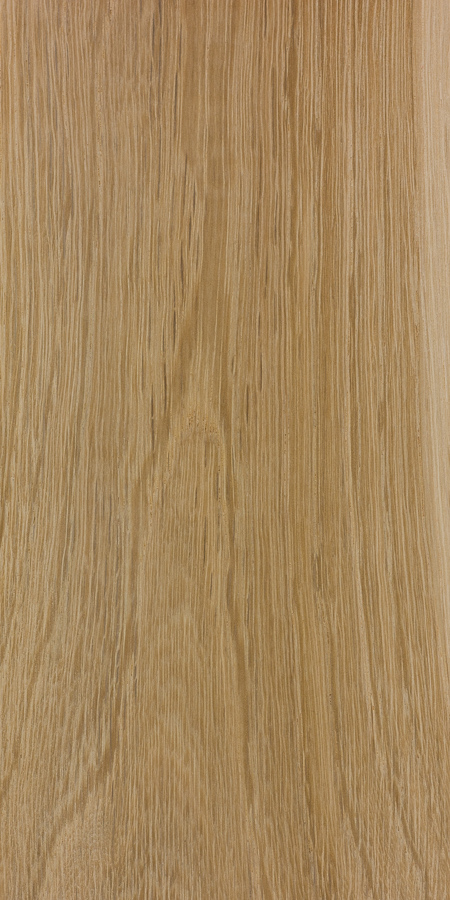
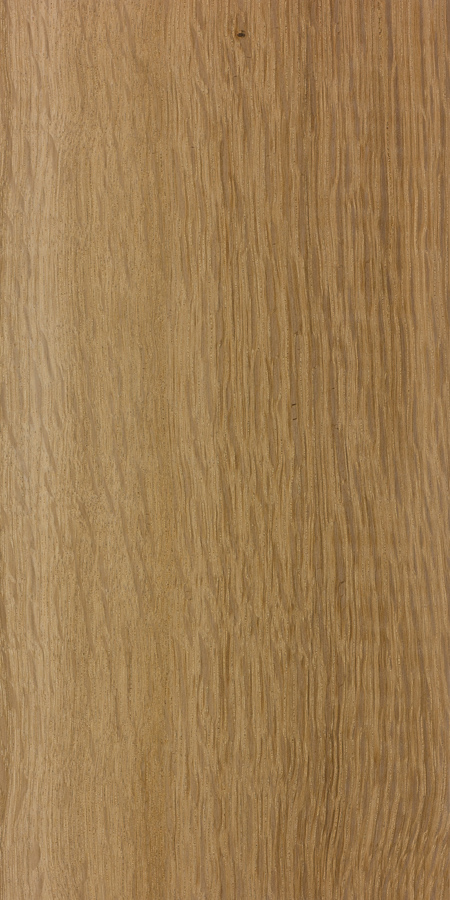
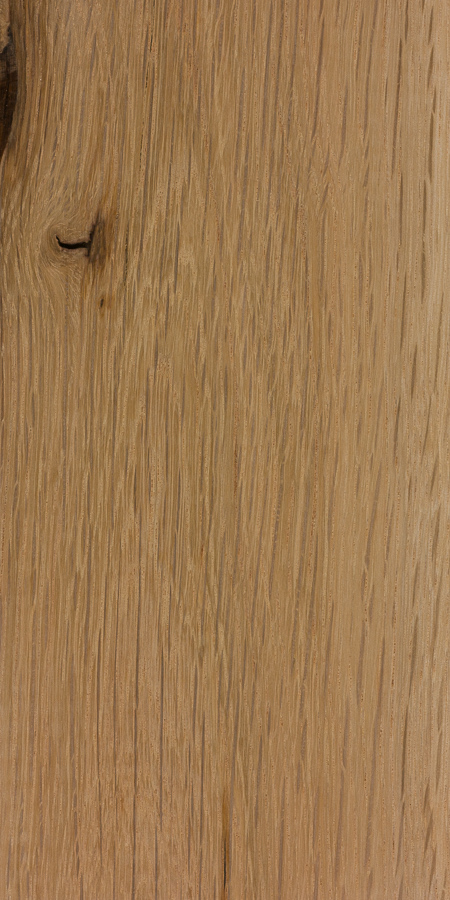
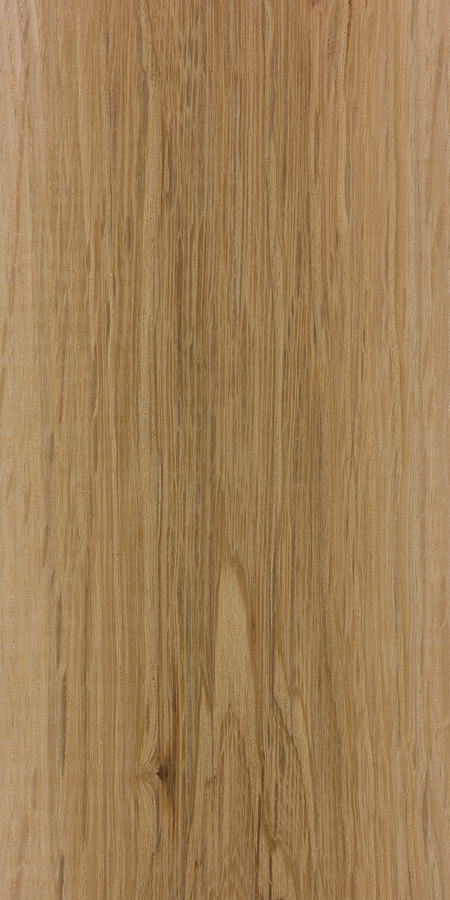
When looking at the face of the board, especially in the flat-sawn areas, you may notice little dark brown streaks running with the grain, sometimes referred to as rays.
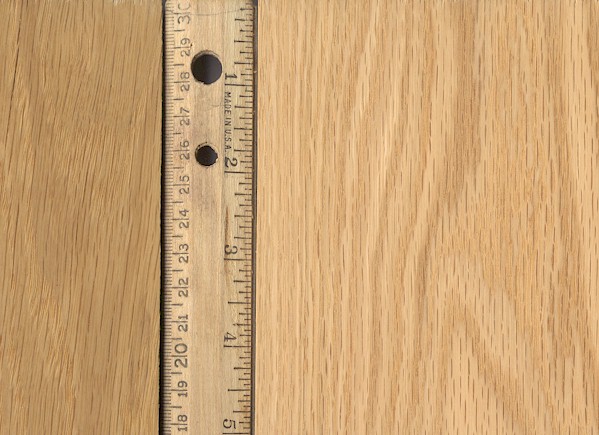
Look closely at the picture above, (click on it to enlarge it if you have to), and note the length of the rays in both types of wood. Red oak will almost always have very short rays, usually between 1/8″ to 1/2″ long, rarely ever more than 3/4″ to 1″ in length. (Pictured above on the right.)
White oak, on the other hand, will have much longer rays, frequently exceeding 3/4″ on most boards. (Pictured above on the left.)
This method is probably the most reliable under normal circumstances, and is useful in situations where the wood is in a finished product where the endgrain is not exposed.
3. Use sodium nitrite
This technique is sometimes used at sawmills if various logs need to be sorted out quickly. Instead of taking the time to analyze each log closely by hand, a 10% solution of sodium nitrite (NaNO2) is sprayed or brushed onto the wood and observed. If it’s red oak, there will only be a small color change, making the wood only slightly darker. But if it’s white oak, there will be a noticeable color change in as little as five minutes, (though it can take longer if the wood is dry, or if the temperature is low). The heartwood of white oak will eventually change to a dark indigo to almost black.
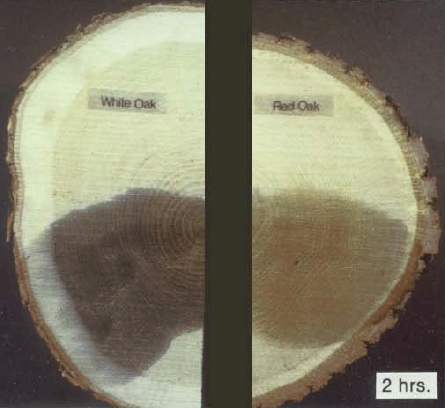
This method is extremely accurate and reliable, though in most instances, it’s probably overkill. However, if you’re ever in a situation where you can’t separate between red and white oak based on anatomy, this method is nearly foolproof. (Though, only the heartwood will bring about the color change, not the sapwood.)
First, you have to obtain some sodium nitrite (NaNO2). You may be able to find some locally through chemical supply stores, but they typically only sell in bulk quantities, making such a small project prohibitively expensive. However, some online retailers have the chemical for sale in much smaller quantities, bringing it into reach of most that are curious about oak identification.
Next, you need to mix up a roughly 10% solution of sodium nitrite by weight. This ratio actually isn’t as critical as it seems: solutions as small as 1% and as high as 20% have all been used with success, but to err on the side of caution, we’ll use the most appropriate quantity recommended.
Recipe for 10% Sodium Nitrite Solution for Testing Oaks:
- 1 cup water
- 4 teaspoons sodium nitrite
Directions: Stir in sodium nitrite until clear. Clearly label solution to avoid confusion; sodium nitrite is very dangerous if ingested.
All that’s left is to simply brush this solution onto a raw wood surface and wait for a reaction. With dried wood stored at room temperature, this reaction should take about 10 minutes. Red oak will be only slightly discolored by the solution, sometimes developing a slightly greenish hue, while white oak will gradually turn a dark reddish brown, eventually turning a deep indigo to nearly black.
See the progression photos below for a better look. (Also note that around the 8 and 15 minute marks the water begins to evaporate from the surface of the wood, but the color is still present after the wood has dried, as indicative of the 25 minute photos.)
TIME | RED OAK | WHITE OAK |
| raw | ") | ") |
| 1 minute | ") | ") |
| 5 minutes | ") | ") |
| 8 minutes | ") | ") |
| 15 minutes | ") | ") |
| 25 minutes | ") | ") |
Why you’d want to tell red oak from white oak
As to the reasons why you’d want to be able to distinguish between the two, most of the answers have been explained above, but I’ll recap:
- White oak is much more resistant to rot, and is suitable for water-holding applications, boatbuilding, outdoor furniture, etc.
- Red oak should only be used for interior pieces such as cabinets, indoor furniture, flooring, etc.
- White oak tends to be more dense, while red oak is a bit lighter and has a more porous and open grain.
- White oak is usually slightly more expensive than red oak.
- White oak has larger and more pronounced ray flecks when perfectly quartersawn and historically has been used more often in antiques than red oak.
Get the hard copy
 If you’re interested in getting all that makes The Wood Database unique distilled into a single, real-world resource, there’s the book that’s based on the website—the Amazon.com best-seller, WOOD! Identifying and Using Hundreds of Woods Worldwide. It contains many of the most popular articles found on this website, as well as hundreds of wood profiles—laid out with the same clarity and convenience of the website—packaged in a shop-friendly hardcover book.
This is the table without the leaves
I have a table my 2nd great-grandfather built at the turn of the century. It is solid quartersawn oak (with yellowed polyurethane at the moment). There are 6 leaves with the original finish. They are veneered boards that are peeling. We want to build new leaves or re-veneer the old ones and then refinish the whole table and leaves to match. I need to know what type of oak the table is so I can get the correct wood for the leaves. Can you help?
“Red oak shouldn’t be used outside” fully agree on that, so imagine my surprise when I restored an antique stitching pony (for leatherworking). It was completely black when I got it and after sanding it, it looked a lot like all my other oak, which is white oak. At the time I hadn’t learned the difference between them and since white oak is most frequently used, I just assumed it was white oak and drilled out some old screws, before plugging them with white oak plugs. Only to be surprised when I oiled it, by all of its lovely reds,… Read more »
Hi Eric. I have been told my hardwoods are white oak, but I posted a question on Houzz, and someone said they think they’re red oak. Can you take a look and give your thoughts?
Considering the information above, the rays appear to be longer than 1/2″ in places. I’m a novice so take that into consideration.
Hi. I am wanting to get oak worktops for the kitchen. I asked the worktop company what type of oak they have. they didnt know but sent me a sample. Reading through this great site, as I have done many times, I’m still not sure if this sample is red or white. The colour is more like white.. a slight olive tinge. The pores are mostly open. The rays are kind of long .. I think.. I want it to be white because its going to get wet around the sink. If its red, I might as well pay half… Read more »
The supplier has now said that it is European oak
Hi Eric, just found this post and it’s so helpful. I’m refinishing 100-year old floors in a 1926 Western NY foursquare. I have done so much research and remained confused as to whether they are red vs. white oak. I saw in these comments a few instances where old floors were actually a mix of the two, and a few of my neighbors have a mix as well. Do mine look like a mix to you? And can you comment on 1) why this was done in the past (perhaps the stains used back then didn’t show much of a… Read more »
Unless the wood was specifically sorted for color and grain, it could just be down to the natural color variation of oak. It’s really hard to say for sure. One possibility is that some of the planks were replaced or repaired too, and that might account for some of the color differences. The first three pics have quartersawn grain (or close to it), which has the effect of helping to make the boards look a little more homogenous, while the four picture is of flatsawn pieces. Flatsawn boards show a lot more vivid patterns in the grain, but are a… Read more »
Thank you, Eric. You just solved another mystery I had…, I don’t have any boards on the upstairs floors that show any signs of cupping. But on the first floor, I have quite a few.
So then do you think it is all one type of oak? Could it all be white?
Thanks again.
It could be all just white oak. I would need to see a clear view of the endgrain on multiple pieces and check for tyloses to say that more definitively.
Is the discoloration from the sodium nitrite solution permanent?
Trying to identify this wood species. House built in 1902 (GA). This wood is 1″ thick and slats are on walls and ceilings of a bathrm we demolished for renovation.
Looks like softwood, possibly pine.
Thank you.
Specifically southern yellow pine, most likely. By far the most common construction lumber in the southeast US.
Hi Eric,
Thank you for such an informative website and your willingness to help. I just fixed a patch of white oak hardword (I think it’s white oak) but I’m having a difficult time matching the colour. I could use your expertise. Do you think my finished floor was stained or is it just a clear coat of Polyurethane? How do I match it?
Thank you very much,
John
Oak can be quite hard to color match. Even if you can match red/white oak, the new/old dynamic will still create problems in different patinas. I’ve usually had best success if its just patching something to find some reclaimed floorboards locally at a salvage yard. Usually you can scrounge enough of the right size and color from the reclaimed stuff.
Hi Eric,
Thanks for your reply and your suggestion!
Dear Eric,
I found this incredibly informative website after trying to determine whether my two Bokuto wooden training swords are white Japanese oak or red Japanese oak – the two to most common woods used for such training weapons here in Japan.
I believe the one on the right to definitely be white oak but the one on the left has become darker after 35 years of use so I’m not sure anymore. So, any help would be most gratefully received!
Best regards,
Simon
Can someone tell me if these two cabinets are red oak or white oak (or something else)?
I could be wrong but looks like red oak!
Hi Eric, hoping you can help identify our 80 year old existing oak floors. They only had a varnish or sealer applied originally so had this orange tone to them. Sanded they have pink and yellow undertones to them. Contractor added new white oak (select plain) in kitchen to replace old linoleum floors. He said existing was white. After sanding he now says the existing is red and white, but my husband and I are still not sure if that’s right. The existing also appears to be quarter and rift sawn. Photos of living room included and section where old… Read more »
Hard to say for sure, it does look like there could be a mixture of both red and white oak in some places. But the predominant color of most boards looks closer to red than white.
Helo Eric Meier!
Plz help me, how can I distinguish acacia hybrid and eucalyptus or rubber via ENDGRAIN?
And do we have any way to distinguish by chemistry?
Acacia is a genus with about 1000 different species, so hard to generalize. Eucalyptus species is also very large but generally they have exclusively solitary pores. Rubberwood will have banded parenchyma that the other two (usually) will be lacking in most species.
After receiving samples (that I loved and tested stains on successfully), we purchased a house full of engineered white oak. I knew what we were doing with stain,etc..What we received leaned so red, that I was certain it had to be a mistake on the company’s end. (For instance, light waxes pulled pink so hard it looked like pepto.) The sample of the three wet boards in the picture, the middle one is definitely red oak we had for a different project. The others are supposedly white. We purchased a test kit, and the result is this lot is white… Read more »
There can be a LOT of color variation in oak. I’m glad you posted this so others can see firsthand what I’ve tried to explain in the beginning of this article. In a nutshell, I think there should be far less focus on the exact species of the oak, and much more emphasis put on the quality and consistency of the wood being considered. I realize it’s probably too late now, but you may want to mention what would be an acceptable amount of color variation between boards. You could also consider bleaching the wood before staining to try to… Read more »
Thank you. I have had success with bleaching Knotty Alder and with bleaching antique fir (and possibly birch) antique doors that had been once finished with orange shellac. See pictures. And yes, bleaching is finicky and can pool tannins. But with both projects, I could use vinegar to neutralize and lots of water to ease off the suds. However, this floor is engineered, so that option scares me since the bleach can raise the grain more drastically and also damage it. I wouldn’t have much room to fix problems. Sigh. I do want variation. I did not choose select for… Read more »
Eric. Very helpful post. I am working on a restoration project and wondering if this wood can be identified from a photo or two? Much appreciate your expertise (as well as the opinions of others).
Looks like cedar (as I lay here next to the wall of my cedar log home)
Thank you for your information on red and white oak. I am still not sure if the oak sample I have is red or white. One side is unfinished and the other has varnish and looks orange. I’d appreciate it if you could let me know. Thank you
A lot of color variation in that door. Superficially, the rails and stiles look like white, while the center panel looks like red oak. But you just need to get a closer look at the endgrain clear enough to check for tyloses, similar to the third picture but closer with more clarity. Per the article, tyloses = white, no tyloses = red.
This is a really helpful website. Would you be able to tell me if these two samples are red or white oak? Thank you!
Hi! I just discovered this webpage and I love it :) Would you mind taking a look at these two pictures and telling me what your professional opinion is on the type of wood that I’m looking at? Thank you kindly!
Bit difficult to judge from the facegrain appearance alone, but I would guess stained white oak.
Hi, I’m trying to determine if my flooring is white oak or red oak. I need to get flooring to put into the kitchen and refinish the existing floors and new floors to try to match. Please help. Thanks
Hi Eric, thanks for looking at all these pictures of wood floors! Its really hard to tell! I think this floor might be white oak many of the boards have longer rays, but some still seem to have short rays haha. Best.
There’s a possibility that it’s a combination of the two. But if I had to guess, I’d say it looks more like red oak to me.
I just wanted to know what type of Hardwood Floors I have.
I don’t think it’d really be possible to ID from those pics. A very tentative guess may be hickory based on the color patterns and variation.
This was supposed to be white oak rift sawn. Some seems like white oak, some seems like red. The trim on these doors have no yellow tone, but the panels have a pink hue after applying Rubio 5% white.
Thoughts?
Hi, I am wondering if the floors in the home we recently purchased are red oak or white oak. I am attaching a photo or two from different rooms for you to see if you can tell. Thank you!
I got this 34×72 oak table from the 60s, can anyone tell me if these boards are rift sawn? Still cant figure if its red or white oak, but which oak were common as indoor table back in those days?
Yes that is rift sawn 30-60 ° orientation of the end grain to the face of the board.
Quartersawn is 90° with the face.
Hi Eric,
If you wouldn’t mind, I’d love your opinion. White or red oak? I need to patch some flooring in my 1960s house.
Can’t tell too much from the photos. The overall color cast looks more like red oak, but that’s just a guess.
Hi, our study has built in bookshelves and this is one of the shelves. Can anyone tell me what would this is. I assume it needs to be oak. Our kitchen cabinets were made out of white oak. We want to refinish this and knowing the wood will help us choose finish. Can anyone help please.
It has a similarity to oak, but I actually think it’s ash. Oak has small vertical dark lines called rays visible on flatsawn surfaces, while ash doesn’t. Both will stain nearly identically.
Hi there. I live in the Seattle area, I think my floors are red oak but wanted to make sure as I will be adding flooring in rooms that are currently carpet and will have some repairs as I remodel sections of the old 70’s house I have. I can provide more images if needed. I feel like my phone took away some of the warmth in the color of the flooring in the images, just FYI. Thanks for any help.
I would agree, looks like red oak.
It is Red oak.
Hello from Washington DC! The previous owners of my home must have taken out tiles in the kitchen because they installed hardwood floors that do not match the adjacent room. I can’t tell if it’s just the stain that’s different, or if they are different types of wood. I want to refinish the floors to make them all uniform. Do you think they are just stained different colors, or are they different types of wood (ie. red vs. white oak)? I think if they are different types of wood I will use a darker stain. Thanks so much for your… Read more »
Looks like red oak to me. It can be hard to color match existing flooring to new material, since there’s stain, but also natural patina and darkening that changes over time.
Thank you! Do you think it will look better when we stain the whole floor one color?
In general, staining has an effect of creating a more uniform color across different boards.
I learned recently that this is actually pretty common, is your kitchen maple per chance? I think the logic is that maple goes in kitchens because it’s slightly cheaper and will maybe see more wear and tear.
I need some help identifying this wood flooring so that I can try to match. House is in northern ontario canada, built in the 40’s or 50’s. There are sections that seem to be rift sawn. When looking at the entire floor, there is a lot of variation and I can’t figure out what I’m dealing with.
More than likely a diffuse porous hardwood. I’d say leading candidates would be maple or birch. Sometimes lower grades of maple which include the darker heartwood sections are sold under the name “country maple” — so that might be a possibility, though not a distinct species and more of a commercial designation.
Eric, I would LOVE to know what you think this is (red/white). I’m leaning towards white due to the length of some of the rays, but some of the planks seem a little pinkish to me on the underside.
Image attached related to the previous post of existing flooring
Looks like a ring porous hardwood, the most commonly used for floors would be oak. However, I can’t see any visible rays in your picture, which may be due to the distance the picture was taken from, or if the stain applied to the floor exactly matched and obscured the rays. But no visible rays also might mean that the floor is something like ash, and not oak.
Thanks appreciate the feedback. The floor is oiled and hasn’t been stained by us. When you say rays what do you mean! Below is a closer picture of the wood. Thanks in advance.
Point #2 in the article above mentions rays. They’re basically small little dark vertical slits / streaks in the wood grain, and looking at your most recent picture, I don’t see any visible rays in the wood. (Technically just about all wood has rays, but the issue is whether or not they’re visible or conspicuous to the naked eye.) Based on the provided pictures so far, I’d lean even more heavily toward ash and not oak.
ash
It is NOT oak wood, for sure! In my opinion, possible species: ash or chestnut.
Hi trying to work out what kind of flooring we have so we can match it. Its been down about 16 years….think it might be American oak but not 100%sure…anyone able to identify?
The Left side of your web page is cut off either by miss-aligned or being two wide. The first word in every paragraph is half covered. The same on all my devices.
Do you have any screenshots? On all your devices? This is the first I’ve heard of something like this.
Hi there! I was hoping that someone could tell me what these cabinets are… we were hoping for white oak rift cabinets, but maybe we got quarter sawn instead. Some even have a pinkish hue to them like red oak does. Are they even white oak cabinets? Thanks for your help!
Eric, do you happen to have any thoughts by chance? If so, I would really appreciate it! Thank you!
Looks all over the map, hard to tell 100%. Possibly even a combination of both red and white oak.
These cabinets pictured are rift and quartered white oak. White oak can have some peachy color (not red or pink). I see that on the right side door. I have been a hardwood flooring professional for over 30 years. R&Q white oak is the best!
absolutely rift white oak
Hello from Pennsylvania! I was hoping someone could help me figure out if this is red or white oak. It’s from the top of an old library table from turn of the century and has the “tiger oak” appearance. I am in the process of refinishing and would like to know so I can choose the right finish. The linseed finish is still in the wood on the right. Any help would be much appreciated!
Hard to say for sure, but the ray fleck patterns look more like white oak to me.
Eric, Thank you for your prompt response. That would make sense as it is from that era when quarter sawn white oak primarily was used. I really appreciate your help!
Hi, I’m based in London UK and this is the most quirky yet incredibly useful site! I hope someone can help identify a wood sample which we’re trying to match. It’s from the parquet floor of our flat which was flooded and we’re trying to find the closest match. Everyone is saying it’s Oak and the flooring shop gave us a sample of what they would supply, also Oak. They’re so different. Their sample has a lot more pronounced grain and is more contrasty. The finish is plain lacquer on each. The original is on the left, the suggested new… Read more »
You are correct in your suspicion as it does not appear your floor is oak. Unfortunately, I’m not familiar with what hardwoods were commonly used in London area, but if you knew the candidates it would be a much simpler process of elimination.
Hi Eric,
Thanks so much for your response.
As far as we know the floor was laid about 20 years ago but the blocks may have been reclaimed. The most popular woods in the UK in the 1930’s were, Oak, walnut, cherry, lime, pine and maple. Do you think it could be any of those? The other thing of course is, even if we identify it, will it be available or will it be a preserved species?
Thanks for your help.
Geoff
I just purchased this table and the guy said to me he was certain that it was white oak. But after having it in my house for a couple of days it seems like the stain choice (Minmax – Simply white) is a bit pinkish. Can you tell if this is white or red oak? Thanks!
That is red oak. A nice glue up of narrower boards
Thank you! Is there anything I can do to cut the red out of the wood if I stain it again?
Look into Pink Blocker by Ciranova. Or, research green dye to block red.
I’ve been told that one of the ways you can tell a red oak from a white oak is that red will accept water and white water will “bead” and not soak in. True or false?
I’ve never heard of this technique before. I know white oak will wick up thin liquids like alcohol when the endgrain is submerged, but I don’t know about just putting water on the facegrain. Seems like it’d be an unreliable way to tell the two apart as both woods will soak in water placed on the raw wood to some extent.
Thanks bunches
White oak smells like whiskey, that is why whiskey smells like white oak from the barrels.
Hi I salvage this from an old mansion just wondering if you could tell me if this is an oak or a chestnut? Looks to be white oak to me?
Yes, quartersawn white oak.
Thank you I appreciate it
Hi- I’m trying to figure out what went wrong here. The cabinets in question are the ones flanking the two smaller windows. My question involves why did the cabinet fronts take the stain differently than the cabinet themselves. The photo to the right shows the cabinet fronts before staining. The photo to the left shows it after staining and clearly there is an issue. I’m told that the same stain was used on all the wood – Minwax Classic Gray. I’m also told that all the wood used is white oak. One of these cannot be true. I’m starting to… Read more »
I’d be interesting to see what the bare wood looked like before staining, and compare how close the color was in the wood as a starting point.
First, this column has been invaluable! I purchased a special bundle of white oak from a Florida distributor. I am going to finish the floor with wax oil. As there would be left over stock, I decided to also put new flooring in the master bedroom. So, I purchased bundles from a well known discount distributor and some from a national big box store. The bundles from the big box were pre-finished and as I sanded that finish off it appeared like white and red oak were mixed together. I also had the issue of bundles coming apart in the… Read more »
Not sure about the first and third, but I think the second pic is pretty dark, so I’d be surprised if it were not white oak. Not sure about the frequency of mis-identification, but it can definitely happen.
paid for upgrade to white oak but we can’t tell if they installed white or red oak. Can you tell? Thanks!
The overall color looks closer to white oak to me, but can’t be 100% sure based on pic alone.
Thank you!
Hi Eric,
I just had my wood floors refinished. The contractor told me that it was red oak. They had to add new boards where I had a hearth removed. When they put the clear finish on the floor the new boards turned a darker color. Do you have any idea is my existing floor is actually red oak? We need to have it removed and are at a loss for what to do. Thank you! Mark
Based on your description, it sounds like your existing floor is the lighter wood on the bottom in the pic. That looks like red oak, and a fairly standard coloration of red oak. The darker wood could also be a species of red oak, but the color looks pretty dark. There is however a lot of color variation in oak, so it’s not outside the realm of possibility that it is also red oak, just poorly color matched. It really can be a pain to color match oak, and rarely turns out perfect, but this is a pretty exaggerated example.
Hi, I’m trying to refinish a kitchen cabinet, as there was so much residue on it that the finish was damaged. I am guessing this is red oak (darker part is where I sanded off some finish to see the real color).
I am also guessing this is a white wash stain that yellowed at bit.
Thanks!
Tracy
It looks like white oak to me.
Thanks! It throws a lot of red/pink when I white wash it. Any thoughts?
I don’t understand what you mean by throwing red/pink
Hi, When I put a white wash stain on the the wood, the tone comes out very slightly pink. I guess I should add a bit of green but not sure how much. Thanks!
Can I use red oak for a front door?
Why you would want to tell white vs red is the T/R ratio. Particularly in green woodturning. White is way more stable as it dries than red. If I’m working red oak I am restricted to spindle orientation. If it’s white oak I can get away with facegrain turning. A traditional facegrain bowl made from fresh red oak will fold like a taco as it dries. White oak hardly moves at all.
Hi can you help me I just can’t decide is this white or Red? both blocks re-claimed same floor the light block is plain unsanded the other is sanded and clear oiled.Thanks in advance Lolly
That looks more like beech to me. Do you have a picture of the endgrain?
Thank you hubby said beech so I guess you are both right :) thank you so much for your help much appreciated
hi I just took this picture of the end-grain it may help someone else too
Request advice! I have an oak butcherblock table from the early 90s, I just sanded down to bare wood and want to stain to preserve beautiful natural color; clearcoat poly turns the wood very yellow. I’m not sure if it’s white or red oak, and would love help identifying from the pictures below, as well as advice about the stain. Some of the pieces have short rays, others are much longer. Thanks in advance!
Just so you have a clear idea of what the natural wood color will be when finished with anything applied to it, have you tried wiping it with something like mineral spirits just to get a baseline idea of wood color? Sanded wood will always be lighter in color than finished wood, regardless of finish used. If the wetted wood color looks acceptable to you, you could try a water-based polyurethane, which doesn’t give the yellowing that oil based does. But if the actual look of the wetted wood surface is too yellow in and of itself, you’d have to… Read more »
Thank you Eric! also still wonder if it’s red or white oak…
White oak
Could you tell me if this looks like white or red oak?
red oak, short ray flecks the end grain pores are open.