
by Eric Meier
When attempting to identify a wood sample, it’s important to keep in mind the limitations and obstacles that are present in our task. Before starting, please have a look at The Truth Behind Wood Identification to approach the task in a proper mindset; I consider the linked article to be required reading for all those visiting my site with the intent of identifying wood.
1. Confirm it is actually solid wood.
Before proceeding too much farther into the remaining steps, it’s first necessary to confirm that the material in question is actually a solid piece of wood, and not a man-made composite or piece of plastic made to imitate wood.

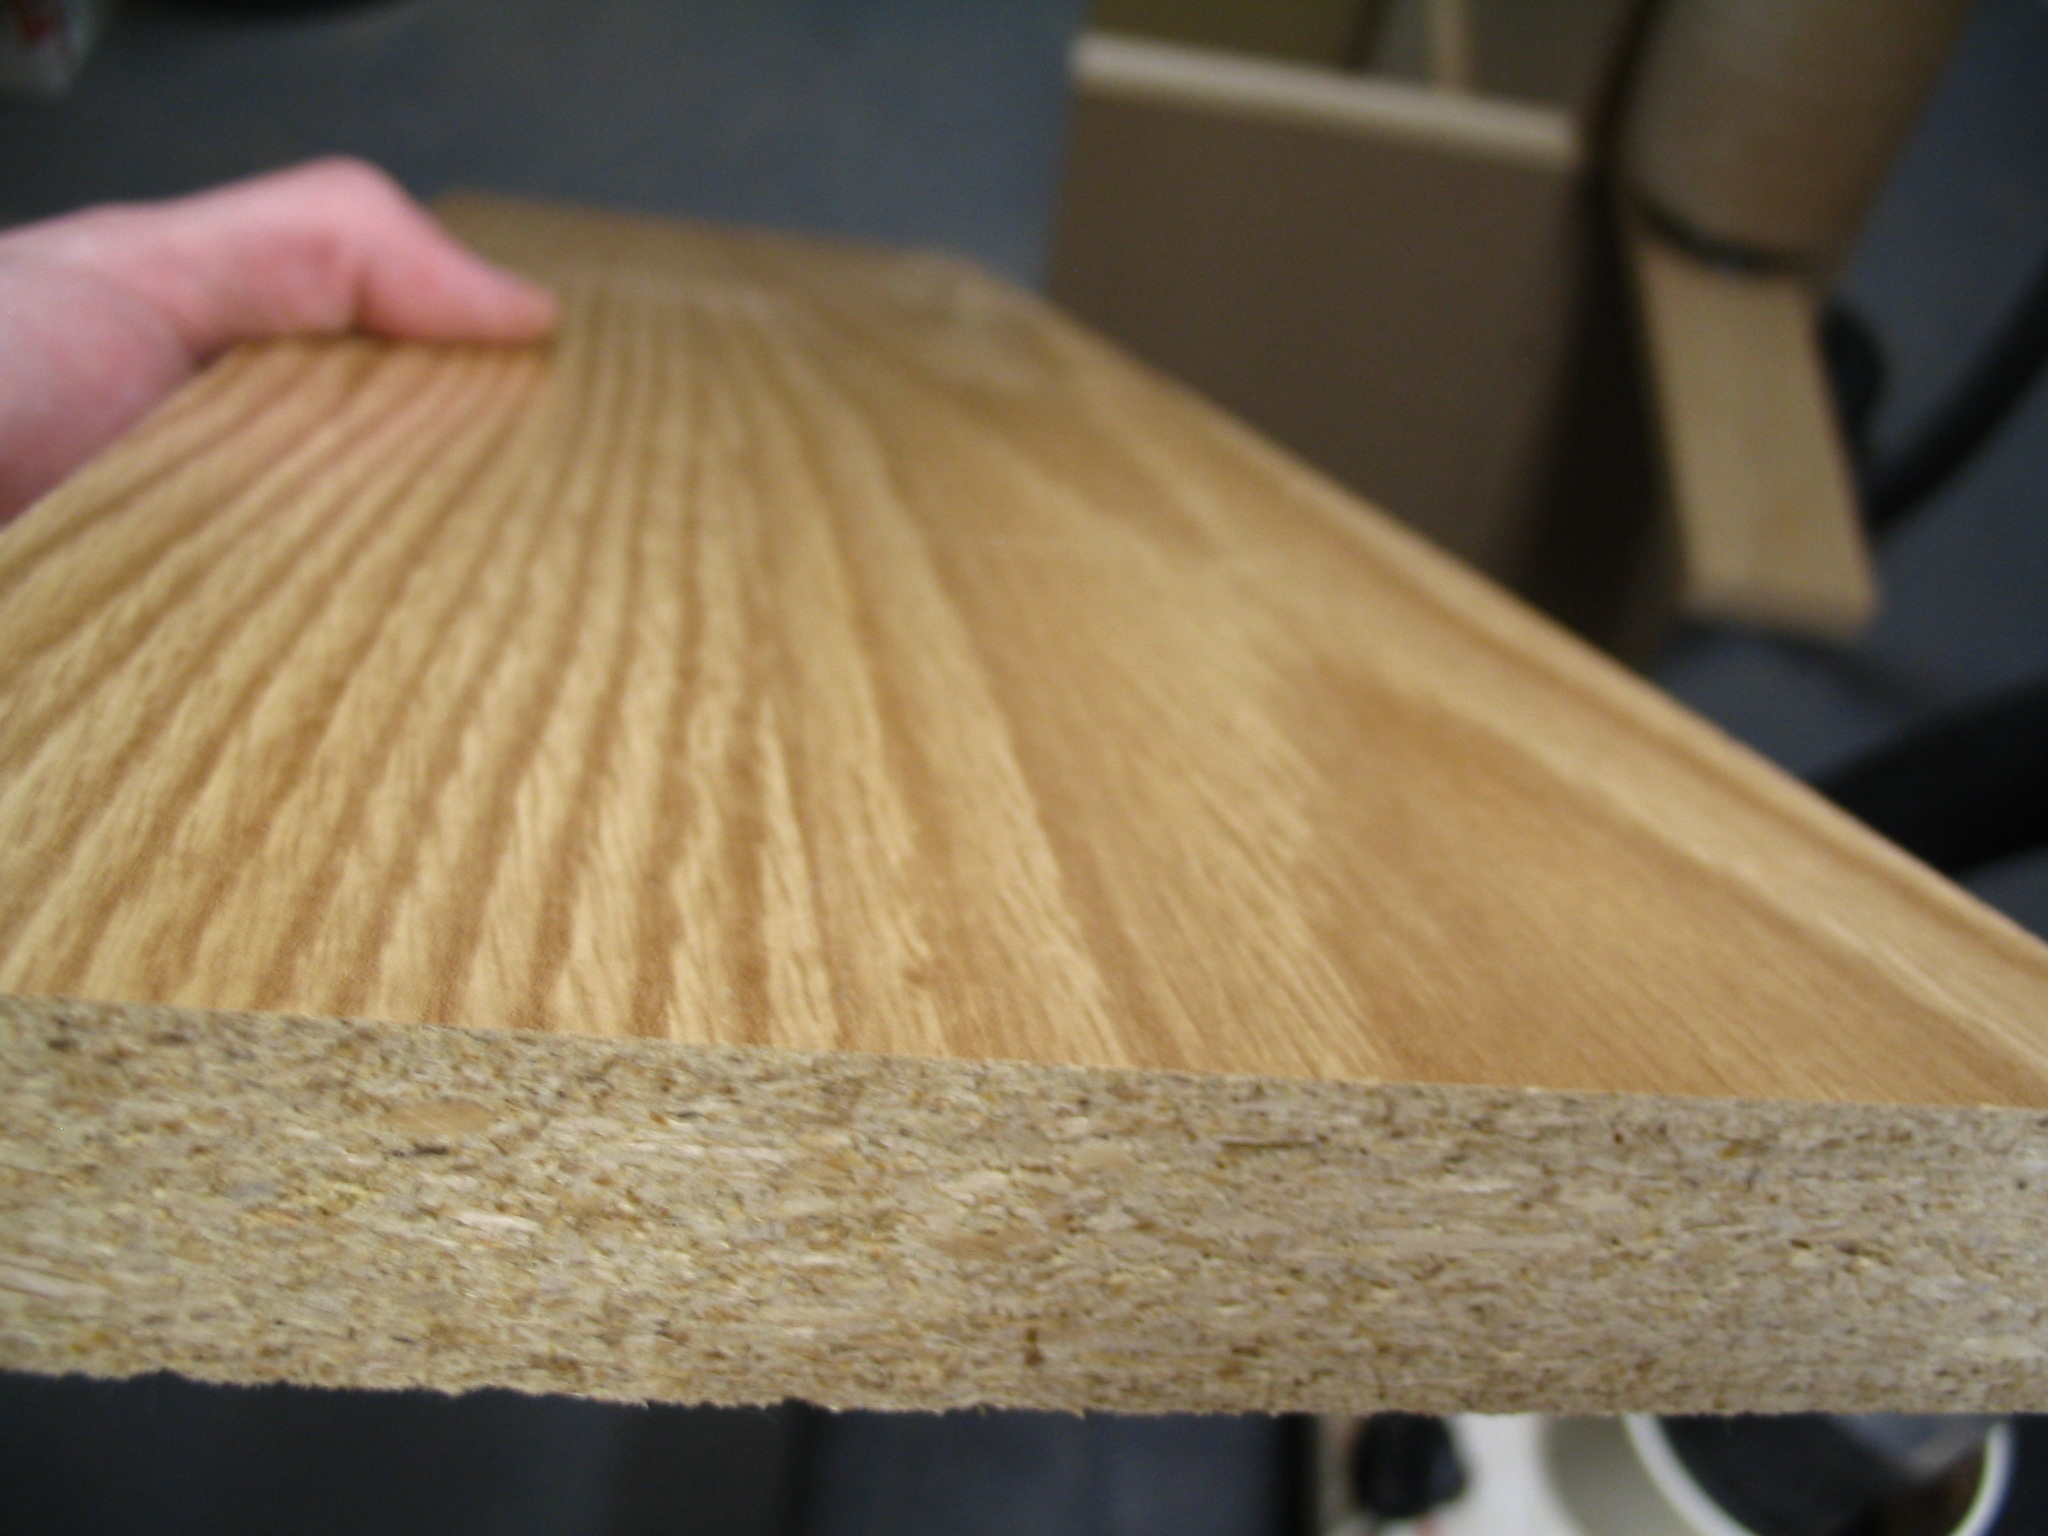
Can you see the end-grain?
Manufactured wood such as MDF, OSB, and particleboard all have a distinct look that is—in nearly all cases—easily distinguishable from the endgrain of real wood. Look for growth rings—formed by the yearly growth of a tree—which will be a dead-giveaway that the wood sample in question is a solid, genuine chunk of wood taken from a tree.
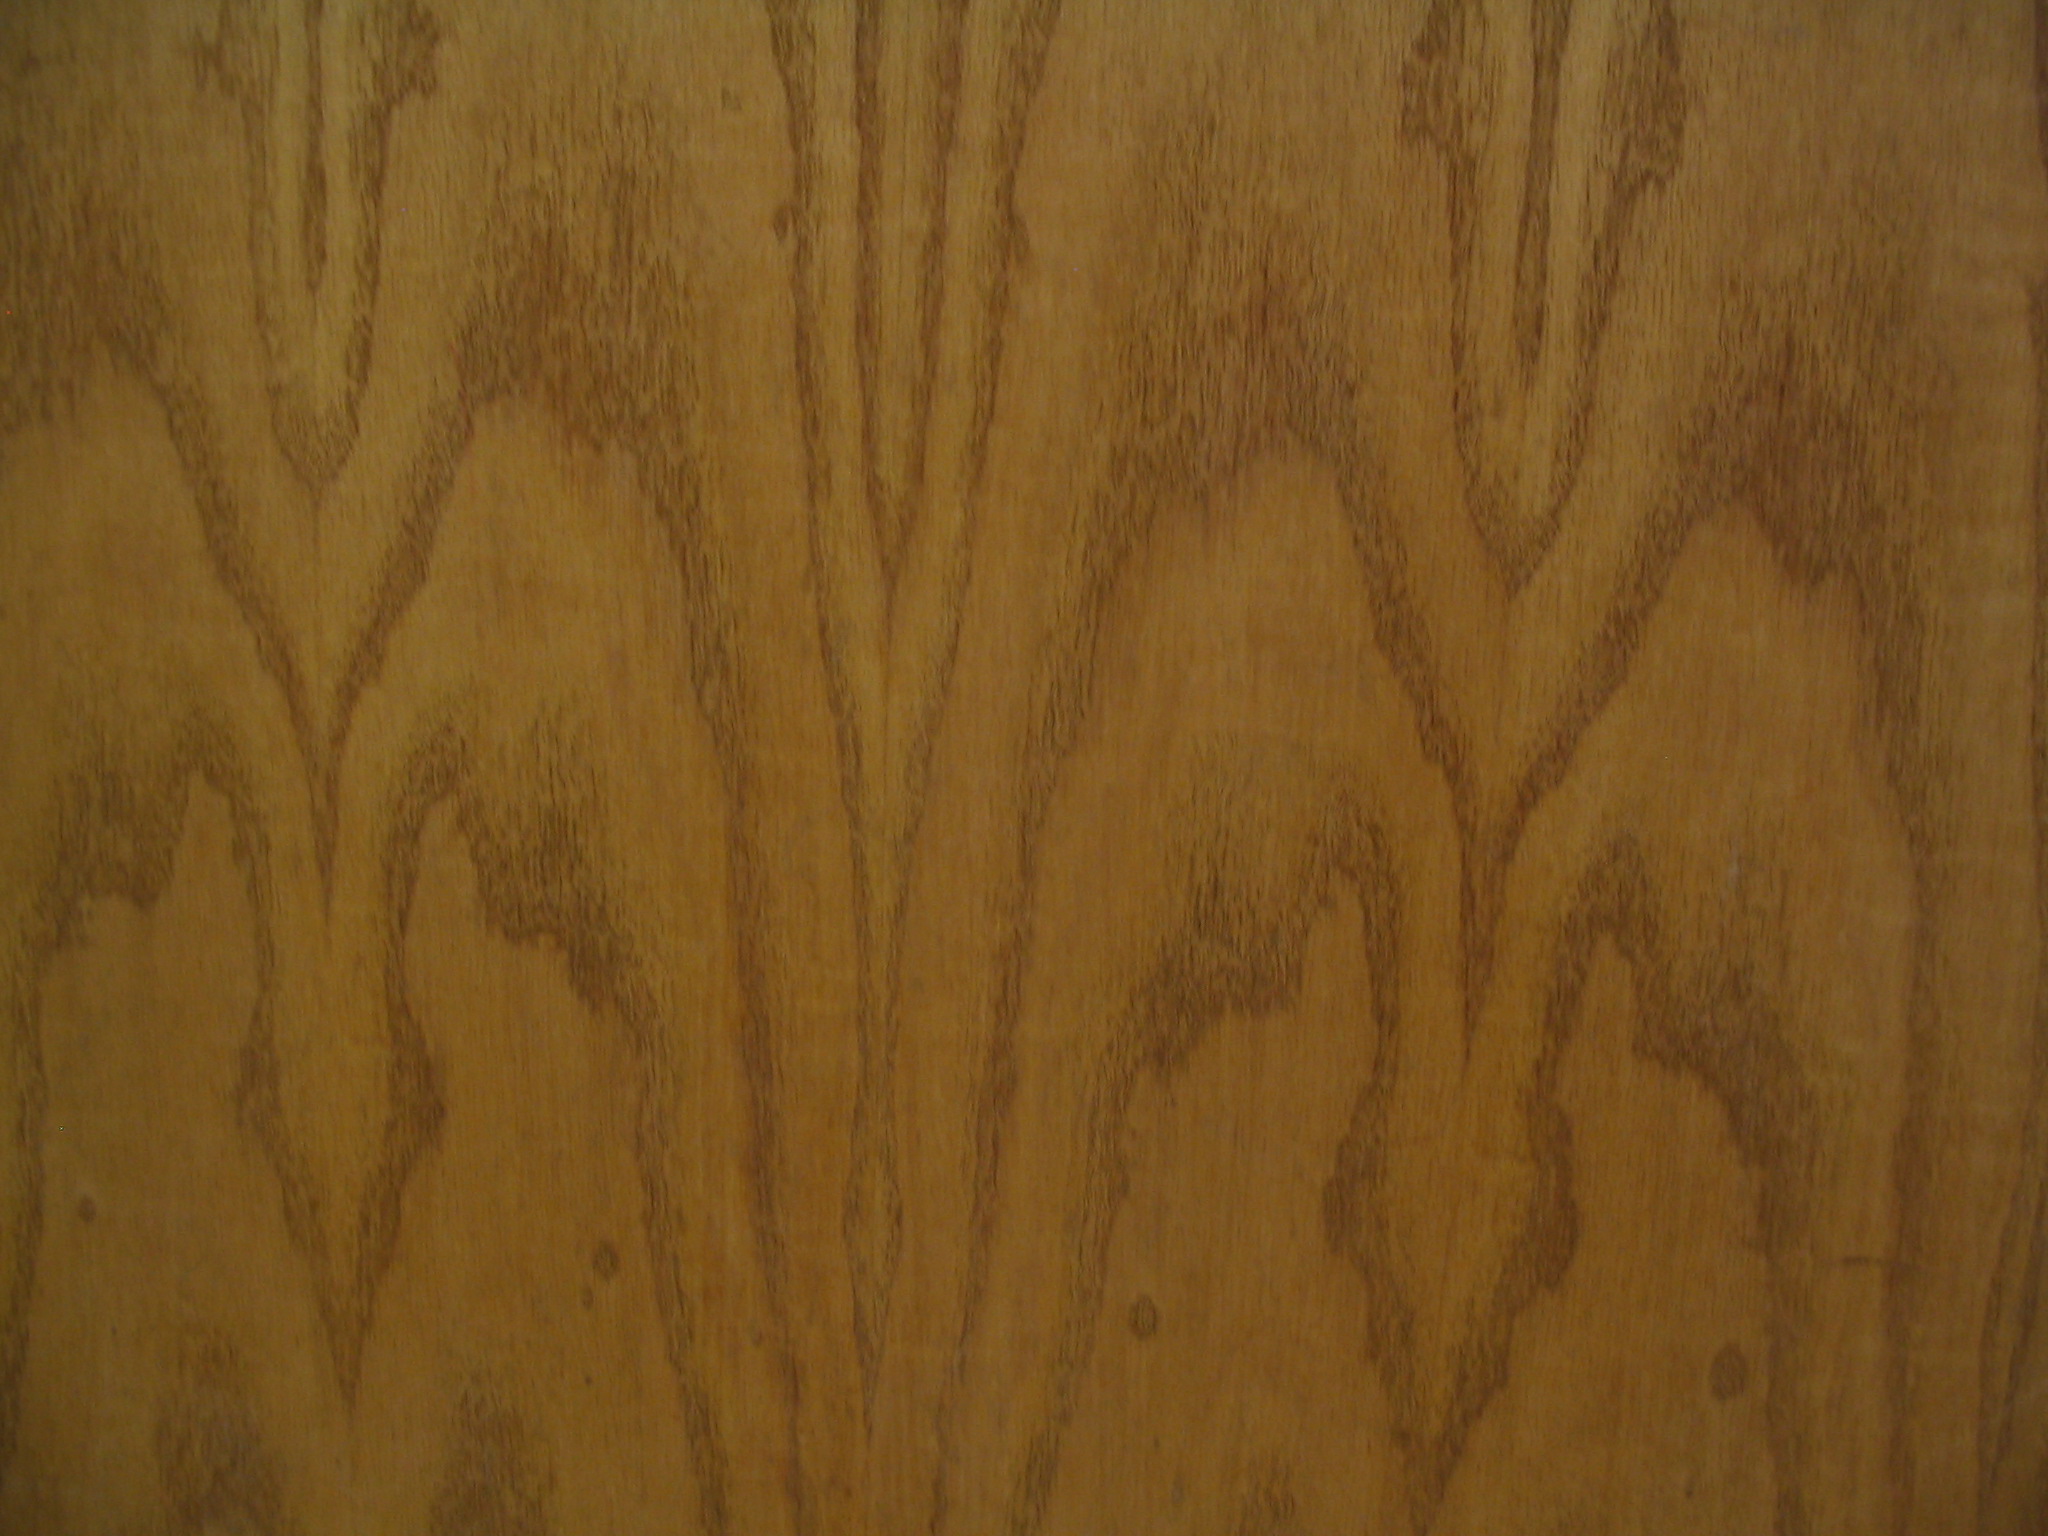
Is it veneered?
If you see a large panel that has a repeating grain pattern, it may be a veneer. In such cases, a very thin layer of real wood is peeled from a tree and attached to a substrate; sometimes the veneer can be one continuous repeating piece because it is rotary-sliced to shave off the veneer layer as the tree trunk is spun by machines. Assuming it is a real wood veneer with a distinct grain and texture—and not merely a piece of printed plastic—you may still be able to identify the outer veneer wood in question, but you should still realize that is it only a veneer and not a solid piece of wood.
Is it painted or printed to look like wood?
Many times, especially on medium to large-sized flat panels for furniture, a piece of particleboard or MDF is either laminated with a piece of wood-colored plastic, or simply painted to look like wood grain. Many of today’s interior hardwood flooring planks are good examples of these pseudo-wood products: they are essentially a man-made material made of sawdust, glues, resins, and durable plastics.
2. Look at the color.
Some questions to immediately ask yourself:
Is the color of the wood natural, or is it stained?
If there is even a chance that the color isn’t natural, the odds are increased that the entire effort of identifying the wood will be in vain.
Is it weathered or have a patina?
Many woods, when left outside in the elements, tend to turn a bland gray color. Also, even interior wood also takes on a patina as it ages: some woods get darker, or redder, and some even get lighter or lose their color; but for the most part, wood tends to darken with age.
Is it possible to sand or plane the board to see the natural raw color of the wood?
The most predictable baseline to use when identifying wood is in a freshly sanded state. This eliminates the chances of a stain or natural aging skewing the color diagnosis of the wood.
3. Observe the wood grain.
If the wood is unfinished, then look at the texture of the grain. Ask yourself these questions:
Does the wood have an open, porous texture?
Most softwoods will be almost perfectly smooth with no grain indentations, while many common hardwoods have an open pore structure, such as oak or mahogany; though there are some hardwoods that are also smooth to the touch, such as maple.
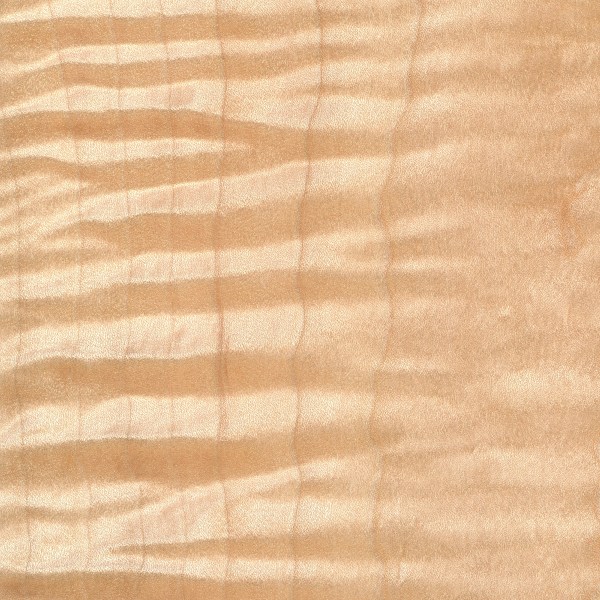
Can you tell if the wood is quartersawn or plainsawn?
By observing the grain patterns, many times you can tell how the board was cut from the tree. Some wood species have dramatically different grain patterns from plainsawn to quartersawn surfaces. For instance, on their quartersawn surfaces, lacewood has large lace patterns, oak has flecks, and maple has the characteristic “butcher block” appearance.
Is there any figure or unusual characteristics, such as sapwood, curly or wild grain, burl/knots, etc.?
Some species of wood have figure that is much more common than in other species: for example, curly figure is fairly common in soft maple, and the curls are usually well-pronounced and close together. Yet when birch or cherry has a curly grain, it is more often much less pronounced, and the curls are spaced farther apart.
4. Consider the weight and hardness of the wood.
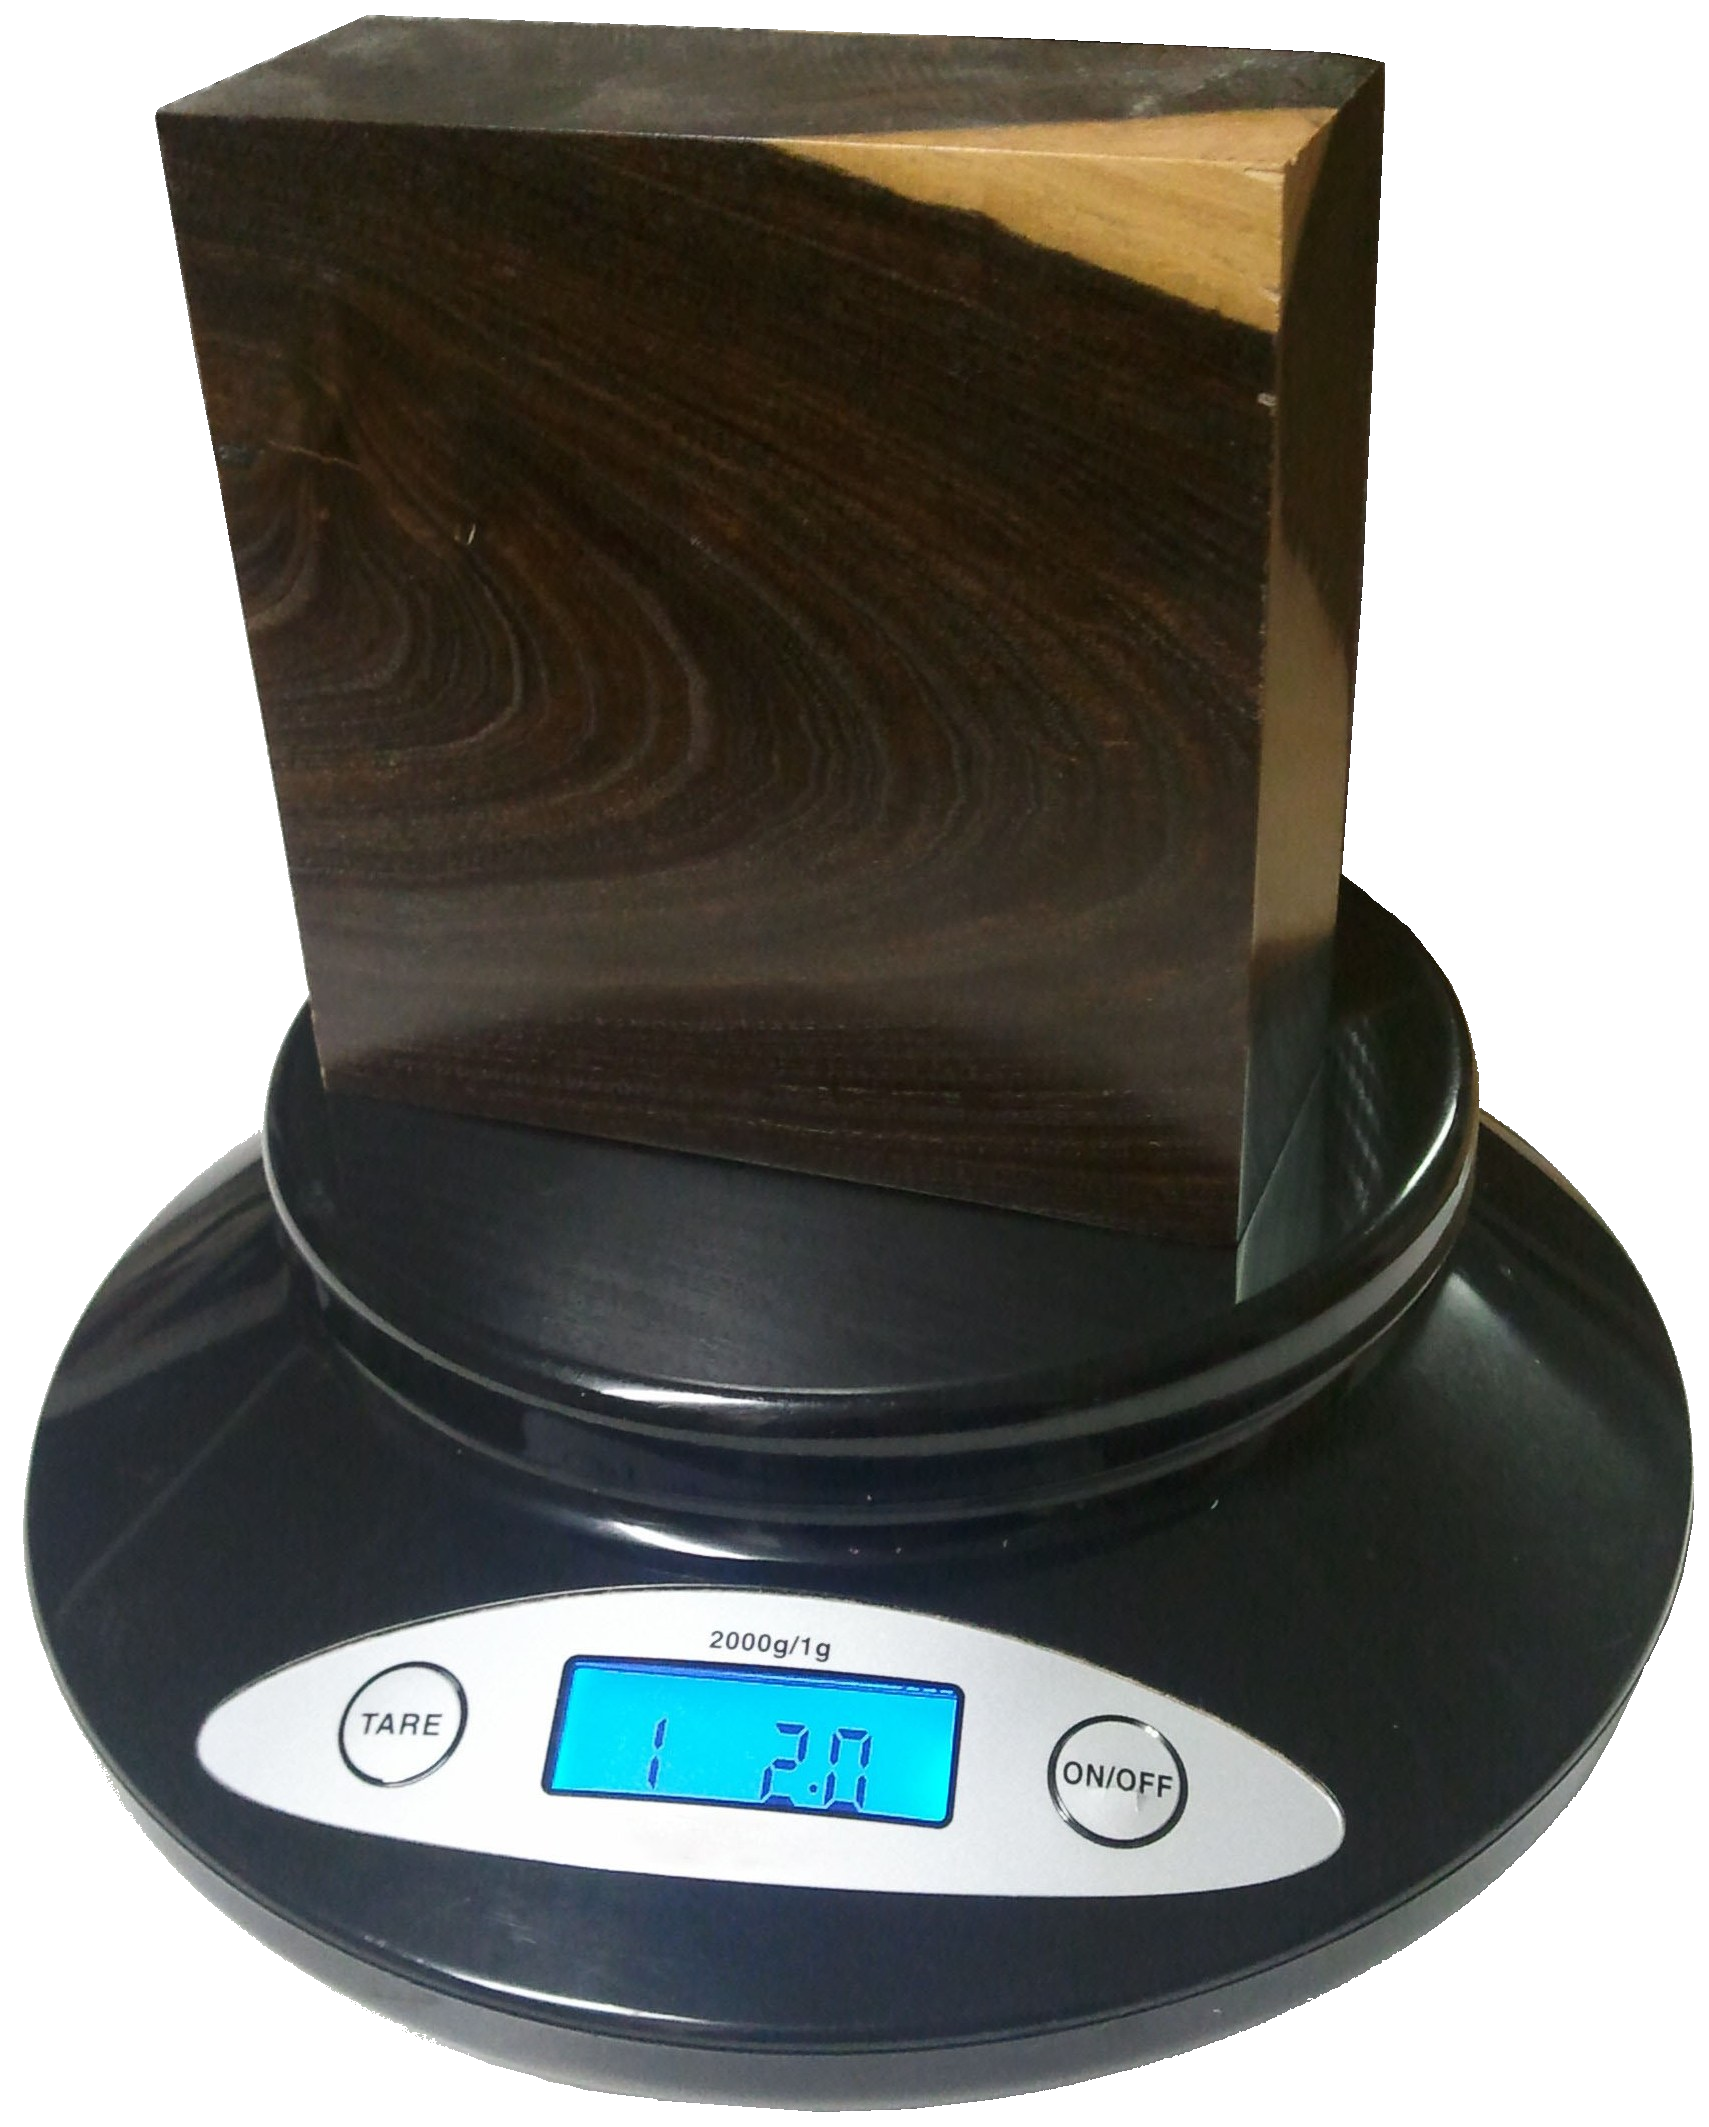
If it’s possible, pick the piece of wood up and get a sense of its weight, and compare it to other known wood species. Try gouging the edge with your fingernail to get a sense of its hardness. If you have a scale, you can take measurements of the length, width, and thickness of the wood, and combine them to find the density of the wood. This can be helpful to compare to other density readings found in the database. When examining the wood in question, compare it to other known wood species, and ask yourself these questions:
Is the wood dry?
Wood from freshly felled trees, or wood that has been stored in an extremely humid environment will have very high moisture contents. In some freshly sawn pieces, moisture could account for over half of the wood’s total weight! Likewise, wood that has been stored in extremely dry conditions of less than 25% relative humidity will most likely feel lighter than average.
How does the wood’s weight compare to other species?
Taking into account the size of the board, how does its weight compare to other benchmark woods? Is it heavier than oak? Is it lighter than pine? Look at the weight numbers for a few wood species that are close to yours, and get a ballpark estimate of its weight.
How hard is the wood?
Obviously softwoods will tend to be softer than hardwoods, but try to get a sense of how it compares to other known woods. Density and hardness are closely related, so if the wood is heavy, it will most likely be hard too. If the wood is a part of a finished item that you can’t adequately weigh, you might be able to test the hardness by gouging it in an inconspicuous area. Also, if it is used in a piece of furniture, such as a tabletop, a general idea of its hardness can be assessed by the number and depth of the gouges/dings in the piece given its age and use. A tabletop made of pine will have much deeper dents than a tabletop made of Oak. Additionally, you can always try the “fingernail test” as a rough hardness indicator: find a crisp edge of the wood, and with your fingernail try to push in as hard as you can and see if you’re able to make a dent in the wood.
5. Consider its history.
Many times we forget common sense and logic when attempting to identify wood. If you’ve got a piece of Amish furniture from Pennsylvania, chances are more likely that the wood will be made of something like black walnut or cherry, and not African wenge or jatoba. You might call it “wood profiling,” but sometimes it can pay to be a little prejudiced when it comes to wood identification. Some common-sense questions to ask yourself when trying to identify a piece of wood:
Where did it come from?
Knowing as much as you can about the source of the wood—even the smallest details—can be helpful. If the wood came from a wood pile or a lumber mill where all the pieces were from trees processed locally, then the potential species are immediately limited. If the wood came from a builder of antique furniture, or a boat-builder, or a trim carpenter: each of these occupations will tend to use certain species of woods much more often than others, making a logical guess much simpler.
How old is it?
As with the wood’s source, its age will also help in identification purposes. Not only will it help to determine if the wood should have developed a natural patina, but it will also suggest certain species which were more prevalent at different times in history. For instance, many acoustic guitars made before the 1990s have featured Brazilian rosewood backs/sides, yet due to CITES restrictions placed upon that species, East Indian rosewood became a much more common species on newer guitars. (And this is a continuing shift as newer replacements are sought for rosewoods altogether.)
How large is the piece of wood?
Some species of trees are typically very small—some are even considered shrubs—while others get quite large. For instance, if you see a large panel or section of wood that’s entirely black, chances are it’s either painted, dyed, or stained: Gaboon ebony and related species are typically very small and very expensive.
What is the wood’s intended use?
Simply knowing what the wood was intended for—when considered in conjunction with where it came from and how old it is—can give you many clues to help identify it. In some applications, certain wood species are used much more frequently than others, so that you can make an educated guess as to the species of the wood based upon the application where it was used. For instance, in the United States: many older houses with solid hardwood floors have commonly used either red oak or hard maple; many antique furniture pieces have featured quartersawn white oak; many violins have spruce tops; many closet items used aromatic red cedar, and so forth. While it’s not a 100% guarantee, “profiling” the wood in question will help reduce the number of possible suspects, and aid in deducing the correct species.
6. Find the X-Factor.
Sometimes, after all the normal characteristics of a sample have been considered, the identity of the wood in question is still not apparent. In these instances—particularly in situations where a sample has been narrowed down to only a few possible remaining choices—it’s sometimes helpful to bring in specialized tests and other narrower means of identification.
The following techniques and recommendations don’t necessarily have a wide application in initially sorting out wood species and eliminating large swaths of wood species, but will most likely be of use only as a final step in special identification circumstances.
Odor
Believe it or not, freshly machined wood can have a very identifiable scent. When your eyes and hands can’t quite get a definitive answer, sometimes your nose can. Assuming there is no stain, finish, or preservative on or in the wood, quickly sand, saw, or otherwise machine a section of the wood in question, and take a whiff of the aroma.
Although new scents can be very difficult to express in words, many times the scent of an unknown wood may be similar to other known scents. For instance, rosewoods (Dalbergia spp.) are so named for their characteristic odor that is reminiscent of roses. Although difficult to directly communicate, with enough firsthand experience scents can become a memorable and powerful means of wood identification.
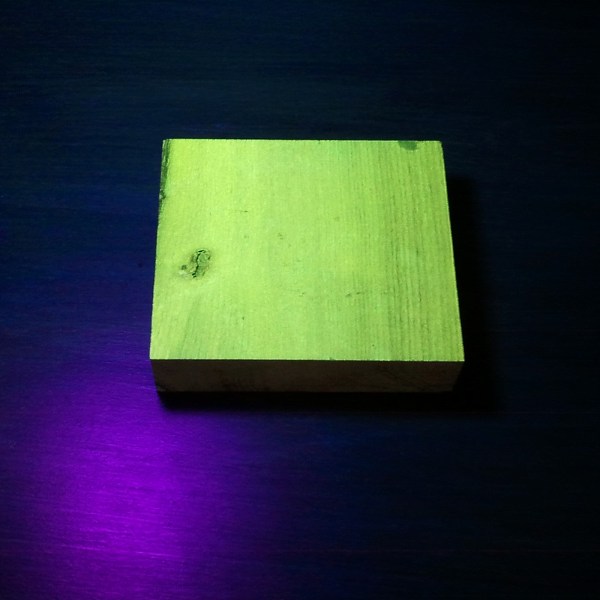
Fluorescence
While certain woods can appear basically identical to one another under normal lighting conditions, when exposed to certain wavelengths—such as those found in blacklights—the wood will absorb and emit light in a different (visible) wavelength. This phenomenon is known as fluorescence, and certain woods can be distinguished by the presence or absence of their fluorescent qualities. See the article Fluorescence: A Secret Weapon in Wood Identification for more information.
Chemical Testing
There are only a small number of chemical tests regularly used on wood, most of which are very specialized and were developed to help distinguish easily confused species with one another. They work by detecting differences in the composition of heartwood extractives. A chemical substance (called a reagent) is usually dissolved in water and applied to the wood surface: the surface is then observed for any type of chemical reaction (and accompanying color change) that may occur. Two of the most useful are the tests that are meant to separate Red and White Oak, and Red and Hard Maple.
Heartwood Extractives Leachability
Sometimes a wood species will have heartwood extractives that will be readily leachable in water and capable of conspicuously tinting a solution of water a specific color. For instance, the heartwood extractives contained in osage orange (Maclura pomifera) contain a yellowish-brown dye that is soluble in water. (This can sometimes be observed anecdotally when the wood is glued with a water-based adhesive: the glue’s squeeze-out is an unusually vibrant yellow.)
In a simple water extract color test, wood shavings are mixed with water in a vial, test tube, or other suitably small container, and the color of the water is observed after a few minutes. If the heartwood extractives are leachable by water, then a corresponding color change should quickly occur.
In addition to osage orange (Maclura pomifera), merbau (Intsia spp.), and rengas (Gluta spp. and Melanorrhoea spp.) are also noted for their readily leachable heartwood extractives. Because this property is quite uncommon, it can serve to quickly differentiate these woods from other lookalikes.


Get the hard copy
 If you’re interested in getting all that makes The Wood Database unique distilled into a single, real-world resource, there’s the book that’s based on the website—the Amazon.com best-seller, WOOD! Identifying and Using Hundreds of Woods Worldwide. It contains many of the most popular articles found on this website, as well as hundreds of wood profiles—laid out with the same clarity and convenience of the website—packaged in a shop-friendly hardcover book.
Why I will no longer be replying to every wood ID request I’ve replied to literally thousands of wood ID requests on this site over the past 13+ years, but as the site’s popularity has grown, so has the time demands for ID on a daily basis. (Contrary to what some may seem to think, I am not some all-knowing wood wizard that can instantly ID your wood. It can actually take me a long time to sift through a lot of different resources.) Over the past few years, my backlog of pending wood species to be added to the… Read more »
It was an $80 barn find. I could probably get $1000+ for it when it is all done, but will hold on to it for my future grand children. Original, unrestored & in fair to good condition these go for an easy $2000 to $20,000 depending on model & maker. (Tom Blake is the quintessential designer of these days & though this is missing the plug (or emblem), it is likely either made by one of 3 companies he licensed to reproduce his designs, or a good copy of one of his patents) P.S. Thanks for the expert advice. Look… Read more »
So this is a 1920’s surf board? Sweeeeet.
That’s way before the Hawaiian influence on WWII vets and the California wave craze.
I’m thinking Antiques Roadshow, that baby’s GOT to be worth some cashola.
I think I may have possibly located the actual model (so possibly actually from the 40’s) see attached (though this one was made of redwood there were a few different companies manufacturing Tom Blake’s designs in those days)
Thank you so much. Here is the before photo, & I will be posting the after later. (p.s. looks like it was later turned to a lifeguard board with a faint “lifeguard blue” paint still visible. I am restoring it to what I think was it’s previous condition (hopefully). This would probably be a “Bordeaux” dark reddish brown as which was traditional in that day….
Ben – 1st photo looks like yellow pine rotary cut plywood veneer, or possibly fir, 2nd photo looks like a regular fir or hemlock board, but could be pine also. It’s got a lot of age going for it. Good closeup, though. Now I want to see what the whole thing looks like, even if that sounds kooky.
….also here is the tail block which would be neat to identify as well. Thanks.
I am restoring a 1920’s hollow surf/paddle board (called a kook box). Am attaching a picture of the veneer (or early plywood) which I am trying to identify & fix a missing section of the board. Thanks. (GREAT SITE)
Ted,
I believe the mirror used to sit on top of a sideboard/buffet, and it would have been mounted with the shelf on the top and mirror underneath. I’ve done some research, and the piece dates back to around the 1890’s and early 1900’s. I wish I could have seen the sideboard it was originally made to go with. Thanks so much for your input!
John, I’m going to guess at Pecan. Lara, Hard to see, but I’m going to guess quarter sawn oak with a dark walnut stain. The 3rd photo, the 1×3 at the bottom(?) looks like QSO & so does the veneer on the left of the same photo. 1st photo, top left, looks like oak there, too. This piece has seen some hard use. Is this a shelf with a mirror under it? Hard to determine it’s purpose. 2nd photo, the veneer on the scrollwork looks like QSO, that the craftsman put there (where it was highly visible) to accentuate the… Read more »
And here is a third showing more grain patterns….
Here is another angle of the first photo….
I’m trying to identify what kind of wood my antique mirror may be. It’s a very heavy piece, and the veneer is starting to peel. I can see wood grain underneath where it has peeled already. I have more photos I can post as well. Thank you!
Hi Eric. Any ideas what wood this is?
http://i294.photobucket.com/albums/mm96/Richard-B-Murray/Guitars/Build%2014%20Pine%20Tele/PineTele.jpg~original
Thanks Eric. Here is a pic of the unfinished, underside of the table. It looks a lot like the Black or Tropical walnut.
@El
Okay, I change my guess to walnut. Looking closer at the face grain of the main panels, it appears to have a subtle gradation of pore size which would indicate a semi-ring-porous wood like walnut. (Plus the color matches better.) The outside border still looks like olive ash burl, but could possibly be a light-colored walnut burl.
Lisa, Fungus (or …Fungi, if you want to be technical)
@El That looks like ash to me. I’d say the border is olive ash burl, and the rest could possibly be ash veneer.
Hey all. I am trying to ID the top of this dining table (which appears to be a wood veneer).
This photo is of the top.
This tree was knocked down 8 years ago and just cut it to move it. What is this strange orange red color?
What I have found is the case with any “exotic hardwood” is that you always need to be VERY CAREFUL to apply a very controlled amount of force when using ANY “sharp woodworking tools”. In other words NEVER apply excess pressure to ANY part of any grain of “exotic wood”. Many people say, “Whatever, I know what I’m doing…” but I say, “Don’t say I didn’t warn you if you lose a finger, arm and/or leg if you weren’t careful…”
Marion, you’re too far away to make a species identification. Do you people even read earlier posts? I can’t identify era or style, not my forte.. looks “new” rather than antique, or it’s something that has been stripped down and completely refinished. Pretty shiny for an antique, looks like a gloss polyurethane finish on it. To my taste it would look nicer just plain wood and fluted columns, and without the fruity & leafy thing on the 3rd drawer. That’s hideous. Let me think about that, no, it wouldn’t even look good on the 4th drawer, either. Chintz. Over-embellishment. You… Read more »
Inherited bedroom set over 100 yrs old photo of dresser, also vanity desk dresser and bed. Can you tell me what type of wood and style this is’
What era would this be?
James,
Re17th, maybe lignum vitae?
Re27th, modern post-1950s mass produced, machine made, secondary wood on outside frame, like basswood, cherry veneer with maple inlay. Saw cut around edge is modern innovation to pass off mass produced furniture as “expensive” inlay work. (just think what would grow down in there after little Jimmy spills his frosted cocobomb cereal…EEEEK!)
what kind of wood and what era might this be?
Anyone know what type of wood this is its a dark very hard type of wood.
LOL, Ted, you are definitely NOT kicked off…
If the rest of you vote to kick me off of here, I’ll understand, and my mother used to say, “if you don’t have something nice to say, don’t say anything” – but I can’t resist.
Mike – Hey, what’s with the blurry photo of firewood?
my freind took these peices out of a boat house/dancehall built i think in the early 1900’s near alexandrea bay new york.
Eric:
That sounds like a good idea. I’ll repost my last post at the FB page.
To all who’ve tried to post pictures of their stuff for ID recently:
For whatever reason, the photo uploads haven’t worked, so your post wasn’t listed. I’m considering moving this feature (posting wood pics to be identified) to my new Wood Database facebook page.
I think this would be a better forum to post pictures and have discussion than here in the comments section. What do you think?
Thank you all for great expertise. The thing I liked so much about this small piece of wood I found, apart from it’s beauty, was how well and how easy it was to get a really high finish to it. I mostly use oil such as “minwax antique oil finish” or “liberon finishing oil” (both are oils mixed with varnish). The wood is also easy to shape with a sander at the same time as it’s quite hard and will withstand both use and abuse. Is this also the caracteristics of pear, cherry and apple wood? What other woods have… Read more »
Johan, That’s an excellent endgrain shot. It’s almost certainly a fruitwood in the Rosaceae family. That lighter colored wood you mention under the bark is called sapwood. It’s not maple, as then the sapwood would comprise about 2/3s of the wood. Also, the pores are too small and of a uniform size — ruling out walnut or pecan. The thing is, it’s not really possible (to my knowledge) to reliably separate between the various fruitwoods. It may be Pear, or Cherry, or even Apple. I’m guessing that most woodworkers that have chimed in are located in the United States, and… Read more »
Johan, The v-grooves in the ends of your logs are chainsaw marks. I’d say cherry also, based on the graining, and the colors you’re experiencing. Definitely a fruit or nut wood. It is NOT maple. Maple is very light. Maybe walnut or pecan, we need a bark expert to chime in. Cherry darkens over time, but starts out medium brown to dark brown with red hints. The really RED cherry that we see in the US is a stain used habitually by furniture manufacturers so that the public perception is that a species of wood looks that red, when it… Read more »
I’ve been out sanding the end grain and taken some new pictures. I put a math on the endgrain to help determine size. I’ve also read up on different woods types here on the database and managed to rule out some that I had suspected. I wish I could weigh the piece but I don’t have a scale nor a moisture meter. Conclusions so far: The wood is heavy although very dry. It has dense grain. It sands to a almost gloss finish, endgrain sands to gloss. Doessen’t smell. Has some wavy patterning and dark streaks. Colour is medium reddish… Read more »
Johan, color and bark, looks like cherry wood. The knot makes it prettier, but it looks like cherry…
Mark,
That second sample might be Sassafras, but the arrangement of the latewood pores in bands is more indicative of Elm than anything. Or it might be Hackberry, which has a similar pattern, and can have a mild scent too.
Johan,
Thank you for those excellent pictures and thorough description.
From your photobucket pictures, it appears to be a fruitwood (Rosaceae family). Based on your location, I think the most likely suspect would be Pear.
http://www.wood-database.com/pear/
It could also possibly be Wild Cherry.
http://www.wood-database.com/wild-cherry/
Perhaps someone that is familiar with the bark of these trees could help shed further light…
I found this 3″ x 9″ x 18″ piece of wood in a dumpster when i was collecting firewood. I would like to know what it is so that i can get more because this wood is absolutelly fantastic to work with! It sands to an almost shiny surface so there’s almost no open pores. It darkens quite a bit when I apply Liberon finishing oil, wich it soaks up fast, especially at the end grain. It’s quite heavy even though it’s been dried inside for over 2 years now. The sawdust has a orange colour and the cut surface… Read more »
Eric, I see what you mean. The pores are less packed on your example, which is an awesome high resolution scan.
Endgrain shot
One more request if I may.
Can someone confirm if this is sassafras wood. I salvaged this wood from an old dresser that looks like it was built in the 70-80s. I think its sassafras because it has a sweet smell when I cut it and the pores in the endgrain appear to match with your database example.
I asked about the weight to get a rough idea of how heavy the wood was — density really should not be used too precisely for ID’ing. The coefficient of variation for wood density is +/- 10%, and with the middle ground of 44 lbs/ft that you measured, it could be almost anything. Basically, all that’s known at this point is that it’s brown, and it’s of medium weight. :) I suppose you could *suspect* African Mahogany, but I really haven’t seen a sample with the densely-packed of pores on the endgrain before. If you look at the attached file,… Read more »
I think the weight just gave it away. I was thinking it was African Mahogany after looking through your database, but I think the weight just confirmed it, at least I hope. I had to find an online density calculator and put the measurements of a piece that measured 3″x38″x1.125″ with a weight of 3.23 lbs. The resulting calculation is 43.54 lbs/ft3. The wood to my knowledge has been stored for years in an old garage workshop in Houston which may be the cause of the smell, but it is certianly more prominate once I cleaned it up on the… Read more »
Mark, I don’t think it’s Mahogany — the pores on the endgrain seem to be too numerous and packed together, and the parencyhma appears too thick in relation to the pore diameter. Do you by chance know if the wood was collected locally, or if it was salvaged, or bought, or any other like details? Is the musty smell from possible mold or anything ON the wood, or is it when the wood is being worked — i.e., the wood ITSELF. Also, do you mean that the wood is still exuding sap? Lastly, knowing the approximate weight would help a… Read more »
Mark,
Mahogany
Here is a shot of the endgrain.
Fisrt of all great site!
I live in Texas and recently received some old wood from my wife’s grandfather. I am unsure as to the species, and aside from the attached pictures it has a musty smell and contains sap. Any help is greatly appreciated.
Hi Ted,
The table is very heavy and so are the chairs. Thanks for your comments I guess I will label it as ebony.
Benny- the bookend matched pieces around the moulding under the top may be rosewood, but the top itself looks like mahogany to me, without the cherry red stain most pieces have, mahogany is a middle brown color like what you have. Walnut doesn’t have the zig-zaggy stripes your piece shows in the 2nd photo bottom center & right. Mahogany does. Pieter – I can’t even guess from the photos you’ve posted. Neat little corner unit, looks like someone has used it hard from the dings on the top surface in the 2nd photo. Maybe a refinisher could tell you what… Read more »
@ Benny: I agree with your assessment of walnut. It’s still a very nice table, but stating that it’s Brazilian Rosewood seems a bit… optimistic?
I remember buying some wood (sight unseen) salvaged from a chair that was supposedly Brazilian Rosewood. It turned out to be Jatoba.