
by Eric Meier
1. Not enough sanding
In my very earliest days of woodworking, I used to think that sanding through all the different grits of sandpaper was for anal-retentive chumps. “Nonsense,” I thought, “I’ll just use some 60 grit to get out the larger defects, and then some 220 to smooth things out.” As it turned out, I was the chump.
Differing grits of sandpaper are meant to save you time, not waste it.
If you’re just starting out, and you’re put off by the apparent large price of all those different grits of sandpaper, I’d highly recommend buying a variety pack that has a few sheets of each grit included. Then you’ll realize, especially if you value your time, that getting the right sandpaper definitely isn’t too expensive: it’s well worth it.
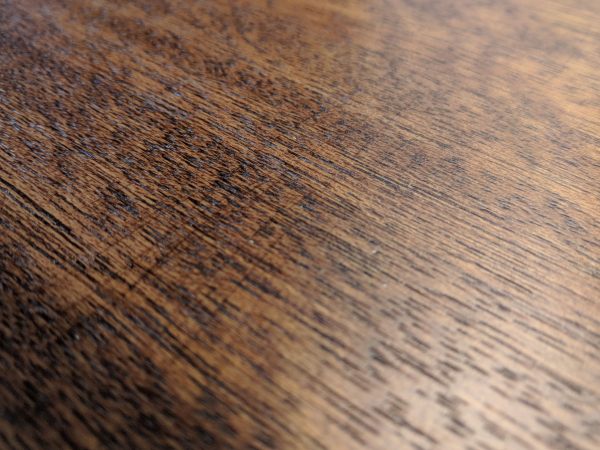
Basically, you are putting successively smaller and smaller scratches in the wood until, ultimately, the scratches become so small that they are “invisible” to the naked eye. So when you make coarse scratches in a wood surface—say, for instance, 60 or 80 grit—the fastest way to remove those scratches is with a medium grit: too large a grit (only slightly finer than the paper in your previous step), and you’ll be adding needless work; but too fine a grit, and you could sand for hours and still not remove the deep scratches.
Insufficient or poor sanding is a classic mistake common to a lot of beginning woodworkers. The wood is either given a quick, insufficient sanding; or else, if it is sanded to a finer grit, it is done haphazardly, and while skipping grits. The resulting surface my feel smooth to the touch, and may even look good from a distance with casual examination, but the proof is in the pudding, as they say.
Once a finish (and especially if a stain is applied) the sanding scratches will become all that much more noticeable and pronounced. You want to fix sanding mistakes before they’re embedded (and accented) under a few thousandths of an inch of pigments, dyes, and resins.
Learn how to inspect your sanding job between each grit
It’s not enough to just feel the wood or take a casual look and think “that’s probably good enough.” Sure, pros can sometimes get away with this lackadaisical approach because they have years of experience. But when you’re first starting out, anything that possibly can go wrong probably will go wrong: and nowhere is this more apparent than in the sanding.
Nothing’s worse than going through all the grits only to find that you still have some 60 grit scratches left in the wood from the very first step. To check, wipe all the sanding dust from the surface of the wood—I like to use a microfiber towel that can “grab” the dust right out of the pores and scratches of the wood. A can of compressed air or an air compressor can also blow the dust out, but it also creates a cloud of dust in the air. Once the dust is out, hold the piece up to a light (or bring a light to the work-piece if it’s something larger), and view the surface at a very low angle—almost parallel with the surface—to try and spot any serious/errant scratches.

Use alternating sanding techniques to find where (and at what grit) you’re having problems
While it’s not always the best (or most efficient) method in all circumstances, using varying sanding techniques can be invaluable if it seems like you’re running into repetitive sanding flaws in your work, and you’re just not sure where they’re coming from. For example you could sand the first grit by hand, parallel to the wood grain, and then the second grit could be with a random orbit sander, and so forth. Just take care that sanding directly perpendicular to the grain by hand puts some serious scratches in the wood that will be very hard to get out with a finer grit—a better solution would be to sand at a slight left-hand or right-hand angle from the grain, and not to cut directly across the grain.
The success in using this trick is rooted in the simple premise that you should hopefully know the direction and shape of the scratches that you’re putting in the wood. Sanding by hand with a stiff backing block? You should see deep, straight scratches. Sanding with random orbit sander? You should see little tiny circular squiggles all over the surface. Sanding with a pneumatic/rotary sander? You should see broad, circular/arc patterns in the wood. By changing the pattern with each successive step, you’ll be able to tell by the direction and shape of the scratches where you went wrong. When you finish sanding and find a flaw, you’ll be able to say something like this: “Okay, I see there’s still some swirl marks in the wood, which are 100 grit scratches made with my random orbit sander; I followed that up with some 180 grit hand sanding that apparently didn’t get all of the previous sandpaper’s scratches out. I need to spend more time at 180 grit to ensure I remove all the 100 grit scratches.”
2. Using incompatible products
Oily tropical hardwoods can cause a lot of problems; essentially, the finish seems to stay wet and tacky indefinitely. This is due to the antioxidants present in the heartwood, which prevent the finish from properly curing (through oxidation). This article explains the problem as well as possible solutions in more detail.
Even if you are using a finish-friendly wood species, you may still have trouble when using a combination of two or more products that are incompatible with each other. In short, oil and water don’t mix! Try to use finish products that all use the same base solvent. If you absolutely must use some specialty product somewhere in the finishing process, a good rule of thumb is to try to use shellac as a peacemaker between two incompatible coats. The adage goes “shellac sticks to everything, and everything sticks to shellac.”
Lastly, in rare instances, steel wool can cause problems when used under water based finishes. Namely, the tiny particles of steel will rust when in contact with water. (Use bronze wool instead.)
3. Not enough coats of finish
Most people are looking for the fastest, easiest wood finish. This is a perfectly understandable impulse, but if you’ve put all that work into a project, it makes sense to finish strong.
The temptation is to only apply one coat and call it good enough. However, the quality and protection of most film building finishes (such as polyurethane, lacquer, and shellac) goes up exponentially on the first few coats (e.g., there’s a huge improvement in durability and moisture excluding effectiveness from coat #1 to coat #2, and another big jump from coat #2 up to coat #3.) After maybe 3-4 coats, the benefits of increasing film thickness diminish somewhat. See this article on wood finishes for more info on what finishes work best in certain situations.
One last tip that will increase the clarity of your wood finishes: when building up wood finish film thickness, use a glossy finish. Even if you want your final sheen to be satin or low-gloss, I recommend using high gloss on the initial coats whenever possible. This is because most satin finishes contain a flattening agent that dulls the surface of the finish, and can appear cloudy when built up in several layers. Instead, simply rub out your final finish layer (see tip #4) or apply a satin or low-gloss finish as the final coat of your finish.
4. No rubbing out
Most of the time, when advocates of only using a single thin finish film complain that thicker finishes look “plasticky,” it is usually because the finish was slopped on in several thick, drippy, gobbledy-gook coats (polyurethane is chief in this trespass). I would agree, such finishes do look like cheap plastic, but that isn’t solely due to the number of coats of the finish, but simply that the number of errors, defects, and unevenness in each coat accumulated without correction until you are left with one thick, bumpy, coat of clear plastic.
Consider this: many guitars are finished with ten or more coats of spray lacquer. Most of us would not say that the mirror-polish on guitars is plasticky at all. What’s the difference? After all those coats, the guitar’s finish was sanded level and then rubbed out.
The art of rubbing out is perhaps too long to go into detail in an overview article like this. In a nutshell, a sufficiently thick film is applied to the wood surface and allowed to thoroughly harden over several weeks. Then, the finish is sanded flat and level (the thickness of the finish helps create a buffer so that the sandpaper will not actually cut through down to bare wood during this process).
Next, with a perfectly flat and uniform surface, the finish can be buffed up to whatever sheen is desired for the piece. (One additional mistake that can sometimes get overlooked is when no pore filler used, which means that on many porous woods, even with ten or more coats of finish, the pores still leave an uneven surface after leveling.)
For most beginning woodworkers, an easy way to get familiar with the process of rubbing out is to simply apply a few extra coats of wood finish to your project, and then sand it lightly with 400 grit sandpaper to remove all surface dust and irregularities. Then use #0000 very fine steel wool and rub the entire surface of the piece, this will leave a very pleasant and uniform satin finish that softly diffuses light.
Are you an aspiring wood nerd?
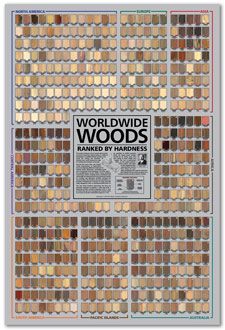 The poster, Worldwide Woods, Ranked by Hardness, should be required reading for anyone enrolled in the school of wood nerdery. I have amassed over 500 wood species on a single poster, arranged into eight major geographic regions, with each wood sorted and ranked according to its Janka hardness. Each wood has been meticulously documented and photographed, listed with its Janka hardness value (in lbf) and geographic and global hardness rankings. Consider this: the venerable Red Oak (Quercus rubra) sits at only #33 in North America and #278 worldwide for hardness! Aspiring wood nerds be advised: your syllabus may be calling for Worldwide Woods as part of your next assignment!
i can’t get the white stop marks fromthe different sanders .. my last grit was 120
hey there, is there a sealer I can use that will not discolor sanded birch, or smudge paint? (and isn’t flammable as that was making me nervous)
Hi Eric! I just installed new, unfinished red oak floors that I plan on staining. I used 36 grit, 60 grit, 80 grit and 100 grit. I can’t find 120 grit anywhere readily available and I’m on a time crunch. Is it ok to stain on 100 grit? I plan on ordering 120 grit for between the top coat layers but I don’t have time to wait for 120 grit for the raw wood. Thoughts? Also, should I use 120 grit between top layers or something finer? Thanks!!
Pics from last post
No matter how much I sand I still have areas that look stained or whiteish. I started with paint remover and then 120 grit on this table. There were tons of dark streaks. I experimented and experimented with different grits and then just gave up and went to a 40 grit. It got off almost everything, but there are still a million places that have dark steaks or spots and light streaks and spots. There are also a little black knots coming up that we’re not there before. My intention is to go to 60 80, 100, 120, 150, 180,… Read more »
Its hard to tell for sure from the pictures what I’m looking at exactly. Was the wood stained a very dark color previously? If so, it may be residual dye still in the wood. If not, it may just be natural coloration of the wood. I struggle to see the discoloration you are talking about. Also, have you tried wiping down the surface of the wood with a solvent like acetone or mineral spirits to see if it lifts the color?
Hi Eric
I have an oak table which I have sanded all the old finish off and then have oiled it. The top coat was put on thicker than the first 2 coats. My problem is that there are small patches all over that look as if there is no adhesion of the oil to the surface (see pic attached) I am at a loss as to what I can do to rectify this
What is the exact finish that you applied to this table? Is it fully hardened, just uneven?
Hi Eric
I used Polyvine wood oil. Yes it is fully hardened. The picture was taken 10 days after the final coat was applied.
The oil was recommended by Wood Finishes Direct as it has UV stabilisers in it and the table is in a sun room.
After reading the directions for that finish, it appears that it is meant to be applied by wiping on in a very thin coat. It’s my guess that your finish is not made to be applied in such a thick coating like you’ve done, probably lacks ingredients that would help level it out, and you’ve arrived at the position you’re now in. If it were me, I would try sanding back at least the majority of the finish and reapplying a proper film-building polyurethane finish.
OK thank you for that. I’ll give that a try
Hi Eric, great post thanks for sharing. I have my own predicament – after applying a stain that wasn’t fitting on our kitchen table I’m back at sanding it down. The idea was to repeat the process (orbital, hand 60-100-150-220) to get a nice smooth finish and replace the slate (which was basically blue) with more of a weathered grey. But, after the recent orbital job there are a few patches that almost look like I sanded “too deep?” The grain seems gone and before I get to hand sanding with the grain I’m wondering if there was maybe just… Read more »
It’s hard to tell from the pics, but if your suspicions are correct, that would be about the worst case scenario. If you’ve sanded through the face veneer, there’s really no way to salvage it — short of completely re-veneering the surface entirely. You may want to paint it instead.
Maybe this is a better quality image?
It’s hard to tell because I can’t get a sense of the depth of the dark spot. If the dark spot is indeed lower than the surrounding wood, then it is probably the glue line between the layers in the plywood. If it is a high spot, then it could be residual stain. High spots could simply be sanded out to match the surrounding wood. But if it’s a low spot, then sanding will only serve to expand the discoloration as more and more of the layer underneath is exposed.
Hi Eric, I am repainting my cabinet with gel stain as some of the paints has been peeling off, especially at the corners. I used RO to sand it and then hand sanded it again with 220 grits. I didn’t take away all the paint but the scratches mark still can be seen after 1st caot of gel stain. May I know if the top finish coat will hide the scratching marks? Or should I re-sand in between gel stain coat? If so, what grits sand paper will you recommend, dry or wet? Am I on the right track? Thanks… Read more »
Generally you can get an idea of what the top coat will do by wetting the surface of the wood temporarily with a solvent like mineral spirits. My guess is that it won’t hide the scratches.
It looks like you hand sanded against the grain, which is a no-no. The stain looks so dark, you might just be better off using a good primer to help with adhesion, and then painting it.
Hello, I am working on restoring an antique looking drop leaf table. I’ve got the top completely sanded down smooth as a baby’s bottom and don’t find any sanding marks. I felt like I had all the original top coat and stain sanded out, and feel good about the touch and smoothness of the wood, and am super happy with what grains are now showing through… however, when I got it down to what I thought was the bare wood and removed all the dust with a soft cloth, dark speckles appeared in about 2 minutes. It is so strange!… Read more »
It’s my guess that those spots are caused by oil or some other old finish that has remained uncured within the wood. (Some oils don’t really cure or polymerize over time.) You might try wiping down the entire wood surface with a rag or towel soaked in solvent that can pull up the residue. Naphtha seems like a good choice since its faster to evaropate, but you could used mineral spirits too, it just might take longer to evaporate. I’d expect it to take several wipings.
Hi I got a hand made bookshelf from guy on internet. It looked great but after a couple of days the smell/fumes from it were unbearable. He told me he used colron danish oil and it should dry soon. It still stank and gave me headaches for days and days to the point I put it in a spare room. After doing some research I decided to just sand it down and see if I could get down to the bare wood. I borrowed a detailing sander and went at it. I couldn’t get it all off but I was… Read more »
Sorry to hear about your bookshelf. I must admit, it looks like a big hassle to have to do all this stuff. Since the finish wasn’t even fully dried (cured) to begin with, I’m guessing that the sandpaper got gummed up and clogged with finish easier than usual. This can cause deeper scratches in the wood as the junk on the sandpaper digs into the wood. Also, you may want to consider going up to 180 grit. I highly recommend getting some high quality sandpaper and changing it often — look at the paper every so often as you sand.… Read more »
Thanks for your reply, I’m amazed you even exist ? So the 180 will take out the 80/120 swirls? Because they were made by build up on the paper I was using?
The biggest obstacle is simply understanding what the sanding marks are, and how they got there in the first place. If they are just regular 120 sanding swirls, then yes, 180 will take them out (that’s what it’s meant to do). But if the marks are from buildup on the paper, then it’s best to go back and resand with initial grit (such as 120) and ensure that you have all of the deeper swirls out first before progressing to higher grits.
I’m sorry, I may be being thick here, finer paper will take out the swirls from coarser paper? (barring the option that the swirls are from build up of oil on the paper). And I understand you are giving this information from your spare time and I really do appreciate your input, I’ve read do many articles and forums, my head is spinning
Swirls are just sanding marks, they’re normal. Progressively finer paper puts progressively finer swirls in the wood, until they become so small that they can no longer be seen.
Hi. I’m refinishing my tabletop and noticed after sanding there were these little bumps that I could feel if I ran my hand along with the wood. Some were higher than the wood, some were lower. How do I fix this? It’s invisible to the naked eye but I feel it when I touch the wood.
Can you post a closeup picture of this phenomenon? Not sure what you’re describing.
Hello, I might not have been too clear because I was emotional. I sanded down my hardwood floor, put stain on it and then gave it a coat of semi gloss poly. I noticed that their were bubbles in two spots and was told to sand it down with 220 grit. I did that but didn’t seem to work so tried 150 grit. I could still see the outline of the bubbles but through the internet the information said to poly over it and it will be gone. It wasn’t so I tried 220 again. no luck. Tried 150 and… Read more »
I don’t want to discourage you, but it honestly looks like a nightmare. Dark wood stain like this is very hard to match or repair, and something this dark, and this exposed has got to be a challenge. Are you using an upright floor sander? (That’s what it appears in the photos.) The problem is that there is a feathered edge going from 100% thickness of finish down to 0% finish, and then even deeper to below wood surface — removing the stain. Almost picture a very shallow ramp, only the ramp is transparent wood finish sitting on top of… Read more »
Thank you for replying. I appreciate it. Can you elaborate on how to sand like a cliff apposed to a ramp? Thanks, Cathy
Basically you should just begin to see the resanding process on a per-board basis rather than a general area of the floor. So if you look at your floor boards, determine which pieces will need to be refinished, and sand the entire piece end to end and then stain it. You may need masking tape to prevent accidental sanding of the surrounding area.
Thank you I assume I should try this with a 36 grit sandpaper correct?
After trying with a 36 grit sandpaper I am still finding that the wood is smooth. Could I be over sanding? How do I correct that? I realize I am asking so many questions but I have to find answers to this. Thank you so much.
I don’t know what to say. I don’t think there’s any possible way that a wood surface could be called “smooth” after sanding with 36 grit sandpaper, it is very coarse. Either the sandpaper is not actually 36 grit, or our definitions of “smooth” are very different.
Hello I am having trouble with doing my floors. I had bubbles on my floor and tried to correct them by sanding them down. I tried first with 220 grit but I couldn’t get the stain to take to the floor. Then I tried 150 grit but that wouldn’t work as well. Lastly I tried 60 grit and I still can’t get the stain to take. As you can see I have this bare floor amidst my stained one. Should I still try 36 grit sandpaper or what? I am so upset because this took so much time and energy… Read more »
Please include pictures. Also, are you hand sanding, or using a machine?
I am sanding at this point with an small rectangle orbital sander. It takes 1/3 sheet paper. I originally sanded the floor with a drum sander going from 36 grit on up.Then I stained it and put polyurethane on it. Also could stripper help at this point? I just want to cry.
Hi Eric – thank you for this great info. I’m sanding & refinishing the kitchen floor – I thought I had minimized some small black water stains next to the dishwasher but with the first coat of oil-based poly, they look pretty bad. Would this be too crazy – sparingly apply some of my kid’s artist oil paints before the next coat? I’m not finding anything on this on the internet. It would be a few scattered square centimeters. I’m inclined to try and, if it’s bad, just sand it off. Thanks! Jul
I guess that’s an unusual technique. I think you might try testing on a scrap or something else first to see if you have an significant issues with adhesion.
I did it – it worked. Non-artist myself, I was able to mix a good color & apply. The paint is opaque so it easily covers the ugly black stains. Adhesion is fine!
Hello. I originally had this table sanded down to the laminent perfectly. I applied black gel stain, many coats, then my 50-50 polyurethane many coats. I just want happy with how it was turning out so I sanded it down almost to the original laminent. I left some of the original black gel stain on as I read that was no big deal. I thought I got all the swirlies, but after my first coat of gel stain I can see the light swirlies when I look at the table in different angles. Should I sand this coat back off… Read more »
The darker the stain, the more difficult and unforgiving things will be. I would recommend re-sanding. Try to use quality, brand-name sandpaper and change sheets often to avoid clogging. The few extra bucks worth of good sandpaper is practically worth its weight in gold when it comes to saving time.
Thank you. I did end up re-sanding. I can still see swirlies, now in the laminent. I am so frustrated. I don’t remember having this issue at all my first go around. Thank you for the advice. I might go at it one more time before giving up.
Hello, Currently I am working on my longboard and I plan to paint it once I’m done sanding. I did hand sanding at first, then used a belt sander that resulted in deep scratched because I didn’t know what i was doing but then I used a vibro sander going from 100 to 220. After the 220 I put a piece of 800 on the vibro sander and thought I’d go ham and finish it off before I primed the wood but it seemed that the 800 was scratching my board? I had to stop for the day and then… Read more »
The texture comes when you get the wood wet with water, as it raises the grain. (Oil found in wood finishes doesn’t do this.) I would say, put away the belt sander, and try sand with the 100 grit sandpaper you have until the deepest scratches are gone. The only thing I can think of is that the 800 grit sandpaper got clogged and gummed up and that’s what was scratching your piece. You need to make sure you are using fresh sandpaper. 220 grit is more than adequate for preparing for painting, definitely no need for 800.
Hello – I’m in the process of sanding polyurethane off a walnut table, then I plan on reapplying two coats of really good polyurethane. I hand sanded with 80-120-180-220. With magnifying glasses, I can sanding light sanding scratches, but I think that’s a byproduct of any sanding no matter what coarse sandpaper is used. You can see from the pics that there are some lighter lines going against the grain (I think) — I may have created those when sanding against the grain when using 80 coarse. Also, I see areas of a lighter haze like there’s a film on… Read more »
Ray, wow, I can’t imagine hand sanding through polyurethane on a table of that size! I would recommend using a chemical stripper on the finish first (even eco-friendly ones like citri-strip should work). It’s my guess that you have still not sanded through the polyurethane yet, and those lighter-colored strips that you see (if I am looking at the same thing in the pic that you are seeing) are the few areas where you are starting to break through the finish and getting to bare wood. Polyurethane is a very resistance and resilient finish that’s tough to sand away. Perhaps… Read more »
Hi -I am currently refinishing an oak table. I stripped the finish and sanded for a long time to remove several words scratched into it. I applied one coat of minwax stain and it looks like a few areas of the wood look grey? I can’t figure out why or how to fix it. Do you have any ideas?
Weird, not sure what that is. Maybe try sanding it down to raw wood, and the wetting the top with mineral spirits and see what the wood looks like. Need to rule out some sort of chemical reaction or wood was/is possibly weathered and discolored?
Hello!
Thanks for your informative article! I am refinishing an oak table. I used a paint stripper and then sanded through all of the grits. After applying stain, it all looked beautiful except a white ring showed up. The article says it is most likely that I did not get down to the wood but since the table is solid wood, I sanded the heck out of every inch of it. Can you please advise! I do not want to do anything else until I can resolve this issue. Thanks in advance!
Do you have a picture of the white ring? It’s hard to know for sure where it came from or how to remedy it without seeing it first.
Hi! Thanks so much for your article. It is very helpful! I need some advice. I am a beginner and am trying to finish an unfinished solid pine dresser. I stained the drawers with a dark oil based stain, then sanded with 220 grit sandpaper with a palm sander to prepare for applying polyurethane. After sanding, I noticed some light scratches where I accidentally sanded against the grain so I have not applied poly yet. I am not sure how to fix this? Should I try to sand those scratches out or try to apply another coat of stain? Also,… Read more »
I hate to say it, but with a dark stain, you will probably have to sand it all down and start completely over on that surface. Wood stains are very unforgiving, and they are even moreso on softwoods like pine!
I am finishing new doors and finally got the stain to the desired color. Then I noticed that from turning them over, I lightly scratched the doors (they are solid core and heavy) from the top of one set of sawhorses. There are scratches on both sides. One scratch is almost completely horizontal and would be at eye level. What do your suggest? I’m hoping I don’t need to sand and start over as it took lots of tweaking to get the stain right. Thanks for any advice.
Depends on how deep the scratches are and how dark the stain. If the scratches are deep and the color dark, you’ll probably have to resand the entire panel, though you should be extremely careful on a door that is possibly veneered to not sand through the face veneer. (If that’s the case, it may not be worth the risk.) If the stain is a very light color, and the scratches are light, you could try to gingerly sand out the scratches with something like 220 grit paper and see if you can’t blend the stain in with the existing… Read more »
What a Great article! Thanks for your expertise. In an effort to get ready for homeschooling I thought I would refinish the table for my boys. Are used an orbital sander with 80 grit. Since it was my first time I didn’t realize I was going against the grain in certain spots. Now the error is painfully obvious :(. I noticed the patches and went back over them with 60 then 80 then 120 and thought the stain would cover them. Beginners mistake I guess. Now I’m wondering how to fix this? Orbital again with 60? It’s a labor of… Read more »
It appears that those staining blotches are actually areas where you have not sanded enough to get to bare wood. It may seem like bare wood, but the fact that they are remaining light colored and not absorbing the stain indicates that there is still residual finish from the original construction in those areas. Start with a coarse grit until the table looks uniform. An orbital sander always goes against the grain–that’s what makes it so effective at sanding. You just need to sand to a high enough grit that the sanding marks can’t be seen anymore. Stain almost never… Read more »
I have a new kitchen pedestal table of which I’m not exactly sure of the type of wood. Company is telling me that it is mango. It has a rustic look with what seem to be imperfections, which is why I liked it. A hot potato in tin foil from the grill slipped of a plate and landed on the table. It was immediately removed but has left a type of burn mark that was not darker as you would expect from a burn, but just a little lighter than the rest of the table. I now believe I made… Read more »
Assuming you have not sanded all the way through the finish layer to bare wood, you may be able to polish the area back up to match the surrounding area. The color of course will still be different, and would be very tricky to try to repair without refinishing the entire tabletop. What’s at issue here is the level of sheen in the finish, satin or semi-gloss for the table, and matte for the spot. A simple starting point could be to try a small amount of scratch remover for car scratches on the spot. (Car clear coats have a… Read more »
Thanks very much. We agree with the “sheen” being the problem. We’re going to try to polish the area, and if we still feel that more could help, we will try the scratch remover for cars to hopefully raise the sheen.
Thanks again,
Paula Thomas
I’m sanding this chest that has been in my family for about 30 years. It’s never been sanded or stained. I’m trying to sand it bcuz of course there is wear and tear etc. But my sander is making these lines. How can I avoid this and also fix this??? Pic attached
Straight line sanding scratches are generally made by a belt sander. Are you using a belt sander?
No I’m using square kind
Either those straight lines are from hand sanding, or your sander is only sanding in a straight line. Just to be clear, you are talking about the deep scratches going from left to right in the middle of your picture, correct?
No I’m talking about the light colored lines going up and down
That appears to be natural figure in the grain of the wood, which is being brought out and clarified by sanding to a higher grit. You can verify this by applying a bit of solvent to the wood surface (such as mineral spirits, denatured alcohol, or acetone) to get a bit of a preview of what the piece will look like when finished. Chances are those light colored lines are just different grain patterns, which is a good thing. (An extremely example of figure is curly maple.) https://www.wood-database.com/curly-maple/
Thanks so much for the info. One more quick question. I was thinking about what u said about my sander not sanding in a straight line. Do u think those lines could be because the wood is not flat??? When I run my hand across the wood I can feel like ripples. I know the chest has been exposed to moisture/humidity.
Are you sure you are feeling literal differences in depth? It’s my guess that you are just feeling subtle differences in grain direction caused by the figure in the woods grain. It the wood surface is truly rippled and not flat, you will have to continue sanding until it is flat.
I’m refinishing a table for a client. I wouldn’t consider myself a beginner, but I’m no expert either. I have had to start this table over three different times because of how it looks after I apply stain. I go through multiple grits with my orbital sander and inspect the top pretty thoroughly before I stain. There are horrible swirls and scratches every time. I’m not sure what else I can try! Any advice?
If you are describing the marks left behind as “horrible” then I would guess that they are occurring at the lowest, first grits used. It could also be that the sandpaper is getting clogged and leaving deeper than usual scratches which can be harder to sand out with subsequent grits. But foundational to all this is the ability to adequately check one’s progress in sanding. If you are inspecting the top and not seeing the scratches, then it’s more than likely just a problem with technique. Scratches can be very hard to detect, particularly in lighter colored woods. But as… Read more »
I am a first time user of stain. I sanded my table and chairs – going through all the grits until smooth. I stained them last night and on one chair, there are very visible scratch marks going across the grain, which I didn’t notice before staining. Can I sand out only the part with the scratches, or will the stain not blend well? My stain also went on a little splotchy despite using a pre-stain conditioner on the wood. Can you advise? Thank you.
Did you use a fairly dark stain? The darker it is, the harder it will be to blend it in. But in general, stain will get slightly darker with multiple applications, so you could have areas of color unevenness if you don’t sand out the entire surface. My advice is to get an electric sander and not do hand sanding if at all possible. Even a cheap quarter sheet electric sander will do a much better job than hand sanding, especially for a beginner.
Yes, it’s fairly dark. I will re-sand and redo the chair. Thank you. I appreciate the info.
Hi, I have just sanded back on old dining table. It is made from fruitwood, probably mango, and has not been taken bare of. Left outside, has water damage and it a bit warped at the one end. I sanded it back, and noticed all these small black flecks in wood. I did not mind.But when I treated the table with Danish Oil afterwards all the flecks stood out and large black areas of black became dominant. Is there a way to remove the black patches and flecks or do I just stain it dark? I have attached photos. I… Read more »
Your pics did not come through. Please include pictures for best advice.
I had my benchtop stained to where i wanted it. I applied the first two coats of satin clearcoat, with at least two hours dry time in between coat one and two. Dried it overnight. I sanded it back lightly with 360 grit and areas have become cloudy. I wiped it down to remove the dust but it’s still cloudy in a few areas. What can i do?
Hello, I am sanding a table to prepare it for going outside. I read some articles about if you go to 220 the wood will not take the stain as well. If I’ve already done 220, do I just have to use more stain? This is my first project and I really don’t want to paint the table because it is a beautiful wood table.
Hi I gel stained my table and added a second coat which went fine. I lightly sanded with 400 sandpaper and i see the sanding lines. will they fill in with clear coat
Try wetting the table down with a wipe of mineral spirits to get an idea of what a finish might look on top.
After stripping and sanding this top on a buffet I was getting fuzzies on the one end. I tried to sand some more, but seemed to get worse, so I stopped. I went ahead with the stain and this is the end result. How can I fix this? I can remove the stain with paint thinner, but then how do I deal with the fuzzies?
What grit sandpaper were you sanding with? Generally I’d say to just sand to a higher grit.
When doing final finishing on a french polished (shellac) piece, the current grit of sandpaper – in this case 3200 micro mesh does not remove the previous sanding 2400 grit marks. Same at lower grits aka 2400 does not remove 1800 etc. If I go all the way down to 400 & work up to 12k in increments of about 4k it only unveils much lower grits still hiding out.
Would you suspect the finish isn’t yet set….or just too thin…or…? Thanks
More than likely, I would say either your sandpaper is dull or clogged, or you are just not sanding enough. One trick is to alternate sanding directions to help be sure what exact grit you are having trouble with. Also look very closely after each grit to see if there are residual sanding scratches from the previous grit still hiding out (which is easier to see when alternating directions for learning purposes). You need to continue sanding with current grit until all previous grits’ scratches are gone.
Thank you for your suggestions! I carefully clean the micro mesh as I go and clean between grits with a small bristle brush & soap water then water spritz. I’ve noticed on successful pieces it does not clog as much. I also tried a brand new set of micro mesh. I thought the shellac might be too soft but it has aged for 6 weeks. I sand each grit 90 degrees from the previous & check under low angle very strong halogen + LED light & cannot see lower level scratches until I am all the way to the top… Read more »
Are you set sanding? It is almost impossible to see sanding scratches on a wet surface. Depending on the size of the object your are sanding, different things might work. For me, small to medium projects I use Menzerna solid buffing compound on a cotton buffing wheel. I believe this is a very popular method for buffing out guitars as well — they seem to have the wood finishing process worked down to a science.
Yes I’m wet sanding but then thoroughly drying with soft cotton cloth pre ‘scratch inspection’. I see the same issue between different grades of Menzerna when buffing. Weird. I’m thinking the finish is just too soft. Thanks again for your article & pointers.
I am building a small bench with some pieces of walnut that have amazing grainage. However when I was sanding it, I think I went a bit too far because the grain is starting to disappear in some spots where I really went over it with 220 grit on an orbital sander and got it very smooth. If I go back over those spots with say a 100 grit sand paper is it possible to bring the grain back out by roughing it up? Or is it too late? Will that do more damage than good?
I have honestly never heard of wood grain disappearing with sanding alone. Are you using a wood stain as well? Do you have any pictures?
I am making a corner desk and got carried away with sanding thinking that the smoother the better before staining. I sanded it all the way up to 400 grit. After doing so i realized im supposed to stop at 220. I did a test spot to see how it will dry. I’m concerned it won’t get dark enough. Can i go back over it with 180 or 220 to try to rough it up or am i at the point of no return? Also if the test spot is lighter than desired will a second coat darken it?
A second coat will usually darken it, and would be my preferred method instead of resanding. Best rule of thumb for all sanding and wood finishing is to test on a scrap piece or in an inconspicuous area.
Sorry here is photo in another format PNG
I am resending the issue verbiage as i think my company had blocked the original posting. i used an orbital sander with 220 grit and there are scuffs and swirl marks all over the table. i am afraid to do it again with something coarser. Please let me know if it needs to be sanded more or what might be the problem.
Are you sure you used 220 grit sandpaper? Also, did the sandpaper gum up with finish? Sometimes sandpaper can become clogged and leave larger scratches, but generally you shouldn’t have much visible scratches with an orbital sander at 220 grit.
Yes, the orbital sander came with 3of the 220. There was a lot of varnish on it so maybe the sand paper became clogged. Do you think i should keep going over it, or so something manually?
I would use a chemical stripper to get most of the finish off, then wipe it down thoroughly with a solvent like mineral spirits, and then sand it with the 220. Check the sandpaper every few couple minutes or so, if you can see gunk built up on the sandpaper, it’s time to replace it.
Hello, I’m sanding this wine barrel and began noticing these little scuffmarks. I’m not sure how I’m getting them and it seems like they are coming from my sanding. I’ve used a 80 grit sandpaper with a belt sander to remove stain and clean up. Now I’m using a 220 grit on an orbital sander to smooth and finish prior to applying stain. I’m afraid to move forward in that these marks will show more after I stain and make it look very amateurish.
There’s no picture with your post, so I can’t visualize what you’re describing. I’m going to assume though that they’re from the belt sander, which are, in general, VERY aggressive tools in the world of sanding, so it wouldn’t surprise me if that’s the culprit. They really require very good technique to use well, so you might be better off starting back with some very coarse grit sandpaper in a random orbit sander instead, and working through the grits with that instead.
i have table and its top has rotten, i used an oscillating tool to scrape the top off and have since sanded up to 240. the issue is that in the removal of the top pieces some bits of whats below has come up. so there are cuts and splits and gashes (the splinter and crack when using the oscillating sander) so the surface is some, except for this damage to the wood. how do i sand these marks? i dont care that it looks bad, its a work table. but if i can’t get these edges smooth it wont… Read more »
I wouldn’t sand by hand. I’m guessing you have limited tools available. You might try using a random orbit electric sander with very coarse grit sandpaper (40-60 grit to start with).
I stripped this wood desk and now have these small blotches I cant get rid of. Can someone please help me identify this problem and remove the blotches before staining.
It looks like residual stain that’s still in the pores and other crevices of the wood. More than likely, you’ll have to do some significant sanding to get down to clean wood.
Hi – I have spent such a long time on this project and am super disappointed that I ruined it in this near last step. The table top had a couple spots that were taking the stain less than others. I should have left it as is, but figured I’d come this far, I should tweak it so I’m hAppy with it (famous last words…). I had some spots on my chairs that were not taking the stain AT ALL. I finally went with 60,80,120,150,220 on those spots and the stain went on fine. I decided to do that on… Read more »
It looks like it has been improperly sanded, and the stain has simply compounded the problem and made it that much more noticeable. I am guessing you were hand sanding this? My recommendation is to either buy or ask around and borrow from a friend — you need a random orbit sander. On a big flat surface like this the sanding process will go so quickly and painlessly with an orbital sander. Work your way through the grits with a RO sander, trying to get down to bare wood on the coarse first grit as best you can, and sand… Read more »
I have a problem with a the walnut buffet I just sanded some oily or water spots off the surface today with 400 sandpaper and then applied an oil finish to soak in. Tonight after I wiped the excess the sanded areas look dull. Should I use a fine steel wool to bring back the depth and make it even with the unsanded parts?
Hello,
I am a teak furniture re-finisher. I have encountered a problem working with afromosia (African teak) which is tropical. After sanding, the wood “sweats” a lot and continue sweating after an oil based product is applied, like a Danish oil. Is there a way to seal the wood to prevent this problem. Your opinion is much appreciated.
My landlord recently redid my hardwood
Floors and they came out looking awful as though someone painted them with dark brown oil paint. Can this fixed or do I need to start over ?
I am staining our kitchen cabinets which were made by a cabinet maker. I sanded (quickly, not thoroughly), by hand with 180 before applying seal coat and then stain. Now, I see what looks like curly hairs on the wood, everywhere. Did the seal coat raise the grain, or did the cabinet maker leave these tiny swirly marks with his pneumatic sander? They were supposedly ready to stain when he finished. I don’t know how to identify the problem so I can move forward. Thanks for suggestions.
Raising the grain generally just results in a more textured and slightly rough surface. If the “curly hairs” that you describe take up stain and become darker than the surrounding wood, they’re almost certainly what are sometimes known as “sander swirl marks” — if they are curly-q shaped and fairly small, they are always introduced by machine sanding (since human hands can only sand in broader strokes). If you have a closeup picture that might bring more clarity though.
Help needed! There was a 2 part epoxy on this door frame (west systems) that started to fail. Customer asked me to sand it off and use a different product (awl wood). I sanded with a range of grits with a dewalt orbital sander (60, 80 & 150), but as soon as the epoxy came off, the wood started to discolor/burn (walnut). I showed the customer and he said it should be fine, so I completed sanding. After putting the primer coat on (awl wood clear), it seemed to make the darker/burnt parts even darker giving an unwanted contrast. Can… Read more »
Here is a photo.
I power washed my ipe deck to prepare for staining (also washed and brightened it) but it is now splintery. I hope I have not damaged the wood and can smooth it with sanding. I am a novice. What type of sander should I use? The deck is 11 x 14.
Thank you!
Ouch, those look like pretty deep splinters, I doubt if sanding would be able to remove something that deep. The only thing I can think of would be to slather a whole lot of finish on the wood in hopes of containing and solidifying the splinters so that they don’t get pulled up so easily.
One alternative would be to get some “thin CA glue” (aka “super glue” but much thinner) and wick it under the splinters and then rig up something (maybe waxed paper and a weight on top) and glue the splinters back down.
You should try a wood harder product which will penetrate and splinter stems. Then sand down.
Viewing the surface of a piece at a low angle is a beautifully useful and highly effective tip -you can find some real hidden flaws that way. Thanks for the great article!
After applying one coat of stain on a door, I sanded with 220 grit and the sandpaper immediately had residue on it. I can scratch it off with my fingernail and it comes off as a fine powder. What am I doing wrong? The doors were purchased in 2010, could that be a problem
Hi I’m Patrick I read some info on your blog and said I got to contact you for some type of advice. I started a project sanded the floors with a drum sander. Didn’t go crazy with it but on the 2 bedrooms hallway and living room have theses lines in the sanded floor. I did’t see them before I started sanding but I wasn’t looking that hard either. Keep in mind I didn’t use a buff sander. The drum sander went forward and backwards no turning. My guess the wheel on the machine was bad and left the marks.… Read more »
I just put on my stain and a spit coat of shellac in prep for the final finish on my table and noticed swirl marks in my wood after using a random orbital sander. Is there any trick in removing them or at least making them less noticeable without re-sanding and staining? Thanks.
Best to just resand it down. But if that is absolutely out of the question, the only thing I know of that might help would be to finish with a matte or satin finish that would help obscure the fine details a little bit better than glossy.
I have a palm sander and it leave curly que marks..Am I pressing too hard? Is there a direction the the palm sanders moves IE back and forth or side to side?
This is the natural movement of the sander. Generally, if you can see the little squiggles left in the wood, that simply means that the grit that you are sanding with is too low (coarse). I would say you’d need to go above about 120 grit to not see the sanding marks anymore.
Also, you shouldn’t really use much pressure at all on the sander, and just let the sandpaper do the work — though this generally doesn’t have too much bearing on sanding marks being more or less visible on the workpiece.