
by Eric Meier
1. Not enough sanding
In my very earliest days of woodworking, I used to think that sanding through all the different grits of sandpaper was for anal-retentive chumps. “Nonsense,” I thought, “I’ll just use some 60 grit to get out the larger defects, and then some 220 to smooth things out.” As it turned out, I was the chump.
Differing grits of sandpaper are meant to save you time, not waste it.
If you’re just starting out, and you’re put off by the apparent large price of all those different grits of sandpaper, I’d highly recommend buying a variety pack that has a few sheets of each grit included. Then you’ll realize, especially if you value your time, that getting the right sandpaper definitely isn’t too expensive: it’s well worth it.
Basically, you are putting successively smaller and smaller scratches in the wood until, ultimately, the scratches become so small that they are “invisible” to the naked eye. So when you make coarse scratches in a wood surface—say, for instance, 60 or 80 grit—the fastest way to remove those scratches is with a medium grit: too large a grit (only slightly finer than the paper in your previous step), and you’ll be adding needless work; but too fine a grit, and you could sand for hours and still not remove the deep scratches.
Insufficient or poor sanding is a classic mistake common to a lot of beginning woodworkers. The wood is either given a quick, insufficient sanding; or else, if it is sanded to a finer grit, it is done haphazardly, and while skipping grits. The resulting surface my feel smooth to the touch, and may even look good from a distance with casual examination, but the proof is in the pudding, as they say.
Once a finish (and especially if a stain is applied) the sanding scratches will become all that much more noticeable and pronounced. You want to fix sanding mistakes before they’re embedded (and accented) under a few thousandths of an inch of pigments, dyes, and resins.
Learn how to inspect your sanding job between each grit
It’s not enough to just feel the wood or take a casual look and think “that’s probably good enough.” Sure, pros can sometimes get away with this lackadaisical approach because they have years of experience. But when you’re first starting out, anything that possibly can go wrong probably will go wrong: and nowhere is this more apparent than in the sanding.
Nothing’s worse than going through all the grits only to find that you still have some 60 grit scratches left in the wood from the very first step. To check, wipe all the sanding dust from the surface of the wood—I like to use a microfiber towel that can “grab” the dust right out of the pores and scratches of the wood. A can of compressed air or an air compressor can also blow the dust out, but it also creates a cloud of dust in the air. Once the dust is out, hold the piece up to a light (or bring a light to the work-piece if it’s something larger), and view the surface at a very low angle—almost parallel with the surface—to try and spot any serious/errant scratches.

Use alternating sanding techniques to find where (and at what grit) you’re having problems
While it’s not always the best (or most efficient) method in all circumstances, using varying sanding techniques can be invaluable if it seems like you’re running into repetitive sanding flaws in your work, and you’re just not sure where they’re coming from. For example you could sand the first grit by hand, parallel to the wood grain, and then the second grit could be with a random orbit sander, and so forth. Just take care that sanding directly perpendicular to the grain by hand puts some serious scratches in the wood that will be very hard to get out with a finer grit—a better solution would be to sand at a slight left-hand or right-hand angle from the grain, and not to cut directly across the grain.
The success in using this trick is rooted in the simple premise that you should hopefully know the direction and shape of the scratches that you’re putting in the wood. Sanding by hand with a stiff backing block? You should see deep, straight scratches. Sanding with random orbit sander? You should see little tiny circular squiggles all over the surface. Sanding with a pneumatic/rotary sander? You should see broad, circular/arc patterns in the wood. By changing the pattern with each successive step, you’ll be able to tell by the direction and shape of the scratches where you went wrong. When you finish sanding and find a flaw, you’ll be able to say something like this: “Okay, I see there’s still some swirl marks in the wood, which are 100 grit scratches made with my random orbit sander; I followed that up with some 180 grit hand sanding that apparently didn’t get all of the previous sandpaper’s scratches out. I need to spend more time at 180 grit to ensure I remove all the 100 grit scratches.”
2. Using incompatible products
Oily tropical hardwoods can cause a lot of problems; essentially, the finish seems to stay wet and tacky indefinitely. This is due to the antioxidants present in the heartwood, which prevent the finish from properly curing (through oxidation). This article explains the problem as well as possible solutions in more detail.
Even if you are using a finish-friendly wood species, you may still have trouble when using a combination of two or more products that are incompatible with each other. In short, oil and water don’t mix! Try to use finish products that all use the same base solvent. If you absolutely must use some specialty product somewhere in the finishing process, a good rule of thumb is to try to use shellac as a peacemaker between two incompatible coats. The adage goes “shellac sticks to everything, and everything sticks to shellac.”
Lastly, in rare instances, steel wool can cause problems when used under water based finishes. Namely, the tiny particles of steel will rust when in contact with water. (Use bronze wool instead.)
3. Not enough coats of finish
Most people are looking for the fastest, easiest wood finish. This is a perfectly understandable impulse, but if you’ve put all that work into a project, it makes sense to finish strong.
The temptation is to only apply one coat and call it good enough. However, the quality and protection of most film building finishes (such as polyurethane, lacquer, and shellac) goes up exponentially on the first few coats (e.g., there’s a huge improvement in durability and moisture excluding effectiveness from coat #1 to coat #2, and another big jump from coat #2 up to coat #3.) After maybe 3-4 coats, the benefits of increasing film thickness diminish somewhat. See this article on wood finishes for more info on what finishes work best in certain situations.
One last tip that will increase the clarity of your wood finishes: when building up wood finish film thickness, use a glossy finish. Even if you want your final sheen to be satin or low-gloss, I recommend using high gloss on the initial coats whenever possible. This is because most satin finishes contain a flattening agent that dulls the surface of the finish, and can appear cloudy when built up in several layers. Instead, simply rub out your final finish layer (see tip #4) or apply a satin or low-gloss finish as the final coat of your finish.
4. No rubbing out
Most of the time, when advocates of only using a single thin finish film complain that thicker finishes look “plasticky,” it is usually because the finish was slopped on in several thick, drippy, gobbledy-gook coats (polyurethane is chief in this trespass). I would agree, such finishes do look like cheap plastic, but that isn’t solely due to the number of coats of the finish, but simply that the number of errors, defects, and unevenness in each coat accumulated without correction until you are left with one thick, bumpy, coat of clear plastic.
Consider this: many guitars are finished with ten or more coats of spray lacquer. Most of us would not say that the mirror-polish on guitars is plasticky at all. What’s the difference? After all those coats, the guitar’s finish was sanded level and then rubbed out.
The art of rubbing out is perhaps too long to go into detail in an overview article like this. In a nutshell, a sufficiently thick film is applied to the wood surface and allowed to thoroughly harden over several weeks. Then, the finish is sanded flat and level (the thickness of the finish helps create a buffer so that the sandpaper will not actually cut through down to bare wood during this process).
Next, with a perfectly flat and uniform surface, the finish can be buffed up to whatever sheen is desired for the piece. (One additional mistake that can sometimes get overlooked is when no pore filler used, which means that on many porous woods, even with ten or more coats of finish, the pores still leave an uneven surface after leveling.)
For most beginning woodworkers, an easy way to get familiar with the process of rubbing out is to simply apply a few extra coats of wood finish to your project, and then sand it lightly with 400 grit sandpaper to remove all surface dust and irregularities. Then use #0000 very fine steel wool and rub the entire surface of the piece, this will leave a very pleasant and uniform satin finish that softly diffuses light.
Are you an aspiring wood nerd?
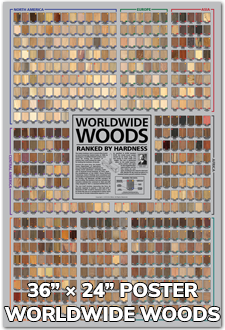
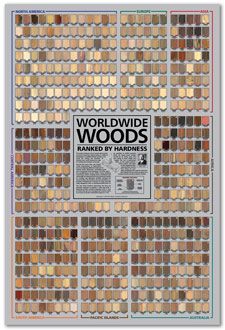 The poster, Worldwide Woods, Ranked by Hardness, should be required reading for anyone enrolled in the school of wood nerdery. I have amassed over 500 wood species on a single poster, arranged into eight major geographic regions, with each wood sorted and ranked according to its Janka hardness. Each wood has been meticulously documented and photographed, listed with its Janka hardness value (in lbf) and geographic and global hardness rankings. Consider this: the venerable Red Oak (Quercus rubra) sits at only #33 in North America and #278 worldwide for hardness! Aspiring wood nerds be advised: your syllabus may be calling for Worldwide Woods as part of your next assignment!
HI Eric.
I used Citristrip on a pine wood closet doors so that I could re-stain the a different color. However, after scrapping the stripper with a meal scrapper the pine turned black. Can the original color be restored? I’m afraid I will make it worse with sanding or bleaching.
you could try oxalic acid which restores the original natural colour of wood and takes out water staining.
a mild amount of Oxalic acid is in barkeepers friend, which i’ve used on small projects
Hi Eric
I have an old G Plan dining table. In teak I think?! I have sanded down a few times now as it was very dark initially. Last year when sanding and then applying a varnish it dried tacky. I have finally gotten back round to sanding down again. What should I apply to the top as I’m guessing I need something on there? Thanks in advance for any advice!
See the tips in this article: https://www.wood-database.com/finishing-exotic-tropical-hardwoods/
Hi Eric,
I have an antique table that I am refinishing. The table was heavily used, but the two leaves were not. I stripped the wood, then I did my initial sanding, but the leaves look like a very different color. If I sand with a finer grit, then condition before staining, will it look more uniform? I’m afraid to do all that work and have it still look so different. I am considering painting it instead. What do you think?
I’d guessing the table is either birch or maple, and the color difference is due to the patina that developed on the rest of the table as it was continually exposed to light, while the leaves were protected and didn’t develop a patina.
Depending on if the wood is solid or veneer, you might be able to get things to match. Only if it is solid wood, you could try sanding through the top layer of patina (or see how long it might take to do so) until you get to fresh wood.
Hello Eric! Thank you for this very helpful article!! I’m trying to learn to identify different markings on vintage/antique furniture pieces, as well as how to repair them. I have a 1920s octagonal table with a quartered burl wood veneer top. Looking from a distance one can see water stains, but up close you can see many short, very narrow “slits” in the wood. Is that considered “checking” or something else? And is it beyond repair? thank you for reading!
Looks like walnut burl, and yes, that looks like checking to me, possibly caused if the wood has been exposed to extremely hot/dry conditions. A lot is a matter of preference, but for most woodworkers, burl figure in particular is more prone to checking and so there’s a lot more leeway given in what is considered acceptable. Personally, I don’t see any problem with this wood. You could just fill the voids with a pore filler and refinish it as usual.
Hello Eric, great article and I’ve gotten a lot out of reading through these comments as well. I just finished my first restore project. It was a record player that belonged to my wife’s grandpa. After stripping the old finish, sanding down the wood veneer and wiping it down with a tack cloth, I stained with an oil based stain, waited 2 days then finished with 4 coats of water based Varathane Diamond Wood finish. After staining, the project looked outstanding but after the finish was done I could see blotches in a few places. Can you tell what caused… Read more »
Hard to say for sure, but it doesn’t look like a sanding issue. To me it looks more like an issue with compatibility and/or residue. More than likely it was either 1) some residual contaminant left in parts of the wood that was not removed with solvent prior to applying stain (tack cloth removes sawdust and dirt, but not chemicals or residues actually in the wood fibers like a solvent wipe can), or 2) a problem between the water based top coat and the oil-based stain underneath. If not wiped down, there’s a chance that the oil based stain could’ve… Read more »
Sounds like I should have done more reading beforehand…
I didn’t know about using a solvent to clean the wood before staining but it makes sense that sanding and a tack cloth wouldn’t get rid of residue left behind in the wood fibers. I’ll definitely remember this for the next time.
Thank you for getting back to me!
I bought a coolibah bowl and tried light sanding what I thought was some glue – it removed the shine – it’s not resin on the bowl as its not a glass shine – I don’t think….would some wax and a good polish help? Lemon oil didn’t do the trick.
Hi! I am re finishing a door that has been weathered a bit. I started sanding and there were a few areas where I sanded deeper than others where you start to see the seems of the wood put together. These are solid wood doors. Have I sanded to much or not enough? Thanks
I’m guessing that you sanded too deep through the top veneer layer, to the lower base layer. While the top veneer layer is higher quality, the standards are a little bit lower for the substrate layer(s) and can have visible seams and join lines, as you have noticed.
Thanks for the response! Is there a way to fix this or add a top layer of veneer or stain to hide the seems a bit? It was inevitable to sand down to the base on some parts of the door do to weathering and dog scratches.
There’s nothing that’s very practical for your situation that I know of, short of just embracing the imperfections. Otherwise it might be a good candidate for painting to mask the underlying stuff.
Would it be possible to glue Veneer strips then stain?
The issue is that with veneer, it’s usually all or nothing. Sometimes you can do a small patch and basically inlay it in a problem spot, but what you’re describing is veneering over only a section. But then there is the issue of what to do at the transition from the veneer layer to the original substrate. There will be a noticeable step down.
Okay. That makes sense. But would it be possible to instead of trying to fix the problem spot, add veneer strips around each door with the windows. Meaning to cover the full exterior doors with veneer strips?
Yeah, you could try that. That would be an example of an “all” solution for veneer. Just a few things to keep in mind though. 1) It’s a lot of work. 2) Be mindful that this will change the thickness of the doors, especially in the areas where the door meets the frame near the hinges, which may cause issues. 3) It appears to be an exterior surface, so you’d have to be sure that your veneer gluing is rock solid to avoid having any parts peel up or come loose when exposed to the elements long term. But not… Read more »
Hi,
After 6 months, dark sots appeard on the oak veneer. The veneer was glued to the fireproof MDF and on the back side is paper. Finished with fireproof varnish.
What could What could have caused the color change. There are no natural light in the room.
Very hard to say for sure, but based on the cyclical nature of the splotches, my guess is that it may be some sort of manufacturing residue (I’m picturing big rollers or something going over those veneer panels, and leaving some sort of residue that eventually resulted in the discoloration.)
Really informative article! I wish I read it before starting. I have attempted to strip a thick stain on newly exposed timber beams. Hand sanding was too weak and I was too weak to hold an orbital sander that high to remove ll the thick glue/stain on the wood. I settled on an angle grinder with a 40-grit flap disk. It has really helped reduce/remove the stain and glue but I have noticed heaps of what look like little finger marks everywhere. I can’t seem to remove them no matter what I change (sander type or grit). So whilst I… Read more »
Hello! I need help. I’m working on a table project using black walnut slab. After sanding, I am now in the process of tinting it. Howevet, whenever I tint, the strokes is getting highlighted and is becoming obvious. The tint also enphasized darker shade on the strokes and it looks ugly. I had to re-sand it again, and it is still the same after tint application. Without the tint, the wood looks so smooth and nice but whenever I apply the tint, a darker shade of stroke is show. What should I do? Thank you
Your picture is very blurry and is hard to see enough detail to know what exactly could be the problem. After sanding down to bare wood, have you tried wetting the wood with a solvent like mineral spirits or denatured alcohol to get a sense for what the wood will look like with a finish applied? That might help to highlight any defects or sanding inconsistencies before tinting the wood. Also, I’m not sure if it is just semantics, or if you are really using a tint (colored topcoat) versus just staining or dyeing the wood. Tinted finishes are very… Read more »
Thank you so much! I will do what you said. Appreciate your help!
Thanks for the tips, Eric! I’m a newbie with sanding and am restoring some cedar benches. I’m trying to use gentle, long strokes with my palm sander but still get these horizontal marks. Any advice???
Those horizontal marks are not sanding scratches or any sort of blemish per se. It appears that in some areas the patina and/or old finish of the wood has been completely sanded off, and some areas are still not sanded deeply enough. The differences in sanding rates, etc. are caused by the natural variation in the wood grain itself (along with sanding technique).
Put on a fresh piece of sandpaper and sand until the wood is a uniform light color.
Thank you so much!!! I’ll keep at it!
Hi Eric, I attempted reviving my acacia patio table. The seal was pealing and there were some concerns of water damage. I sanded off the original poly with stain, starting with 80 grit on a sheet sander then hand sanded with 180 grit. I was left with all these white patches. I have put on one later of Varathane natural oil finish in semi gloss.I am wondering what exactly these patches are from? Should I have spent more time sanding these white areas before finishing? Or did I butcher it and sand too much? I don’t mind the very weathered… Read more »
TWo possibilities come to mind: you probably didn’t sand far enough to bare wood across the entire surface of the table. Second, it possible that the particles of the original finish that were sanded off were not wiped off before applying the new topcoat and became lodged in/on the wood surface, and caused the cloudiness.
Thanks for the info. I wiped twice – each time after sanding. So I wonder if I didn’t sand far enough to bare wood as you said. May give it another go then. Thanks again. I appreciate the feedback. All a part of the learning process for me. :)
Hi Eric , my joiner used an orbital sander on my lovely white oak front door then coated it with polyurethane finish . It came up very patchy . So he sanded it back again and applied one coat of Danish oil . I am still not happy with the squiggles in the wood . He says it’s the grain but I don’t think it is . What can I do to fix it please ? Is Danish oil the best thing on a a North facing door . Thank you ??
I agree that the color does look a little patchy, but it’s hard to tell if that is unevenness of patina (which may clear up on its own as the wood ages) or unevenness in the stain/finish on the wood (which may remain visible). I can’t make out any sanding squiggles in the wood, so I can’t comment on that; would need to see a closer view of an area in question.
Danish oil wouldn’t be as durable as polyurethane, but a lot would depend on number of coats applied, thickness, etc.
Hi Eric. I’ve probably got nearly 10 light coats of lacquer spray on this piece. (the drop front of an antique secretary) After several coats applied, I have begun sanding between coats with a micro-fine sanding pad. It seems to be getting better with each coat, but not nearly as smooth as the original surface. Still lots of grain coming up as each coat dries. I assumed that as I applied multiple coats of lacquer that the grain inconsistencies would fill in and disappear. But as the lacquer dries, it still seems to follow the roughness of the grain. Yes,… Read more »
It was suggested to me that considering that I have sprayed so many coats of lacquer that at this point I should be able to carefully do some sanding, a bit more than “light” to get the surface more even.
I also read separately that aerosol lacquer is notorious for drying too quickly. There is a specific product called Deft which seems to be a better choice for a slower drying time that will allow the finish to flatten rather than “orange peeling”. Apparently with an actual spray gun, you could thin the lacquer with.. wait for it… lacquer thinner!
Pore filler can save a lot of time in these instances.
But you can also keep in mind that ten coats of lacquer is pretty standard for a guitar finish. You might get benefit from googling the term “rubbing out a finish” to see why they use so many coats.
Hi there! I’m in the middle of my first refinishing project. I had to use citristrip and scraped a lot to get all of the varnish off. Tonight I sanded everything once through. 80 grit was the roughest I had, but I think I will need to try 60 grit tomorrow. Anyway, the table is stamped underneath with “Ligo, made in Thailand”. It is definitely real wood, but not sure it’s the nicest species…someone said maybe “fruitwood”? The original varnish on it was very dark and I’ve made significant progress, but it does look like the wood is very porous.… Read more »
If I had to guess, to me the table looks like it’s solid rubberwood. https://www.wood-database.com/rubberwood/ So the large pores may more or less always appear as a darker color. I would continue sanding until you get a uniform color in the main body of the wood (minus the pores). I think people tend to confuse sheen with finish thickness. Polyurethane in a low sheen (i.e., satin instead of glossy) can have a natural look, particularly if a wipe on poly is used. Tung oil or wax wouldn’t offer much by way of long term protection for a table top. Seeing… Read more »
Thank you! After I submitted my comment, I was doing research trying to figure out what the wood is and came to the same conclusion; definitely solid rubberwood! I will do as you suggest and skip the stain. I was worried it would come out too dark anyway. Is it a top coat of clear satin polyurethane what I would want to try or do you suggest a different product? Again thanks so much for your help!
Yes, satin polyurethane. But since this is a refinishing project, make sure to prepare and clean the surface well beforehand and ideally test the finish on a small inconspicuous area first. If there is residual chemicals, etc. left in the wood, it could interfere with the finish curing properly, and you’d have a gummy, nearly irreparable mess. Don’t ask me how I know!
Hi Eric, I have a complete disaster with my front door! Its cheap wood & I was trying to stain it. I did sand with an electric sander first. Can you please tell me what I should do next? I really have no idea. I am a single parent so thanks in advance.
It depends on what you’re trying to accomplish. If you’re trying to create a nice looking wood door from its current condition, it’s going to take a lot of elbow grease. You may just want to consider painting it instead. I’d just give a quick sanding to knock down any surface irregularities/high spots, then apply a good primer, then topcoat with paint. The primer part may be important, since with all the different stains/chemicals already on the door, regular paint may have a tough time properly adhering. Short of that, I think to do it right, ideally you’d have to… Read more »
Thank you for your reply Eric. It has been wood stained before and despite the look, it doesn’t have many coats on it. Its not that old maybe 4 years. I think the problem is it was varnished before & then I stained it. Is there any type of varnish or wood stain primer I could use?
“Is there any type of varnish or wood stain primer I could use?” Can you clarify what you are trying to accomplish, I don’t understand this question. Are you trying to stain and varnish it, or paint over top it? As it stands right now, the wood surface / color looks very uneven and patchy, and it has basically been locked in by the varnish being applied over top. The problem is that wood finishes are transparent, so any defects in the underlying surface show right through. The only remedy that would allow you to still use a wood stain… Read more »
Hello,
We bought this knotty pine doors. Once we stained them we noticed that they have this strip line going across them. I have tried sanding and it’s not working. Do you know what it could be or how to fix it? Thank you!
Hi, I just came across your blog while googling pretty much how to fix my mistake, I’m a very small woodworker, one of my favorite things to do is sand believe it or not, well I got some free poplar wood and made 3×3 in squares, glued them all together going in different directions and made a decorative tray out of them, 99.5% of the time I use matte paint and or matte clear coat but for this I wanted a little bit of a glossy finish, I did that and then it felt a little gritty even though it… Read more »
I’m not understanding the 1500 grit scratches. Are you talking about scratches in the wood, or in the finish? Maybe it is a typo and you meant 150 grit. 1500 grit sandpaper should not leave any visible scratches in the wood, unless it was several clogged, at which point it is no 1500 grit anything but large particles being dragged across the wood.
Our handyman stained and applied poly to these treads a few months ago. Water based. We weren’t happy with the uneven application of the stain and some scratches against the grain. Yesterday he used a stripper on only 6 of the worse treads and we have very rough looking raised grain. He is intending on switching to an oil based stain.
Can these treads get smooth? Will the treads that are stained with oil match or existing water based?
I don’t want to let this guy get too far if the results will not be good.
Thanks!
I will assume that you are referring to the leading edge of the tread. It looks like there is significant tearout along the leading edge of the tread in the first picture, which would take a lot of work to sand out / correct. Tearout that bad I think really is the fault of whatever mill produced the treads. Anyhow, with tearout, stain tends to concentrate in the imperfections and accentuate them. The second pic overall looks improved, just in need of a quick re-sanding to smooth out the raised grain. I’d guess that raised grain takes about a minute… Read more »
Thank you. He is only refinishing 6 of the 18 stairs , and wants to switch to oil base stain. Will the color match the other 12 that were stained with water based?
It will depend on the stains used, and the skill of the person applying, etc. Too many variables to give a firm answer.
Hiya, i don’t have pics yet. But I’m getting these pale untreated seasoned pinewood pallets from a dealer – they look really white n in need of sanding. Someone’s recommended a mesh something cuz it has less grits to go down I’m planning to do 1-2 layers of Tung oil (any recommendation?) n 2 layers of beeswax finish cuz imma use it as a low table like surface – snacks, forks, soda. I want it to look smooth but matt, like in those Airbnb rooms, the pale light yellow non-glossy pallets(i really don’t like glossy). Would u recommend those mesh… Read more »
Refinishing a cedar bench. I sanded off the polyurethane (oil based), wiped it down well and applied a fresh coat of oil based poly. You can see there are areas that are not absorbing the poly, how can I fix this problem? (The bright white spot is from an overhead light)
Hmm, does the finish literally just bead up and roll off that area of the wood, or is it just drying dull? Sometimes there can be dull spots on the first coat where the wood absorbed all the finish on the initial coat, and putting on a second coat usually remedies it. But if it is somehow beading up and not sticking to the wood in those areas at all, you probably have a more serious problem, and there may be residual finish or contaminants leftover on the wood that need to be removed first.
It appears to be beading up and rolling off of those areas,. I put a second coat of poly on it (after this picture was taken) and it did the same thing. Should I try stripping/sanding it down to wood level again and starting over? I appreciate any advice you can share!!
That’s very strange, about the only thing I can think of that might behave that way would be wax. I think you’ve got to get down to bare/raw wood again. Otherwise, you might try wiping the wood with a solvent like acetone to see if that is able to lift whatever is in the wood first.
To give some background info, the bench was in a garage and had been basically used as a “work space” for other projects. It had blobs of thick paint and puddles of dried polyurethane sitting on it. There were also pieces of fabric that had stuck in spots. I don’t mind putting in the work to restore it, just not sure how to go about doing so. Thanks for any/all suggestions!
Hi Eric, do you have any advice on how to improve this finish? I love everything about color, I just think the the pores look prominent. It’s white oak with two coats of “smoke” colored hardwax oil.
You’d need to use a pore filler to get a smooth finish and fill in the unevenness. Then follow up with a top coat to protect.
Iv been working on this for about 2-3 days now and I got nothing. Oak door, pretty sure it’s white oak but can be wrong. The owner I’m doing it for, him or someone he knew had very little if any experience at all had either just pained it black or put layers and layers of black stain on it. So I couldn’t tell which oak it was.
That looks like pine to me. https://www.youtube.com/watch?v=ExKj6uovn-M
Hi Eric,
mum sanding some oak cabinet doors and have started to lose the grain.
is there a solution to bring it back ?
thanks !
Yikes, this is a classic example of sanding through the veneer layer. Underneath is just MDF with no wood grain. I’m afraid I don’t know of any way to fix this, short of re-veneering the entire surface. To me, the best way now to salvage the doors would be to paint them.
Hey Eric, it s Teri Browne again. I was using my orbital sander after the citrus stripper and this started happening. Thoughts?? Thank you so much!
It looks like a bit of a mess, but I think it’s just from an incomplete job in stripping. A mixture of residual stripper and finish. You might want to consider switching to a coarser sanding grit and really concentrating on the darker areas, and eventually you should get down to the lighter colored raw wood. But you need to be careful of unevenness / dips since it looks like you are working with a softwood, so there’s likely to be a pretty big disparity between the lighter portions (earlywood) and the denser part of the growth rings (latewood).
Eric, Great article. I need help. I’m refinishing door sills on my boat. They’ve become dull and scratched over the last 15 years. I sanded with 180 then 400 just to remove the light varnish already there. When I applied new marine spar varnish, all of a sudden I have uneven color on the flats and also the wood plugs just jump out now! The first picture is a door sill that hasn’t been touched and the second and third pics are after sanding and a first coat of varnish. This is teak. Do I need to resand and use… Read more »
My guess is that the original varnish contained some degree of colorant that gave it a slightly darker color, and you’ve essentially replaced that with a transparent varnish. Getting back down to raw wood and staining would be probably the best but most time consuming way. Otherwise I know that minwax sells a line of tinted polyurethane called Polyshades that could be a shortcut if you’re tired of dealing with it and want a quick fix. You’d just gradually build up top coats and get darker and darker color until you get a match.
Thanks for replying. I actually figured it out. The lighter colors appeared that way because I hadn’t sanded all the way through the old varnish. Once I sanded to bare wood and revarnished, the shade came out darker and much better. Thanks again!
Hi Eric, my husband and I are refinishing an old hatchcover table top from a Liberty Ship. I am sure you are familiar with them. It was previously redone and now has been in a storage shed for many, many years. We used the citrus stain stripper which worked pretty well with a few coats. Then I began sanding with an orbital sander, higher grit, and it doesn’t seem to be too coarse, but it is pulling up white wood where I have sanded. I have stopped sanding to research. Any thoughts? Thank you so much. Teri
Do you have any pictures of what you are describing? It just sounds like you are sanding into fresh wood and removing the surface finish / stain, but it’s hard to say for sure without seeing it.
Hi Eric, I sanded my stair treads with an orbital sander and a 80 grit, they were nice an smooth. My husband tried to do under the lip of the tread and now I have these marks. How do I get them out? I tried sanding with orbital sander and 80 grit and they never came out. Thank you
Assuming I am seeing what you have intended for me to see with your photo, namely, the little reddish flecks in the upper corner of the tread, then all is well. It appears your stair treads are made of hard maple, and what you are seeing is a completely natural and normal part of the wood and is sometimes known as ray fleck.
Hello!, I have this wooden bench that was in my ex’s family for a long time. I have no idea re- the age, history of how it was treated or stained, etc. One photo is the unfinished edge of the bench – it appears very porous… does this mean it’s not “real” wood? The other pic shows where I sanded compared to where I have not. I feel like there’s no woodgrain ???? I don’t know if I should just sand the rest and slap on some coats of regular paint, or if I should stain it. Please help???
Looks like solid wood, though a pretty soft softwood like fir, spruce, or pine. With a lot of these species, there can be pretty low contrast in the grain, so it’s not the most dramatic wood to stain.
Hi, Eric. I stained this plywood and I get what looks like drip marks. I’m trying to sand it out but to no avail as the grain is not showing.
Help! I’m sanding an oak door that likely has 4 or 5 layers of spar urethane. I used stripper first and then sanded for hours. It looked like bare wood but when ai applied stain I could see that there were areas that didn’t accept the stain. I applied another coat of stripper and then sanded for more hours. How do I know the poly is really off before I stain again? I so appreciate any advise as I can’t bare the idea of sanding this for another 5 hours.
Try wetting the wood surface with mineral spirits and look closely to make sure it’s being absorbed evenly and the surface sheen is uniform. Not foolproof, but a lot better than just hoping you’ve gone far enough.
You say you can’t over sand, but I think I have… This is a solid wood chest with two issues. The top spots, can they be fixed? And I can’t get all the stain off on the sides. I started with Citrustrip, didn’t work great for me. Then
sanded with 80, 120 then 220. Help!!
Sorry you are having to go through all of this, refinishing can be a big headache! The top looks kind of deceptive to me, as it looks like solid wood when viewed from the sides (since it appears you can see the endgrain on the boards for the top). However, I would guess they made a solid top out of a cheaper wood, rounded the top edges, and then added a thin 1/8″ piece of decorative mahogany plywood overtop that. I’d need to see a closer picture of the endgrain/top corner to verify. The white spots you are seeing are… Read more »
Thank you for this informative article! I have an old coffee table that I painted 25 years ago because there were water stains/marks on it. The paint was looking really bad so I decided to strip it and sand it. To my surprise, when I initially removed the paint (with Citristrip) the water stains weren’t visible. I started sanding and decided to stain it rather than re-paint. But I fear I have over sanded because now the dark water stains are visible. Is there any way to fix my mistake? If I choose a dark stain will it cover up… Read more »
A lot will depend on if it is a veneer top or solid wood. I can’t tell which from the pictures. If it’s solid wood, then there’s not really such a thing as “too much sanding” — at least, you’ve not come close to that yet. Sanding deeper into the wood will expose fresh, unstained wood with a more uniform color. But if it is a veneer top, further sanding is pretty much a disaster waiting to happen, since it’d be quite easy to sand through the top veneer layer, which would in effect ruin the entire top surface of… Read more »
Thank you for responding! I can’t tell if it’s veneer or solid wood either. I’ve had the table for about 25 years. It had been my grandmothers and is about 50 -80 years old, but that doesn’t mean it’s solid wood. She used it as a plant table, thus the water stains. I am pretty sure she stained the table herself, it was a very dark color before I painted it. I think I will stop sanding and use a pre-stain and then stain it a dark color to try to cover up the dark water marks. Do you have… Read more »
No specific recommendations on stain, only that you could apply more than once to get a progressively darker color.
Hi Eric, First of all, many thanks for writing such a helpful article – its very much appreciated. I’m hoping for your help and advice with regard to sealers and protection for our recently sanded beech floor. I’ve attached an image of the floor as it is today. The property itself is a Victorian semi and the plan was initially to stain is a very dark brown, but the sample didn’t work out, so we would now like to ensure we preserve the shade we have now without it going yellowy. It’s a professional sander that’s carried out the job… Read more »
First off, to manage expectations, any finish will technically get the wood “wet” and will darken the color. So no matter what finish you put on, the colors will darken to an extent.
But to keep the color as neutral and light as possible, I’d recommend two things: use water based sealer and finish, and get a satin or matte finish. The water based finishes won’t yellow the wood as an oil-based finish would. And the satin sheen tends to scatter the light and generally make for a more subdued look over a glossy finish.
Hi I am working on refinishing a wood door. I a staining it with a oil based dark walnut stain . I have a spot on the door where the stain will not take . I have sanded and reds fed multiple times and it I am just making the problem area larger . In the attached pick the problem area is the yellow line around the door handle hole. Do you have any thoughts on how I can fix this issue. I have tried treating the door with a pre stain . I have tried a shallac and polystain… Read more »
Hi – I’ve learned a lot from reading the questions and answers below. Thank you. My question – hand me down beautiful old varnished table from my parents. Not solid wood top. There was a crazy thick varnish finish that I’ve finally managed to strip and sand away – although it isn’t all one shade – I will use a solvent to be sure it’s thoroughly cleaned, and hopefully I’ve sanded it evenly enough. My question – I’ve made a few gouges into the veneer that I need to fill. I am planning on finishing the top with oil. With… Read more »
I’m a novice, so take this with a grain of salt. I have a similar issue with a veneer on a 40-year-old chest. All the wood except that veneer is in great shape now that I finally got it all stripped (and cleaned). I saw a YouTube video of a guy who does a lot of mid century and garage sake finds. He used an oil based paint, like the kind you’d find in the arts department at a store like Michael’s, to fill in a few spots on a veneer. That’s what I’m hoping to try on my veneer.… Read more »
What a great blog, thank you for writing it! Ive been battling with a new oak floor (which had an awful plastic finish on it) making every mistake under the sun as the finish was impossible to get off. Even resorted to an angle grinder for sanding. . Ive now started again with a makita belt sander and am examining each board with the light shining across it, marking the mistakes. Plus hand sanding with the grain on patches. Starting with 24 grit on the belt sander to remove the new finish (osmo wood wax finish). Do i need to… Read more »
Just moved into a new house. Wood kitchen worktops not looked after so i bought a kit and sanded them down. After second coat of oil, I still have patches that look dry/flakey – see attached. Any recommendations:?
I don’t see the dryness you describe. Do you know what type of oil you are applying? Is it mineral oil?
Hoping this shows it better – where the wood looks scuffed/ white rather than brown.
I used Danish wood oil from a company I found on amazon??
Thanks
The pics didn’t come through.
hopefully this one works – apologies
I’m having trouble seeing what you are describing in your picture. Frist you described it as appearing dry or flakey, but recently you said it was scuffed or white. Would you describe it more as a cloudiness within the wood finish on top of the wood, or as if the wood surface is dull and still appearing raw, or something else?
Well its kind of both. Its those whiter patches on the wood you can see in the picture. when you look closer, the look is scuffed (as if its the sandpaper look still because its also not smooth to the touch AKA dry….). i dont really know how else to describe it…
My only guess would be that since they were used as kitchen countertops, there may be a lot of residual junk still embedded in the wood from over the years that’s interfering with or otherwise creating irregularities in the finishing process. It can be a real difficulty to remedy if there’s already substantial finish applied on top of a problem area. Ideally you’d want to strip/sand down to raw wood, then use several wipes with a solvent like acetone to lift and remove any remaining residue in the wood. Then use a high quality sanding sealer to ensure that everything… Read more »
Amazing thank you!
Hi there – will primer before painting hide swirl/pigtail marks left from sanding? If not, should I resend with a 220+? Thanks!
Yes, using a good thick primer can help to fill in sanding scratches. Doing a thorough job with sanding is less critical in applications where you’ll be painting rather than staining the wood.
Hi we recently had oak stair treads put in. My husband is staining them, first time. Our contractor said to sand with 220. After sanding and staining we noticed these marks, what can we do? Help!! Thanks!
Well, I hate to say it, but if you’d like to fix this problem, you’d really have to re-sand the entire surface of the stair treads and remove the sanding scratches and existing stain. Sand WITH the grain, not against it. If you only selectively try to sand out the scratched areas, when you go to re-stain the color won’t be uniform.
Hopefully you have not applied a finish over top the stain yet, as this would in effect lock the sanding scratches in and make it much harder and more work.
the finish is like fish scales
the wood came up like fish scales after i applied varnish
ive sanded down twice and waited a full day ,with that i used a high gloss varathane , and when i look at it ,,see this is it the wood?
Your photo did not come through. Possibly the image size is too large?
Forgot to add the second pic. You can see it more on this one. Thanks for your help.
Hello! I am finishing a parota cookie and need someone to let me know if this is okay or not.
I have a festool orbital sander with every grit of sand paper.
I want to oil the piece at 220 grit but I’ve noticed that I’m getting shiny lines where I sand. I’m scared that if I put the finish on, that you will see it. I don’t have this problem with regular tables, only this end grain cookie.
My question is: is there something I’m doing wrong or will it disappear when I oil it.
Get some fast evaporating solvent like denatured alcohol or naphtha and just wipe the surface down with something easily reversible to take the guesswork out. If you can still see the scratches, a finish won’t make it disappear. My guess is that they are lower grit scratches that have been left behind earlier in the sanding process. Since parota is a relatively soft wood, it would be easy for it to become deeply scratched earlier in the sanding. Also, sanding endgrain is a lot more difficult than sanding facegrain, so you have to adjust your technique (and patience level) when… Read more »
Hi, my husband took a belt sander & hand sander to a modern oak table & then applied 2 coats of Osmo polyx white tint oil. The result- so many sanding swirls with the paint from the tint making them more pronounced. I started again using a Mekita RO sander, working through good quality pads – 80,120 & 180, twice with each grit (using the pencil mark method to assess when to go up a grit). I worked slowly, following the line of grain & cleaning dust off between sanding. Took hours! The result is no better! Still lots of… Read more »
It’s very hard to tell from the photos, but to me, that doesn’t look like sanding swirls. It may simply be the figure of the wood’s grain. Probably the most common figured grain is curly maple https://www.wood-database.com/curly-maple/ but similar (though much more broad) figure can be found in almost all wood species to varying degrees. Have you tried wiping the table down with a solvent like denatured alcohol or naphtha to see if the what residue is still visible even when wet? If it sort of disappears when wet, (and assuming it is the wood grain figure and not sanding… Read more »
Many thanks for your response. The wood is solid oak and when wiped with solvent, the swirls pop, as they did when oiled before I re-sanded again. The swirls seem to be from the belt sander as they weren’t there before that. I know they will pop again if I oil again now and am wondering how to get rid of them?
Okay, when I look closer at your last pic, it does appear that the marks cross over from one piece of wood to the adjacent piece. If it were merely grain patterns (as I previously suggested), there wouldn’t be this continuity between different boards. Unfortunately, belt sander marks are incredibly hard to get rid of. It is a very aggressive tool and usually isn’t recommended for refinishing in applications like this. If it were me, I’d try stripping and resanding the entire surface with a random orbit sander and the most aggressive grit of sandpaper you can find. (I’d say… Read more »
Ur problem is definitely the belt sander it has dug into the timber. I can clearly see this as I’ve used a belt sander for years. Only way till try and fix this is go back with belt sander on a 80grit and work up till 120 with belt sander then till 220 by hand (with the grain). But u must sand with the grain and always keep the belt sander moving and don’t be tempted till put pressure on the sander let the machine do the work, if u apply pressure u will end up with the very same… Read more »
Very many thanks Eric and Daniel for your replies and suggestions. So kind of you to take the time. In the end, I asked a friend whose a carpenter to do it and now it’s perfect! He used a large rotary sander with netting pads & and extractor. He worked through the grits and did a fabulous job.
?I love the color of your tabletop!! What stain did you use? That’s what I was aiming for but I didn’t grab the right color
Hi Amanda, I used Osmo White Tint 3040. Hope it works well for you
Help needed! My kids used kinetic sand and made a ton of scratches in our beautiful kitchen table. I quickly tried Tibet almond oil and murphys oil and it only made deep water stains in the grain. My husband came home hours later and sanded away the scratches and oil stains and applied 2 layers of polyurethane. Then he did some more light sanding and put on another layer of polyurethane. Thought the problem was fixed. The table looked different but still good. However it has been almost a month and now we are seeing new darker spots and some… Read more »
I’m not really seeing any defects in the finish from the photos. Hard to say what could be the cause. It may be residue from the oil that soaked into the wood grain. After sanding to bare wood (especially if it was a previously dirty surface), it’s usually a good idea to wipe the bare wood with a good solvent like denatured alcohol or acetone to lift out any residual contaminants and apply the poly on a good clean surface.
Hi, we just finished our floor and these white discolourations have appeared… help pls! what is it and how do we fix it?
If you skipped a few grits, say from 36 straight to 80, should you go back over it with a 60 grit ?
I’m trying to strip my lacquered table In order to re-stain and finish. I think I’ve sanded too much! There’s soft spots (light/white) in some of the grain. I tried using a stripping agent which seemed unsuccessful. Now I’ve done the first layer of sanding with 100 grit paper. Will this sand out as I get finer paper? Or do I keep sanding till it’s all very light (I think it’s maple)? Or how can I fix this! Help!?
Yes, from seeing the endgrain on the sides of the tabletop, it appears to be a solid wood top, so there’s no risk in sanding through as there would be with veneer. I believe those lighter colored spots are just areas where you’ve finally got through the existing finish and made it down to bare wood. You’d want to get the entire top down to bare wood before finishing, especially if you want to stain it.
Ok. Thank you!
Hello, I wondered what to do about these shiny patches that appeared after I treated our oak kitchen top with Liberos Pure Tung Oil. Sanded it with electric sander and by hand right back to bare wood; then started to apply coats but have shiny patches in places. The wood has absorbed and is a matt finish in other places as I intended. I wondered if it is some build up resin from the drying process? Maybe I did not wipe off the excess oil enough after application? What can I do to get an even finish? Can I wipe… Read more »
Hi,
I am installing “repurposed” hardwood flooring and sanded the floor from 60, 80 and 100. I stanned a small sample and it does not look good. Any idea, what is going on? Also, the poors on this red oak are big, should I have prefilled it? Or should this be done when doing flooring?
Well, very good that you first finished a small sample first. I think 95% of big problems here could be prevented with that.
The sample looks fine to me. Was there something you didn’t like about it? Is this just the stain, or the topcoat/sealer as well?
Hi Eric,
Thanks for the quick reply, I am just concerned as it is the first time doing it. Is there a reason why the sealer is not going into the grain area? Should I have applied a thicker top coat or is the grain supposed to have highs and lows?
Using Loba as a finishing top coat.
Yes, basically the finish will telegraph any surface irregularities in the wood (including the pores themselves) into the top coat. It’s perfectly normal and to be expected. Even as I sit and write this on my laptop, it’s sitting on a table top in a hotel with a fake wood top, and even this surface has tiny imprinted surface irregularities meant to mimic those found in real wood. (Or course, the giveaway for this is that these irregularities don’t actually coincide with the pattern of the printed wood grain underneath…)