
by Eric Meier
1. Not enough sanding
In my very earliest days of woodworking, I used to think that sanding through all the different grits of sandpaper was for anal-retentive chumps. “Nonsense,” I thought, “I’ll just use some 60 grit to get out the larger defects, and then some 220 to smooth things out.” As it turned out, I was the chump.
Differing grits of sandpaper are meant to save you time, not waste it.
If you’re just starting out, and you’re put off by the apparent large price of all those different grits of sandpaper, I’d highly recommend buying a variety pack that has a few sheets of each grit included. Then you’ll realize, especially if you value your time, that getting the right sandpaper definitely isn’t too expensive: it’s well worth it.
Basically, you are putting successively smaller and smaller scratches in the wood until, ultimately, the scratches become so small that they are “invisible” to the naked eye. So when you make coarse scratches in a wood surface—say, for instance, 60 or 80 grit—the fastest way to remove those scratches is with a medium grit: too large a grit (only slightly finer than the paper in your previous step), and you’ll be adding needless work; but too fine a grit, and you could sand for hours and still not remove the deep scratches.
Insufficient or poor sanding is a classic mistake common to a lot of beginning woodworkers. The wood is either given a quick, insufficient sanding; or else, if it is sanded to a finer grit, it is done haphazardly, and while skipping grits. The resulting surface my feel smooth to the touch, and may even look good from a distance with casual examination, but the proof is in the pudding, as they say.
Once a finish (and especially if a stain is applied) the sanding scratches will become all that much more noticeable and pronounced. You want to fix sanding mistakes before they’re embedded (and accented) under a few thousandths of an inch of pigments, dyes, and resins.
Learn how to inspect your sanding job between each grit
It’s not enough to just feel the wood or take a casual look and think “that’s probably good enough.” Sure, pros can sometimes get away with this lackadaisical approach because they have years of experience. But when you’re first starting out, anything that possibly can go wrong probably will go wrong: and nowhere is this more apparent than in the sanding.
Nothing’s worse than going through all the grits only to find that you still have some 60 grit scratches left in the wood from the very first step. To check, wipe all the sanding dust from the surface of the wood—I like to use a microfiber towel that can “grab” the dust right out of the pores and scratches of the wood. A can of compressed air or an air compressor can also blow the dust out, but it also creates a cloud of dust in the air. Once the dust is out, hold the piece up to a light (or bring a light to the work-piece if it’s something larger), and view the surface at a very low angle—almost parallel with the surface—to try and spot any serious/errant scratches.

Use alternating sanding techniques to find where (and at what grit) you’re having problems
While it’s not always the best (or most efficient) method in all circumstances, using varying sanding techniques can be invaluable if it seems like you’re running into repetitive sanding flaws in your work, and you’re just not sure where they’re coming from. For example you could sand the first grit by hand, parallel to the wood grain, and then the second grit could be with a random orbit sander, and so forth. Just take care that sanding directly perpendicular to the grain by hand puts some serious scratches in the wood that will be very hard to get out with a finer grit—a better solution would be to sand at a slight left-hand or right-hand angle from the grain, and not to cut directly across the grain.
The success in using this trick is rooted in the simple premise that you should hopefully know the direction and shape of the scratches that you’re putting in the wood. Sanding by hand with a stiff backing block? You should see deep, straight scratches. Sanding with random orbit sander? You should see little tiny circular squiggles all over the surface. Sanding with a pneumatic/rotary sander? You should see broad, circular/arc patterns in the wood. By changing the pattern with each successive step, you’ll be able to tell by the direction and shape of the scratches where you went wrong. When you finish sanding and find a flaw, you’ll be able to say something like this: “Okay, I see there’s still some swirl marks in the wood, which are 100 grit scratches made with my random orbit sander; I followed that up with some 180 grit hand sanding that apparently didn’t get all of the previous sandpaper’s scratches out. I need to spend more time at 180 grit to ensure I remove all the 100 grit scratches.”
2. Using incompatible products
Oily tropical hardwoods can cause a lot of problems; essentially, the finish seems to stay wet and tacky indefinitely. This is due to the antioxidants present in the heartwood, which prevent the finish from properly curing (through oxidation). This article explains the problem as well as possible solutions in more detail.
Even if you are using a finish-friendly wood species, you may still have trouble when using a combination of two or more products that are incompatible with each other. In short, oil and water don’t mix! Try to use finish products that all use the same base solvent. If you absolutely must use some specialty product somewhere in the finishing process, a good rule of thumb is to try to use shellac as a peacemaker between two incompatible coats. The adage goes “shellac sticks to everything, and everything sticks to shellac.”
Lastly, in rare instances, steel wool can cause problems when used under water based finishes. Namely, the tiny particles of steel will rust when in contact with water. (Use bronze wool instead.)
3. Not enough coats of finish
Most people are looking for the fastest, easiest wood finish. This is a perfectly understandable impulse, but if you’ve put all that work into a project, it makes sense to finish strong.
The temptation is to only apply one coat and call it good enough. However, the quality and protection of most film building finishes (such as polyurethane, lacquer, and shellac) goes up exponentially on the first few coats (e.g., there’s a huge improvement in durability and moisture excluding effectiveness from coat #1 to coat #2, and another big jump from coat #2 up to coat #3.) After maybe 3-4 coats, the benefits of increasing film thickness diminish somewhat. See this article on wood finishes for more info on what finishes work best in certain situations.
One last tip that will increase the clarity of your wood finishes: when building up wood finish film thickness, use a glossy finish. Even if you want your final sheen to be satin or low-gloss, I recommend using high gloss on the initial coats whenever possible. This is because most satin finishes contain a flattening agent that dulls the surface of the finish, and can appear cloudy when built up in several layers. Instead, simply rub out your final finish layer (see tip #4) or apply a satin or low-gloss finish as the final coat of your finish.
4. No rubbing out
Most of the time, when advocates of only using a single thin finish film complain that thicker finishes look “plasticky,” it is usually because the finish was slopped on in several thick, drippy, gobbledy-gook coats (polyurethane is chief in this trespass). I would agree, such finishes do look like cheap plastic, but that isn’t solely due to the number of coats of the finish, but simply that the number of errors, defects, and unevenness in each coat accumulated without correction until you are left with one thick, bumpy, coat of clear plastic.
Consider this: many guitars are finished with ten or more coats of spray lacquer. Most of us would not say that the mirror-polish on guitars is plasticky at all. What’s the difference? After all those coats, the guitar’s finish was sanded level and then rubbed out.
The art of rubbing out is perhaps too long to go into detail in an overview article like this. In a nutshell, a sufficiently thick film is applied to the wood surface and allowed to thoroughly harden over several weeks. Then, the finish is sanded flat and level (the thickness of the finish helps create a buffer so that the sandpaper will not actually cut through down to bare wood during this process).
Next, with a perfectly flat and uniform surface, the finish can be buffed up to whatever sheen is desired for the piece. (One additional mistake that can sometimes get overlooked is when no pore filler used, which means that on many porous woods, even with ten or more coats of finish, the pores still leave an uneven surface after leveling.)
For most beginning woodworkers, an easy way to get familiar with the process of rubbing out is to simply apply a few extra coats of wood finish to your project, and then sand it lightly with 400 grit sandpaper to remove all surface dust and irregularities. Then use #0000 very fine steel wool and rub the entire surface of the piece, this will leave a very pleasant and uniform satin finish that softly diffuses light.
Are you an aspiring wood nerd?
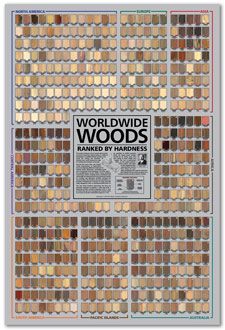 The poster, Worldwide Woods, Ranked by Hardness, should be required reading for anyone enrolled in the school of wood nerdery. I have amassed over 500 wood species on a single poster, arranged into eight major geographic regions, with each wood sorted and ranked according to its Janka hardness. Each wood has been meticulously documented and photographed, listed with its Janka hardness value (in lbf) and geographic and global hardness rankings. Consider this: the venerable Red Oak (Quercus rubra) sits at only #33 in North America and #278 worldwide for hardness! Aspiring wood nerds be advised: your syllabus may be calling for Worldwide Woods as part of your next assignment!
Staining a pine floor, looks great until it dries. What are these marks???
Hello, I’m sanding and then going to stain a piece of walnut for a mantle over our fireplace. Started at 60 grit, then 80. Is it OK to go to 150 then 220? Using a random orbital sander. I read somewhere that it’s OK to go no more than 50% from your previous grit level.. Thanks in advance for your help!
I wouldn’t see it in terms of ok versus not okay, but just in terms of “you can send out the previous scratches in a reasonable amount of time.” Maybe try to use a lighter touch with the 80 and then spend a little longer with the 150. You should be fine if you are aware of what the sander is doing at each grit.
Hi, I am in the process of priming and painting a dining room table. I have stripped and sanded off the old layers of paint to the bare wood. I am now applying primer and sanding to apply paint. Although my surface with the sanded primer feels and looks smooth, I can see the roller marks ever so slightly, the look of ever so tiny bubbles. It is smooth to the touch, I followed your direction of graduating grits and stopped with a 400. Will this show through with the paint? I am using Sherwin Williams urethane hybrid paint. Thank… Read more »
Paint is pretty forgiving when it comes to sanding scratches, so I’m guessing that’s it’s something with the application process.
Thank you for your reply I have not applied the paint yet, as I am concerned these tiny marks will show when painted. It is a 7ft round flat surface table made from pine.
Also, will the pinewood marks show through when painted? I can see their formation through the primer. How many coats of primer is too many?
Thank you
When you say “pinewood marks” are you referring to the yellowish resin that can exude from the wood, or something else?
No, not yellowish stains. I think they are called knots in the wood. Maybe I’m asking, how smooth should the primer be before applying paint?
Hi Eric, thanks for sharing your knowledge and experience. I absolutely love your website. I’m preparing to renovate my stairs. I removed carpet to check what’s underneath. The wood seems to be in quite poor state, with lots of cracks etc. I read online that first step is to remove the old carpet glue. I have tested various scrapers but when I touched the glue it became very sticky and black (see pictures). I’m wondering if you have any advices how to do it right?
Hi!!
I drum sanded our living room with 36, 60, 80, 100 grit. The worst part though seemed to be the edges! I’m terrified of staining and having it look bad (on the edges). I attached a couple photos of the work I did. One is before I edged then another is after. I used a hand orbital with 60 and 80. I’m going to hand sand with the grain to get rid of further disk marks. Any opinions?
Pics didn’t come through, please try to reattach. Though in general I’d say to just use the (presumably rented) tools that are designed for sanding floors. Make sure to use fresh, unclogged sandpaper. If you can still see sanding scratches, use same tool and sand to higher grit, making sure to entirely sand out the previous grit’s scratches before moving up to the next grit. With the right tools, you really shouldn’t ever have to hand sand a floor.
My boss had me power sand the bottom, pealing parts of a wood finished front door, we applied a new stain and everything looks great except the parts we sanded are dark red and entirely noticable. I’m sure this is a stupid question, I’m not a wood worker but I don’t think my boss knows what to do to fix it. Just logically, I imagine we will have to sand the entire door.. remove the stain and start over.. at least that’s my fear.. any advice? Because I don’t think he’s gonna want to do that and will just leave… Read more »
The parts you sanded probably opened up the wood grain and fibers, resulting in the stain being more readily absorbed (and therefore darker) in the sanded areas. I think the right way to do it would be to resand everything and start from scratch. But if that seems too onerous a task, you could try applying a wood toner only on the lighter parts — it’s basically a colored finish that sits on top of the wood and can both protect and darken the wood. The only issue would be trying to blend the existing dark areas with the lighter… Read more »
Addendum: the surface is not smooth; it is advertised as “distressed” but appears undamaged . However , the grain markings are rough , the fingernail catches in them
That’s just natural wood grain in ring porous woods. The pores would’ve had to be specifically filled during the finishing process to get a perfectly smooth surface. Not really a defect.
Second reply today: It seems some people advise using a finish stripper on veneer to reduce the sanding required. I seem to have an oil based finish. Should I? If so, what? Also, do you agree that the coarsest sandpaper on veneer should be 120? Thanks, this is intimidating!
I don’t mean to dissuade you, but trying to strip off finish and sand down a stained veneer is a pretty intimidating project for a first time effort. It will be very easy to sand through the veneer if you don’t have practice or experience on something else first. I’ve made the same mistake myself when I got started too. You mention that the piece is pretty new, so I assume the finish is in good condition already. Do you just not like the color of the existing finish, or what’s the objective behind this refinishing job?
I thought I had replied, sorry. My goal is to urethane the table for heavy kitchen use, which is what I bought it for. As below, my tests suggest that the existing finish is oil based but not sealing well. I hope to keep the stain if possible and still get a really protective urethane job. Since it is veneer, I think starting with a finer grit sanding might be sufficient- and not sanding as much? I know usually you recommend lots of sanding.
If you want to keep the stain intact, I would just lightly sand (in this case, abraid) the existing finish to aid in adhesion, and just apply a more durable urethane topcoat over top. If you are worried about compatibility or adhesion, test in a small area, and/or use a sanding sealer or shellac to give the new top coat the best grip.
Please help! I need to urethane a pretty new stained “ash” veneer table made in China because I want to use it as a kitchen dining table and counter. I tested the finish with alcohol, acetone and mineral spirits and nothing much happened. The mineral spirits seemed to rub in so I imagine it may have an oil based finish. I have read a lot about sanding prior to urethaning, but doesn’t that remove all the stain? Yet photos seem to show urethane being applied to lovely sanded surfaces that have stain. I am not qualified to stain – i… Read more »
You sand bare wood, apply stain (and wipe it off) and then apply a urethane top coat. Applying the stain doesn’t interfere with the quality of the sanded surface.
Thank you. I thought the grain was natural, as you say.
So my sanding will indeed take off the stain. What a shame. I am nervous about sanding, especially veneer, but even more about staining!
Any suggestions about avoiding going too deep on the veneer when sanding? Should it all be done by hand ? Is it a problem if any of the natural grain indentations remain? Thank you so much! I have no experience with sanding, (except for painting), or with staining.
Hi, I’ve applied two coats of stain then one coat of clear. After putting on the clear I have used a 220 Grit to do a light sand as it says on the tin. After doing this I noticed some areas particularly around the edges of the table have become white cloudy. If I rubbed this with water it seems to disappear but then comes back again. What do you suggest I do?
I accidentally started sanding an old wood painted stair rail with 220 grit sander paper what should I do to fix the mistake
Hi Eric just sanded down my sideboard (my first time) on staining it noticed where it had been sanded down near the curves on top there were some scratches so sanded them out but now after staining again it’s lighter will I be able to correct this without having to sand down the whole top again ? Thanks in advance
Staining can be very tricky business. I think it all depends on your tolerance for defects or imperfections. You might try applying a second round of stain to the lighter areas, but it’s my guess that you may have trouble blending the two areas together.
Hi, Eric! Thank you so much for sharing your knowledge. I was wondering if you could help me with an issue I’ve been having with red cedar. I get red cedar slices locally and they always have some gouges that I have trouble sanding totally away. Is there any technique you would recommend to get rid of the gouges totally? I think they are gouges from the chainsaw used to cut them.
You say “slices” so I assume you are sanding endgrain, which is considerably more difficult to sand than regular face grain. You might just try using a more aggressive sander (like a random orbit sander) with coarser grit.
Thank you so much for your reply. I’ve been thinking of getting a random orbit sander and now I’m most definitely getting one! Thanks again!
Hi! I am refinishing our front entry doors, and am finding that I am creating marks that look like water rings from sanding though layers of stain. I’ve stripped off the polyurethane and top layers of stain, but now I have myself in a cycle that seems to be getting worse. It seems like in order to get below the “rings” I have to sand a 1/16 inch or more, which isn’t realistic to accomplish for the entire set of double doors. Have I simply ruined this area and should move on? Or is there a product that can remove… Read more »
Is it truly over 1/16″ that you’ve sanded? If you put a straightedge across two high points, is there really a 1/16″ dip in the middle? If so, then you’ve probably sanded through different layers of veneer. In which case, yes, it is more or less “ruined” in terms of getting back to a uniform appearance.
Eric, Thank you for your quick reply! Here are a few more photos. Indeed, it is truly at least 1/16 inch. And oddly, I don’t believe it’s veneer. It’s a solid oak door, and the wood grain seems to be identical through the layers that I’ve sanded. At this point I’m not sure there is much I can do, except move on and try to use a stain or finish that hides it. I’ve tried a dark stain – espresso. And I’ve tried a lighter stain with green undertones. The lighter green seems to work best, though certainly not perfect.… Read more »
What gives me pause is in that third picture. I see what appears to be a horizontal line going across the wood in the center right hand half, but then on the far right it abruptly stops as the next layer of wood covers it up — or so it appears. Anyhow, the wood itself is not oak. It appears to be some type of mahogany.
Hi I sanded some large scratches on my hard floors and now the sanded areas when mopping gets wet and takes time to dry. I tried using multiple coats of Liberton sanding sealer but those parts still get wet. Please help!!!
If you sanded the flooring down to bare wood, you should apply multiple coats of finish specifically made for hardwood floors.
Hi Eric thank you for your reply is there any recommended finishes I can use?I really appreciate the help!!
I would buy locally, at a flooring sanding/finishing store. They tend to have higher quality products for this specific use case than big box hardware stores.
Hi, I found your interesting web page when searching for a strange issue I have after sanding our stairs at home. I live in Norway. The stairs are made of pine I assume, and I’m using a (Bosch) multi sander. It has 22.000 rpm with an orbit diameter of 0,06” (1,6 mm) When sanding with grit 40 (parallel to the wood grit)I noticed that I got some strange lines crossing the wood grit, but only near the end of each board. I tried to remove it with more parallel to the wood grit sanding movements, and also with the next… Read more »
Are you sure that those lines aren’t just unsanded rough portions, or are you fairly sure they’re actually made from the sander? It might be partially just sanding technique with the sander itself, but I really think you need an intermediate grit like 80 or 120.
Thank you for your answer. I checked again, and yes I could feel the deepest lines, not sure if they came from the sander.
Anyhow, I managed to get rid of most of the lines, this time sanding manually, including the intermediate grit. I will take more care on the other stairs, checking after each grit level.
Hi Eric. My husband and I are taking on the task of refinishing our hardwood floors. We rented some sanders and sanded them all and have applied our first coat of stain. We’re staining them dark, which looks great, but after the first coat we have found spots that we didn’t sand the old lighter yellowish stain/coat off and now we have spots in the floor that don’t match. Can we just go through with a small orbital sander and sand those patches down some more and re-stain? My husband seems to think we need to re-sand the whole floor
It will depend on how how the wood takes up the darker stain, and how picky you want to be in color matching. The problem is that stains usually become a few shades darker upon second application. It’s my guess that you may have trouble getting a good color match/blend with the existing stained portions versus the newly sanded parts. Maybe worth a shot in a small area to see if you can successfully blend the stain if you’re not in a time crunch.
Hi, We had floating (engineered) floorboards sanded back today and they have applied o n e coat of finish. They are coming back tomorrow to apply another two coats. There was no one there this a when I checked on the floor but I noticed a number of regularly spaced horizontal white patches especially on the darker boards. See image. Any ideas what these marks are? Thanks
Hi Eric,
Not sure whether you overlooked this post? I can’t see a reply anywhere?
Sorry, yes I had overlooked it. I think the fact that those lighter marks run across the grain, and actually line up across multiple planks is too much of a coincidence. Can you get a closer picture of one of the white patches in good lighting?Hard to tell if it’s an issue with sanding, or finish/stain, or figure in the wood, or what.
Thanks Eric, The sander reckons it’s in the wood. I send a photo to another sander who said he has seen this occasionally and said it is in the wood and has something to do with the boards laying on racks during the manufacturing process. The marks in the wood are where the wood was lying on racks?
The closeup of that first picture does make it look like it’s some sort of discoloration. It reminds me of what’s sometimes called “sticker stain” when drying lighter-colored woods, where the spacers between the boards, called stickers, cause discoloration. So that may be the case here, though I’ve never seen it on wood this dark.
Can anyone help me with some sanding tips, I started making handcrafted oblique holders for calligraphy for my partner, and I come across the same problem when I sand it down, other than the pores, I get a bit of wood that chip, like splinters? if that makes sense, can that be an issue of oversanding?
I have attached a couple of pictures, those are basically the issue I encounter when sanding, I know the second picture is not really sanded but I get those “cuts” at the end product also. which is really annoying :/
I can’t really seen any issues in the first picture, but maybe I’m just not looking in the right place. In the second picture, if you are referring to those small shallow chunks missing out of the wood, that’s a very common machining defect known as tearout. It wouldn’t be caused by sanding, but usually by a previous step like planing, routing, or carving. It may be that the sanding is just bringing out and making the pre-existing defects all the more noticeable.
Hello Eric, hope you are well, and thank you for getting back to me , I usually get a 7 inch piece of wood which I hand carve myself to a pen , sometimes i don’t see any chuncks like that missing until I start/end sanding and feels, like you mentioned brings it out even more , is there a way to fix that or fill it up somehow ? Other than carve under it ? I’m trying to get as smooth as possible surface , Ofc I know I do it by hand and not a machine, but for… Read more »
With tearout, basically the wood is gone. It’s usually best to avoid tearout at the beginning altogether. I’d guess that it’s happening with overly aggressive cuts in the initial shaping. You could try filling it with epoxy.
Hi Eric, I’m a newbie to woodwork and have just attempted sanding down and treating my Banister handrail. I had sanded back with 180 then 240 grit, followed by steel wool, cleaned with sugar soap, allowed to dry and then have applied 1 coat (so far) of Liberon Hardwax, but have noticed the grain has come up very dark and there are black spots that have appeared through out (pics attached). Are you able to help me understand what these are and how/if I can get rid of them?
I’m going to say that it’s probably an issue with the steel wool. Also, I’m unfamiliar with sugar soap, but I’m guessing that wasn’t needed. It appears you are working with oak. If it were me, I’d just sanded it down to bare wood, and then use polyurethane for the added durability that a handrail would need.
Here’s the image I’m not sure if it attached to my first post. This is all over the entire surface.
That looks like you have some sort of residue still embedded in the pores of the wood from the refinishing process. When you sand down to bare wood, you might want to wipe the entire surface down with denatured alcohol or some other solvent to lift off any residues still lurking in the pores.
Hi, I recently refinished a large parawood table, sanded it all down evenly with 180 grit then used a 220 I between oil based polyurethane coats and I keep getting these strange marks all over it and can’t tell what it is? It’s not picky at all, it’s actually very smooth now, and can not feel these marks. Any idea what it is and how to get rid of it?
Eric, I’m the proud owner of a newly installed solid White Oak hardwood floor. Today is our first day back living on it after letting the last coat of oil finish curing. My wife quickly noticed, while getting close to the floor, some of the low-grit scratches that cross the grain across basically the entirety of the floor (In fact, they’re very similar in shape and color as the ones from your nightstand!). I called the hardwood floor team who did the install and they tried to explain that it’s quite normal, that it was from the 100 Grit floor… Read more »
Do you have any pictures for reference? I’m curious if the scratches are only around the perimeter of the floor, or in the center area as well? It’s kind of fundamental that you sand with the grain, so it would be a pretty glaring error if there were still sanding scratches, especially in the center of the room where a belt-type sander would’ve been used.
Hi Eric, I’m a newbie to woodworking also! I have bought a large piece of beautiful elm, It’s around 180 x 60cm and about 8cm thick, with a ‘living edge’ border down each side. I got it from a local lumber yard and the owner told me to sand it with 60 grit, apply an oil(?), sand it again at 120+ then apply finishing coats(?). I’m looking for a low gloss finish, natural look, but it is a dining table so it needs to be well protected. I’m in the UK, is there any products or advice you would add… Read more »
That’s a nice looking elm slab. Dimensional stability can be an issue with elm, so I would try to use a film-building finish like polyurethane and be sure to finish both the top and bottom, and especially the endgrain. This will help minimize expansion and contraction with seasonal humidity changes.
I don’t know why the owner would tell you to apply an oil before the final sanding. Also, 60 grit, or even 120 seems to be a little on the low side. If it were me, I’d sand up to about 180 or 220 grit.
Hi Eric, thanks for the swift reply! I’ll get some polyurethane for finishing it. Would you recommend doing an initial sanding (using belt sander) at 60 grit, then working up to 80, 120, 160, 180 then finishing it with an orbital sander/hand sanding at 220 grit? Then apply the polyurethane finish and sand lightly between each coat (with 220), and coat 3 or 4 times? Would I need to sand the bottom through from 60 to 220 as well or can I do it a bit rougher as it won’t be seen? And the sides I’ll take great care with… Read more »
Your plan sounds good. Just be careful with the belt sander, as it can be easy to go too aggressive and create dips in the surface. Maybe best to practice your technique on the underside of the table first.
I forgot to add, what would you recommend doing to the ‘living edge’ sides? I’ve read various ideas from a light sanding to taking a brass brush to it. I’m not sure what the end result of that part should be. And should it also be finished with polyurethane to stop it getting marked from spillages etc?
Yes, finish the sides as well. I think the idea behind the brush is to knock loose any particles that may be on the verge of falling off. A lot will depend on how much, if any, of the bark is still attached. As long as the substrate is sound, just apply finish to everything.
Would this be a good option?
https://www.nwepaints.co.uk/acatalog/Blackfriar-Polyurethane-Clear-Varnish-9.html#SID=1
Looks fine to me, though I do find that if you build up coats of a matte finish product, you loose some clarity. I like to build up coats with a glossy product, and then use matte for the final coat, or just rub out the glossy finish to whatever level of sheen you want.
Thanks Eric, this all makes sense!
In regards to the sides, I want to keep them looking different from the flat top i.e keep the ‘living edge’ look. Would I sand down the sides at all or just brush them and then apply the finish?
Cheers
Sand down bare wood. Don’t sand bark.
Hi Eric. I just used my dewalt orbital sander (for the first time,complete beginner) on some 50 year old remnant wood. But I keep getting these lines (left to right of the wood in the pic and against the grain). I sanded with 100 grit then 150 then 180 then 220,slowly and along the grain. Pls help. Thanks!
It looks like two different things. With the wood on the left, I see faint light-colored marks, which look like figure in the wood grain, akin to curl (as in curly maple) but much less pronounced. This is normal and varies from board to board. On the right, I just see a board that hasn’t had all of the finish and stain sanded off it yet. You just need to keep sanding. These bars usually happen when someone stains and finishes a wood right out of the planer. The planer leaves shallow grooves in the wood and should be sanded… Read more »
Thanks for the reply. Its actually the same board. The one with the clamp is the before pic, and the unclamped is the after pic. But will try to resand it at a 80grit and work my way up.
Hi Eric, I am a newbie to woodworking. Started my first project to create a garden table. I made a few mistakes (still learning!). My most recent one is that I joined several planks of wood together with glue and attempted to smoothen the surface by using electric planers on the tabletop. Some parts look great, however, there are some groove lines left from the job. What would you recommend to smoothen the surface? I have a random orbit sanding machine and using 80 didn’t seem to make much difference or should I be pushing to 120 then 150 then… Read more »
I think it depends on what exactly you mean by “groove lines.” I am guessing that they are grooves left from a nick or other defect in the planer blade, which run parallel to the wood grain. If so, I’d recommended just replacing the planer with fresh blades, and taking another, very light pass. You shouldn’t have to do heavy sanding after using a planer, only light cleanup work.
Hi Eric! I am a complete and total noob, teaching myself everything as I go, and I am attempting to create a wall art series using square wood dowels. I’ve decided in order to get a more even sanding and stain coloration, I am doing my main sanding and staining using full lumber boards, ripping them down and then repeating the process on the two newly created surfaces of each dowel. As you stated though, everything that can go wrong, certainly is for me. The issue that I’m now experiencing is the issue of stain coloration. I am using select… Read more »
Primarily, I’d say it’s because you are using pine. It’s pretty tough to get consistent color even on the same pine board, let alone across boards. This problem is compounded by the dark color of stain, which makes it even harder. Possible solutions would be: (1) accept natural variability, and apply more (or less) coats to each individual board until a reasonable level of uniformity is reached, or (2) maybe try a gel stain to give even more control over staining pine, or (3) get a ring-porous hardwood like oak or ash from a local lumberyard.
Hello again Eric! So! I absolutely abhor waste so today I decided I would strip all the boards down to naked wood again and I did a little research about the frustrations of wood conditioner. Ended up brewing a tea stain to coat each board with in lieu of conditioner, allowed it to dry and hour or so, came back and applied only one coat of espresso color wood stain, and voila!! I now have much more consistent coloration. Never again will I use wood conditioner and I thought I would share. ?? Cheers!
i applied the first coat of Linseed oil to a piece of black walnut that i am using on a project, the wood 1X12 has been lazer engraved. after 2 days the wood developed spots like chicken pocks but flat, what can i do this piece of wood is worth$1,200.00 after the engraving and starting over is not an option, what can i do to get rid of the dark spots. they are about the size of a pencil eraser head
Do you have any pictures?
Inexperienced person here! I bought a piece of butcher block for a desk. I conditioned the wood and stained it with oil based products, I then put my first coat of polyurethane finish down, and waited about 14 hours. the table seemed dry, and was told to lightly sand with 300 grit because the finish was rough. the 300 grit made it incredibly smooth, but now I’m seeing dust scratches in my finish. I tried a tack cloth and a very lightly wet cloth to get it up, but it seems to be coming back. I’m nervous about applying another… Read more »
It’s hard to say for sure from the pic, as those sanding scratched look coarser than 300 grit. But if you’re sure that the staining went well, and those scratches are indeed 300 grit, then the next coat should smooth them out. But you might try using a foam backed or other cushioned sanding implement for these more delicate sanding steps. It looks as if the sanding was done by hand, and was a little heavy handed, but I could be wrong.
Help, what has caused these lines? They are only visible in certain light at certain angles. The top is birch plywood finished with a mix of 2pt poly, 1pt boiled linseed oil, and 1pt mineral spirits. My only thought is that I only waited 2.5 days before sanding and buffing.
Please re-attach pics, they didn’t come through.
I didn’t realize I could only add one photo at a time
To be honest, I can’t see any lines or faults in those pictures. How many coats of finish did you put on, and did you sand between coats? It’s possible that there are some coarse scratches embedded in the lower coats of finish.
Eric thank you for replying to my post, I’m sorry it took so long for me to check back. We have twins and I’m looking for work also. I’ve attached another picture. They ridges are very difficult to see in the photos but my wife,though not bothered by them, does see them as well. They have texture and they are mostly parallel that’s why I don’t think they are scratches. I put on 12-14 coats of a mixture of 2 parts poly, 1 part linseed oil, and 1 part mineral spirits. I waited 48 hours before sanding between each coat… Read more »
It looks more like a cloudiness in the finish to me. Sometimes this can be due to applying the finish in a very humid environment. Also, it can happen if the finish is very old, or has been stored in extreme temperatures.
Here are the pics
Hi. I found your articles through Google searching sanding techniques. I currently am redoing my sons dresser from blue to black high gloss. I prepped, sanded numerous times, wood filled, sanded, primed, sanded …. exceptionally well after reading multiple advice articles (I get OCD and Anal sometimes). Then painted 3 coats of black high gloss paint – sanding up to 800 between every coat). I’m at the final coat and just sanded again prior to putting on my sealer. Well, sanding reduces the sheen to flat. Do I put on the high gloss sealer over the flat black paint which… Read more »
Yes, the final topcoat will bring back the gloss and establish the final level of sheen.
I am working in a trading company, selling wood coating solutions in the State of Qatar, I have seen many things in the wood when our customer using various finishing products,
I would like to share with you the problems which I get from my customers, please gives me your solutions to solve the issue, Hope. you allow me to subscribe here. Thanks
I have some Issues, here I am attached pictures is the final panel which coated PU topcoat. we have used colour stain after the sealer coated and sanding, this marking is showing after 24 to 30 hours after the topcoat application,
Hi Eric, I recently just refinished my red oak floors in my house and I followed all the steps to a T and all the rest of my house turned out great except this one area. I haven’t finished staining the area as I know I will have to resand. That being said what grit do I need to go over the marks with and what type of sander? I originally started with drum sanding 36, 60, 120 and then used a buffer to screen with 80 and then 100. No idea how these marks got here as I don’t… Read more »
Judging from the direction, it looks like sanding scratches from sanding with an edge sander. Probably just resand once more paying close attention to sanding through each grit thoroughly and changing through sanding pads before they get too worn or clogged.
Resand with what type of sander and Grit?
Not sure if you rented the tools or if you own them. But if it’s a small enough area, you could use random orbit sander, otherwise whatever you used initially. Same grits, I’d start low to strip off the to layer with the stain faster. But make sure the paper doesn’t get clogged or get too dull.
Hi Eric. I am updating a pair of walnut nightstands and have one drawer that is giving me a hard time compared to the others (see the attached photo). For all of the drawers and nightstand bases, I used 80, 100, and 150 grit sandpaper and alternated between orbital and detail sanders and by hand. I have no idea what I did to this one particular drawer to cause the variation in color / make it look like it has zebra stripes, but any input or potential solutions you might have, would be greatly appreciated. Thanks in advance for your… Read more »
I could be wrong, but there’s a possibility that you have begun to sand through the top ply in a plywood surface, and you are now going through to the glue line that separates it from the underlying ply layer.
Hi Eric,
I acquired this beautiful Curio, really couldn’t turn it down with the wood shelves and half mirror. The inner bones are beautiful but I have never seen the finish on the outside look so troubled. I have been searching what may have caused this, may someone rushing to Poly it??? Not really sure…I dabble in making things beautiful again, just wondering what my next steps should be or if its too much of an undertaking. I would appreciate some input. Thank you in advance.
Please attach pics, they didn’t come through. But without seeing it, I’d guess you’d probably want to use chemical stripper, then sandpaper, and just start from bare wood.
Hi I have a couple of questions for you
1. How do I get sanding scratches out of wood? I used way to low of a grit and it made these awful little lines all over my quilt rack
2. I’ve tried to stain this multiple times and it will not take at all I can’t figure it out. I used 80 grit all the way up to 220 and it still won’t take. The stain im using is Stain & Polyurethane royal walnut.
A couple of thoughts: first, there may still be residual finish still sealing the wood, so you have to make sure you are down to bare wood before staining. The scratches should be removed with sandpaper of just one step higher grit, assuming the sandpaper has not clogged or been gummed up. Cheap sandpaper can cause a lot of headaches in this regard. Second, your wood is a softwood, so it takes stain differently than a hardwood. Basically, there are no pores, so traditional stains will look a lot different. You might try a product like minwax’s polyshades, which is… Read more »
Is minwax stain and polyshades different then just polyshades? Also should I start the grit with 100? To get rid of those lines?
Hello, so should I resend with 100 grit going up to 220? Also how can you tell its softwood? I’m using minwax’s stain and polyshades antique walnut is that different then just polyshades?
You could start again with 100 grit, but I’d recommend using a soft backing pad if you’re doing it by hand. Or make sure to change the paper more often if you’re using an electric sander.
I think all the polyshades are the same. Maybe you can try applying multiple coats, as it is supposed to sit on top of the wood, rather than be absorbed into the wood like a traditional stain.
Hey I started a new project yesterday trying to refinish an old table that has definitely seen better days. There is some damage/rot near the grout line and wondering if anyone had any ideas on how to fix it or make it work. Couple of thoughts i had was: 1. Paint instead of stain (really don’t want to) 2. Create a inlay piece and take out a strip of damaged wood and maybe paint or epoxy it? (never done any of this so will need help/tips) 3. Paint just the center portion and stain the bread bird and putter boards.… Read more »
Definitely not a beginner sort of a task, but maybe worth a shot and learning experience. If it were me, and I wanted to try to preserve as natural a look as possible, I would use a router with edge guide and route out all the bad wood in a small channel to whatever depth is necessary to get to solid wood, I’d guess something like 1/8 – 1/4″. Then I’d just cut off a thin strip of solid wood from a spare oak board, matching the grain as best as I could, and glue the strip into the channel.… Read more »
We sanded and restained our dining table. After wiping on multiple coats of stain, we noticed some scratches. Is this because, as you said in your article, we didn’t sand properly to begin with? Can we sand that one spot? Or do you we have to sand the whole table back down to bare wood? (I have a feeling I know what you’re going to say, but I’m really trying to avoid sanding the darn thing to bare wood again.)
Generally best to resand entire surface and start over. Possible exception might be if it’s a very light colored stain, where you might be able to sand back the problem area and try to blend the stain.
Reposting with photos… Hi, I’m working on re-staining a buffet and am stuck on what to do next. I sanded using 80, 120 & 220 & applied minwax pre stain wood conditioner. After applying two coats of oil based stain theres some shiny spots. It seems like the shiny spots are where the wood is smoother & has less grain. Will this be evened out after applying a polyurethane topcoat? Is there any way to correct this? Thanks!
See my reply to previous post…
Hi, I’m working on re-staining a buffet and am stuck on what to do next. I sanded using 80, 120 & 220 & applied minwax pre stain wood conditioner. After applying two coats of oil based stain theres some shiny spots. It seems like the shiny spots are where the wood is smoother & has less grain. Will this be evened out after applying a polyurethane topcoat? Is there any way to correct this? Thanks!
Is the color any different, or just the sheen? If the color of the stain is different, something is wrong and you may have to resand to get to bare wood. If the color is uniform and consistent, but the sheen is slightly different, don’t worry about it, it will get evened out when you apply top coats.
It is just the sheen, color is uniform. Awesome, I will apply the top coat then. Thank you!
Hi! I am building a bed frame using red oak. Stained and one coat of polyurethane. I tried sanding (120 grit) and scuffed it up quite a bit on the top edge. I am totally new at this, so what’s easier/better…..leave as is; just coat over with polyurethane to protect; or sand out to re-stain and polyurethane again?
Thank you!
It all depends on your tolerance level for defects. Leaving it as is would always be the easier thing, but not the best from an aesthetic standpoint.
We are staining our yellow pine floor & after sanding using 120 final sand we stained & found these stains on the wood. Can we hand sand them out & then start the polyurethane?
Please attach pics.
Hi please can you help ive started to strip the varnish of my old arks and craft table , using 60 grit with a palm sander gone down to 220 but I’ve got some gray areas, will I get rid of it if I keep sanding or is this part of the wood
That looks like fungal discoloration, sometimes called blue-stain. It’s a part of the wood.
I am redoing an old China hutch and am having a terrible time applying the polyurethane. When I apply the first coat it looks great when wet, however once it dries there are terrible pits, craters and bubbles in it. I started by sanding the wood down starting with 80 grit, then 220 and finished with 400 to prep the surface for staining. It seems as though it doesn’t matter what I do I always get the same craters etc every time. What do you think is causing these problems? I have started the top of the hutch twice now… Read more »
What do you mean by “craters”? Do you have any pictures you could attach? Having tiny dips in the surface of the wood finish is common and normal on very porous hardwoods with large pores, but I’m not sure if that’s what you are describing as craters or not. Need more info.
I need help! I’m making a countertop out of a slab of redwood. The sanding was going good. I made many mistakes I was able to fix. Many times I had to go back to a coarse grit and the last time I did that, I used a 40 grit which started causing a lot of scratches in the wood. I’m using a mouse sander and I tried very hard to remove those scratches, I’ve went up to 60 and to 80 grit, tried to not put too much pressure on it and also tried putting a lot of pressure,… Read more »
Redwood is a pretty soft wood, so 40 grit sandpaper is going to put some deep scratches in the wood. If you are sure that what you are seeing is the 40 grit scratches, I would try doing some selective hand sanding (always with the grain) in trouble areas, followed up with using the same grit in an electric sander. I’d start with 60 grit and work my way up to 120. They say time is money, and in this case, buying good quality sandpaper and not an off brand will save you a lot of time and headaches in… Read more »
One of the most common mistake that people make when it comes to floor sanding is not sanding diagonally.
I am doing my first large DIY project. A bunkbed.
I would like to know what to use to finish the frames and all those pieces of wood that are not going to be seen. I am just wondering if is worth to spend time and resources with polyurethane. Or if just a couple of coats of Tung oil or similar would be ok.
I must said that I am living in a humid tropical country and the wood I am using is Cedar.
If you are not overly concerned with wear resistance than you should be okay with the tung oil instead of PU. You would want to use PU in areas of high traffic though, so if there’s a ladder or steps to get up to the bed, that would be a good spot to have the better durability of polyurethane.
Please help ??we are preparing to sell house and the front door needed paint. Underneath a coat of red was black and stain. I stripped it down to bare wood. Now, after 3coats, pictures are Friday and it’s horrible!!
Three coats of what exactly? Do you have any pictures?
Started a new project tonight and need some advise. I got a piece that was kept outside on a patio for 2 years but it was not meant to be outdoors. I started tonight by sanding it and couldn’t get these dark lines out of it using 60 and 80 grit on a palm sander. Any thoughts on what they are or how to get them out?? Planning to stain the seat and paint the frames so mostly worried about the seat portion.
Can you attach pictures? I’m guessing it’s some sort of fungal discoloration from the wood getting exposed to wet/dry cycles. Could be tough to get rid of.
sorry thought i had but here they are
It looks like those dark lines are just areas of the pores where the paint had sunk into the grain. It’s normal, though it can be exaggerated if the pores are larger, as you have to sand deep enough to clean them out.
The seat part of the chair/bench were never painted though. You can see in the sanded one vs unsanded picture how there are dark spots are in the seat too.
I guess I’m not exactly clear on what you are describing, if it is larger grayish blotches, or the small streaks in the wood. Actually, I think the chairs are made from rubberwood, in which case the small streaks in the wood are natural and part of the pore structure. Have a look at the profile of the wood pictures here: https://www.wood-database.com/rubberwood/
Okay so what is the best way to fix cracks in the wood if it’s getting stained vs if it’s getting painted